- News
- Gadgets News
- Microsoft Windows Defender: How to set it up the right way on your Windows 11 PC
Trending
This story is from April 13, 2023
Microsoft Windows Defender: How to set it up the right way on your Windows 11 PC
After many years of relying on third-party antivirus programs, Windows users finally got the first-party solution from Microsoft in the form of Windows Defender. With Windows 11, the tool comes built-in within the Windows Security section in Settings and acts as the default antivirus and anti-malware software for Windows PCs.
The tool is designed to scan the system for viruses, spyware, and other malicious software and prevent them from affecting the PC.In this article, we will guide you through the process of getting started with Windows Defender and scanning your PC for viruses and malware.
Enable Windows Defender on your Windows PC
The first step to ensure that the PC is protected against viruses and malware is to enable Windows Security. To do this go to the Start menu, and then search for "Windows Security". Alternatively, Head to Settings → Privacy & security → Windows Security
Enabling these two options will ensure that the Windows Defender is always active and scanning for viruses and other threats to the system. Users also have the option to make an exception in case they don’t want a defender app to scan a particular app or folder or location.
Update Windows Defender database
Every antivirus program requires an always updated database to catch the virus or malware quickly. For this, users need to ensure that the Windows Defender’s database is always updated. Here’s how to do it.
Head back to the Virus & threat protection section on the Windows Security app
Now, scroll down to Virus & threat protection updates and click on the Check for updates button.
Enable Ransomware protection
Windows Security also has the option to enable Ransomware protection. This allows users to protect their files against threats like ransomware and also see how to restore files in case of an attack.
The feature works in two parts -- Controlled folder access and ransomware data recovery. Controlled folder access prevents changes made by an unidentified application on the system. The Ransomware recover, on the other hand, works with OneDrive and helps users recover files and data in case of an attack.
Enable Firewall & network protection
Usually, the Firewall on Windows Defender is turned on by default. Just check once if it is turned on by default or not. To do that, click on the Domain network option under Firewall & Network protection option and check if the Windows Defender Firewall toggle is enabled. Repeat the same for the Private network and Public network.
More control over Firewall protection is available. Configure it manually in case you need it. For instance, if you want to allow an app forcefully to bypass the firewall, then click on Allow an app through the firewall and select the app from the available list.
App and browser control
This section ensures app protection and online security. Basically, it provides protection against untrusted apps. For this click on Smart App Control and see if it is turned on. Do note that if the Smart App Control is turned off by default, it can’t be turned on without re-installing the Windows on the PC.
Then enable Reputation-based protection. This option provides protection against malicious and potentially unwanted apps, files and websites. Enable the following settings:
Under Phishing protection, do enable Warn me about malicious apps and sites, Warn Me about password reuse and Warn Me about unsafe password storage options.
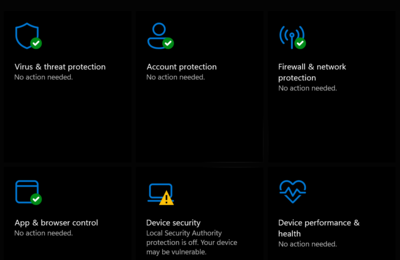
At last, check the Device security status and ensure that all the security features are enabled and working properly. Click on Device Security and ensure that all the security features and tools are turned on and working fine.
Scan the system for viruses and malware
Windows Defender also includes the option to scan the system for viruses and malware. To do this, follow the steps below:
Click on Virus & threat protection
Under the Current Threats section look for Quick Scan button and click on it to run the scan.
It also has the option to run a full scan of the PC. For this, click on Scan options and choose the Full scan option and then click on Scan Now button
Apart from that, Windows Defender also offers the option to run a Customised scan and an offline scan based on the Windows Defender antivirus database. The latter option is designed to run a deep scan of the system to detect the complex and hard to detect and delete viruses and malware using the current database available.
Note: Windows Defender is designed to deactivate itself in case it detects another antivirus program installed in the system. In this, users have two options -- set up the installed antivirus program carefully or delete it and configure the Windows Defender as described above.
The tool is designed to scan the system for viruses, spyware, and other malicious software and prevent them from affecting the PC.In this article, we will guide you through the process of getting started with Windows Defender and scanning your PC for viruses and malware.
Enable Windows Defender on your Windows PC
The first step to ensure that the PC is protected against viruses and malware is to enable Windows Security. To do this go to the Start menu, and then search for "Windows Security". Alternatively, Head to Settings → Privacy & security → Windows Security
Once you find it, click on it to open the Windows Security app and follow the instructions below:
- Click on Virus & threat protection and click on Manage settings and enable the following options:
- Real-time protection
- Cloud-delivered protection
Enabling these two options will ensure that the Windows Defender is always active and scanning for viruses and other threats to the system. Users also have the option to make an exception in case they don’t want a defender app to scan a particular app or folder or location.
Update Windows Defender database
Every antivirus program requires an always updated database to catch the virus or malware quickly. For this, users need to ensure that the Windows Defender’s database is always updated. Here’s how to do it.
Head back to the Virus & threat protection section on the Windows Security app
Now, scroll down to Virus & threat protection updates and click on the Check for updates button.
Enable Ransomware protection
Windows Security also has the option to enable Ransomware protection. This allows users to protect their files against threats like ransomware and also see how to restore files in case of an attack.
The feature works in two parts -- Controlled folder access and ransomware data recovery. Controlled folder access prevents changes made by an unidentified application on the system. The Ransomware recover, on the other hand, works with OneDrive and helps users recover files and data in case of an attack.
Enable Firewall & network protection
Usually, the Firewall on Windows Defender is turned on by default. Just check once if it is turned on by default or not. To do that, click on the Domain network option under Firewall & Network protection option and check if the Windows Defender Firewall toggle is enabled. Repeat the same for the Private network and Public network.
More control over Firewall protection is available. Configure it manually in case you need it. For instance, if you want to allow an app forcefully to bypass the firewall, then click on Allow an app through the firewall and select the app from the available list.
App and browser control
This section ensures app protection and online security. Basically, it provides protection against untrusted apps. For this click on Smart App Control and see if it is turned on. Do note that if the Smart App Control is turned off by default, it can’t be turned on without re-installing the Windows on the PC.
Then enable Reputation-based protection. This option provides protection against malicious and potentially unwanted apps, files and websites. Enable the following settings:
- Check apps and files
- SmartScreen for Microsoft Edge
- Phishing protection
- Potentially unwanted app blocking
- SmartScreen for Microsoft Store apps
Under Phishing protection, do enable Warn me about malicious apps and sites, Warn Me about password reuse and Warn Me about unsafe password storage options.
At last, check the Device security status and ensure that all the security features are enabled and working properly. Click on Device Security and ensure that all the security features and tools are turned on and working fine.
Scan the system for viruses and malware
Windows Defender also includes the option to scan the system for viruses and malware. To do this, follow the steps below:
Click on Virus & threat protection
Under the Current Threats section look for Quick Scan button and click on it to run the scan.
It also has the option to run a full scan of the PC. For this, click on Scan options and choose the Full scan option and then click on Scan Now button
Apart from that, Windows Defender also offers the option to run a Customised scan and an offline scan based on the Windows Defender antivirus database. The latter option is designed to run a deep scan of the system to detect the complex and hard to detect and delete viruses and malware using the current database available.
Note: Windows Defender is designed to deactivate itself in case it detects another antivirus program installed in the system. In this, users have two options -- set up the installed antivirus program carefully or delete it and configure the Windows Defender as described above.

About the Author
Shaurya ShubhamEnd of Article
FOLLOW US ON SOCIAL MEDIA
Hot Picks
TOP TRENDING
Trending Stories
In Section
Entire Website
- Realme C65 5G: First impressions
- Xiaomi 14 Ultra is available on Flipkart for just Rs 72,449; know how to grab the deal
- Lok Sabha Election 2024 polling live: Google, Flipkart and these tech companies ‘appeal’ to voters
- X is down for some users in India: All the details
- WhatsApp users will soon be able to forward outgoing video messages: All details
- Dish TV has Smart+ idea to take on Airtel, Jio and Tata Play
- Blinkit has a ‘10-minute solution’ for North India’s heat wave
- Realme C65 5G smartphone with Dimensity 6300, 50MP camera launched: Price, specs and more
- Best PS2 games of all time (2024 edition); check out the list
- Lok Sabha election 2024 phase 2: How to check your polling booth online for voting; know the steps
- SC verdict on VVPAT big blow to those who wanted to loot ballot boxes: PM Modi
- Phase 2 polls: Brisk voting in Tripura, Manipur; low turnout in Maha
- What rise and rise of Big Mac Index means for Indian equities
- Arms and ammunitions recovered during CBI raids in Sandeshkhali
- B'luru in pics: Free dosa, moti laddu, juice on voting day
- SC rejects pleas seeking 100% EVM-VVPAT verification
- Modi made a promise to youth in 2014. Here's a reality check
- Delhi HC to WhatsApp on its 'threat' to exit India
- K'taka voter turnout 50.93% by 3pm in heat-wave like situation
- Kerala Lok Sabha elections: State records 50% turnout till 3pm

Popular Categories
Hot on the Web
Top Trends
Nagaland Board ResultLok Sabha Election 2024 Phase 2Kerala Lok Sabha Election Phase 2Bengaluru Lok Sabha ElectionLok Sabha Election Phase 2 Full ScheduleDelhi Lok Sabha Election ScheduleKKR vs PBKS Match PredictionJEE MainsRajasthan Lok Sabha ElectionStock Market TodayIPL Orange Cap 2024IPL Purple Cap 2024IPL 2024 ScheduleLok Sabha Election Full ScheduleIPL Points TableIPL Match Full Schedule
Trending Topics
Ravi KishanEverest MasalaOptical IllusionRuslaan Movie ReviewMonthly Health HoroscopeShekhar SumanRathnam ReviewMonthly Career HoroscopeGovindaDance DeewaneRaw MangoShriya PilgaonkarArchana Puran SinghRadhika MerchantTik Tok Ban In USPreity ZintaBest Affordable Vacuum CleanersBest Headphones Under 1000Best Phones Under 35000Best Tv Of 2024
Living and entertainment
Latest News
‘Aavesham’ director Jithu Madhavan reveals why Ranga’s backstory is not shown in the movieWhy India is now the US' second-largest source of new citizensThrowback: When Kareena Kapoor revealed that Saif Ali Khan wears t-shirts with holesRowoon reflects on his cameo in 'A Time Called You' with Ahn Hyo Seop; calls it 'very annoying'Kolkata’s rich cultural tapestry inspires me: Artist Sahid SK‘Ahmedabad to Amsterdam, Surat to Seoul, Patna to Paris; nonstops all over globe from India: IndiGo says after wide body orderJason Derulo makes Indian music debut with King; calls it an ‘incredible experience’ (Exclusive) Mahesh Manjrekar reveals why he SHELVED 'Purana Furniture' in Hindi with Naseeruddin Shah - ExclusiveMahesh Manjrekar reveals why he SHELVED 'Purana Furniture' in Hindi with Naseeruddin Shah - ExclusiveVideo: Prakash Raj casts his vote in BengaluruDirector Kiranraj's meeting with John Abraham fuels collaboration speculationXiaomi 14 Ultra is available on Flipkart for just Rs 72,449; know how to grab the dealUS probes Tesla recall of 2 million vehicles over Autopilot, citing concernsJason Derulo says King and he co-wrote 'Bumpa', 'blending our languages and styles'YSRCP's Kethireddy aims for his 3rd victory as BJP fields Y Satya Kumar at Dharmavaram assemblyGold worth Rs 85 lakh found in Chennai airport lavatoryDirector Sukumar to grace Suhas starrer 'Prasanna Vadanam' pre-release event as chief guestA theatre in London halts the screening of Vijay ‘Ghilli’ as fans go frenzy
Copyright © 2024 Bennett, Coleman & Co. Ltd. All rights reserved. For reprint rights: Times Syndication Service