Manufacturer: Monoprice
Price: $899
Features
The Monoprice Voxel Pro is aiming to supply the optimal machine for people that want high quality 3d prints and a fully enclosed environment. This can be especially appealing to people wanting to print more ambient temperature sensitive materials like ABS.
Here are the tech specs from their website:
● Print size: 200×200×250mm
● 9 point bed leveling *
● Filament diameter: 1.75 mm
● Printing material: ABS, PLA, PC, PETG, PLA‑CF, ASA, PETG‑CF
● Nozzle size: 0.4mm default
● Max nozzle temperature: 240°C
● Max heatbed temperature: 110 °C
● Speed: 10 ~ 150mm/sec
● Print file interface: USB, Wifi
Set up
Pulling the machine out of the box might be the most difficult part of this very easy setup. There was zero assembly required, only removing packing material and loading filament. I was ready to print as fast as I can imagine possible.
There was a small pack of items that came with it. There were a few tools for maintenance and a quick swap high temp nozzle. It looks easy to swap the nozzles out, so that’s convenient, and having a spare ready to go is always nice.
Printing
The default settings in the software don’t push the machine in terms of speed, but the quality is pretty great. I think that it would be easy to say the goal was to create the best results above anything else. Look at this picture below. Those surfaces would normally have at least some minor visible z-banding but it is suuuuuper straight.


There is a bit of fan noise, but over all the machine is fairly quiet, as you’d expect any fully enclosed system to be. I suspect you can turn off the case fan somewhere in the settings but have not investigated.
As I mentioned, print quality was pretty good out of this thing. They included a flexible build plate, which I will always appreciate. The material they used is very grippy. If you print anything thin (like the rafts that print by default in the slicer), be prepared to have to put some effort into scraping it off, because flexing the plate won’t be enough for it to let go. Mine was so grippy that the bed material tore after 3 prints. I’m backing the nozzle away from the bed so that my first layer barely touches now, to avoid further stuck prints. Not huge deal, just something to plan for.

There are no previews on the interface for the file you have selected, nor are there time estimates shown but it does show you all the other things you’d expect like temps and elapsed time. The rest of the interface is intuitive enough. I suspect this is more about the export from the slicer than the machine as I believe some of the included examples do have previews. Note that the ones with previews are .gx as opposed to .g. This means I can most likely enable it somewhere in the slicer. This is not documented though.


The system has wifi capability and a built in camera, but the instruction manual does not cover how to interface with either of these things beyond turning them on at the printer.
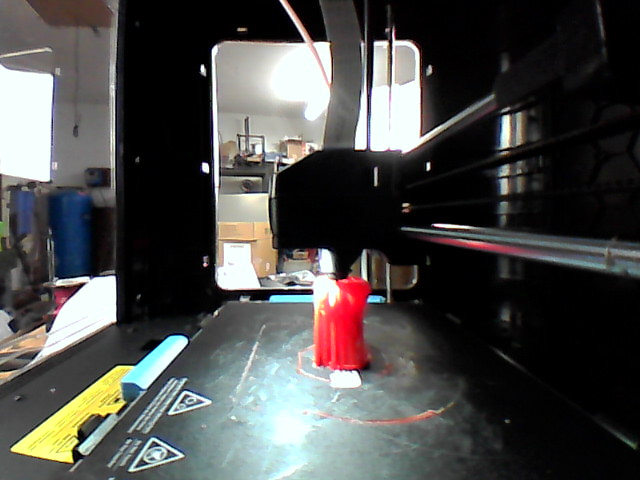
You can collect images (above) and timelapses(below) simply by enabling them in the printer’s interface and they will be saved to the usb stick. However, as you can see, they are of limited utility based on the low resolution. It’s hard to tell, but it might also be focused further away than the inside of the enclosure.

Since the machine has a camera and wifi, I assumed you could check in on the machine remotely. It was on my wifi but as I said there were no instructions on connecting to it from the network. I opened the slicer and poked around a bit, found a place to connect to a printer, but it did not see the unit. I did not put more effort into tracking down this feature.
Thoughts and observations
There was one really peculiar thing I found. The website boasts “auto-leveling” as did all the promotional materials I saw. Maybe I did it wrong, but if you select the 9 point level from the menu, it simply moves the extruder to 9 different points where you have to manually set the distance from the bed. This is not auto leveling by my personal definition, nor anyone else I talked to. Other machines who claim auto leveling will have some sort of a sensor (mechanical or magnetic) to sense the bed for each of these points and – automatically– set the offset for you. This wasn’t a problem, just a little bit of a letdown.
Even with the quirk of auto leveling not quite being auto, I have been really pleased with the quality I’ve gotten out of this machine so far. It’s also nice that it can sit in my office and run without risk of my cats getting into it thanks to the enclosure! The visual quality of the prints has been consistently fantastic.
ADVERTISEMENT
Join Make: Community Today