About This Geode Cake Tutorial
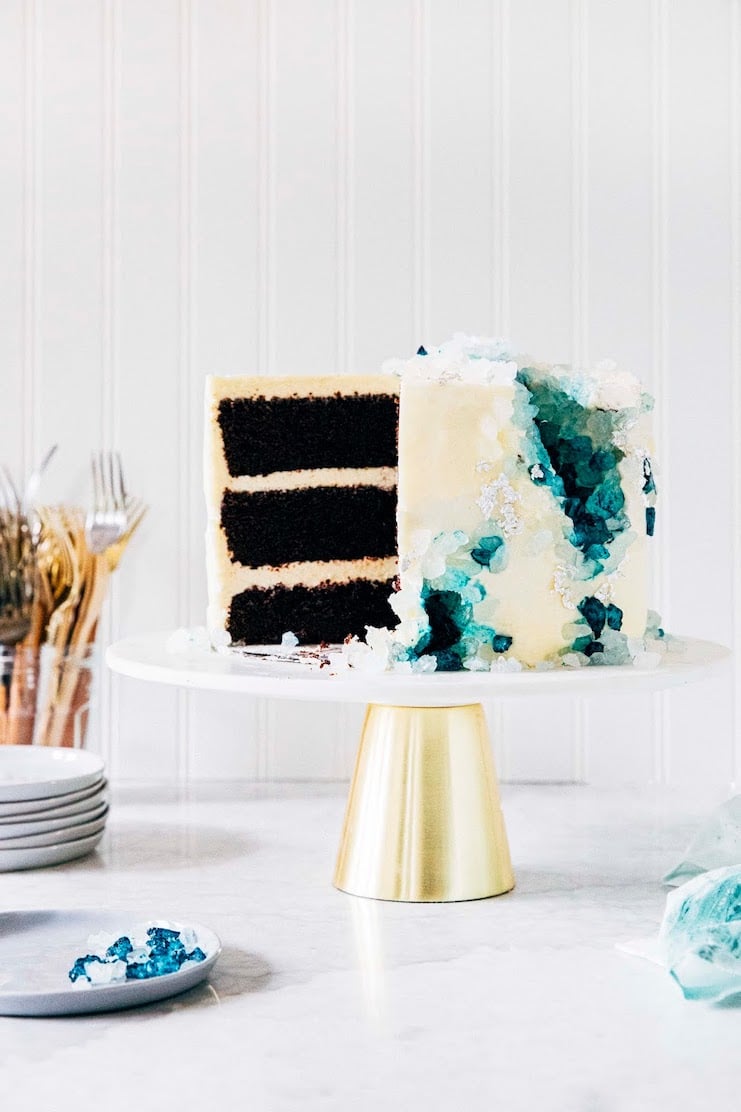
This geode cake tutorial contains a recipe for a 3-layer, 8-inch chocolate cake with vanilla cream cheese frosting. It also includes step-by-step photos showing you how to decorate the outside of the cake to look like a geode rock formation.
What is a geode cake?
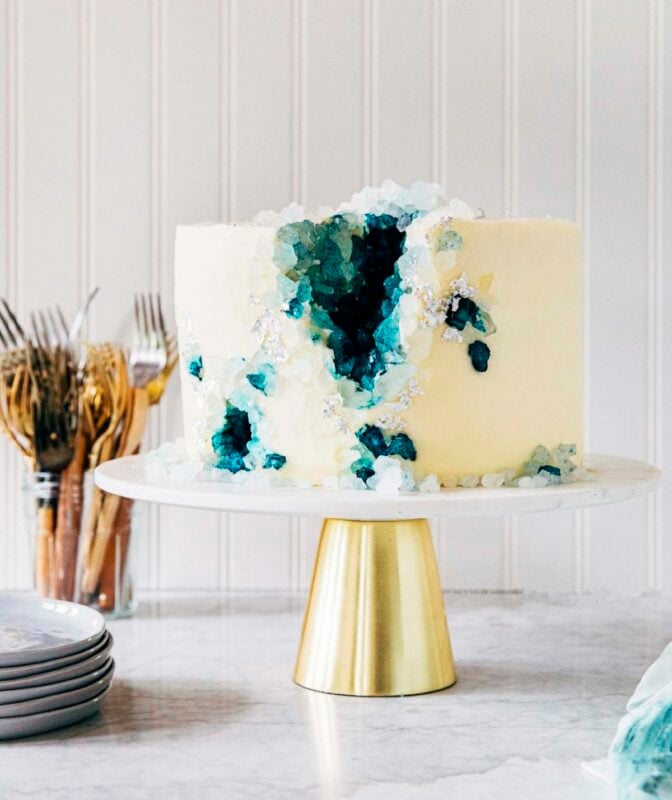
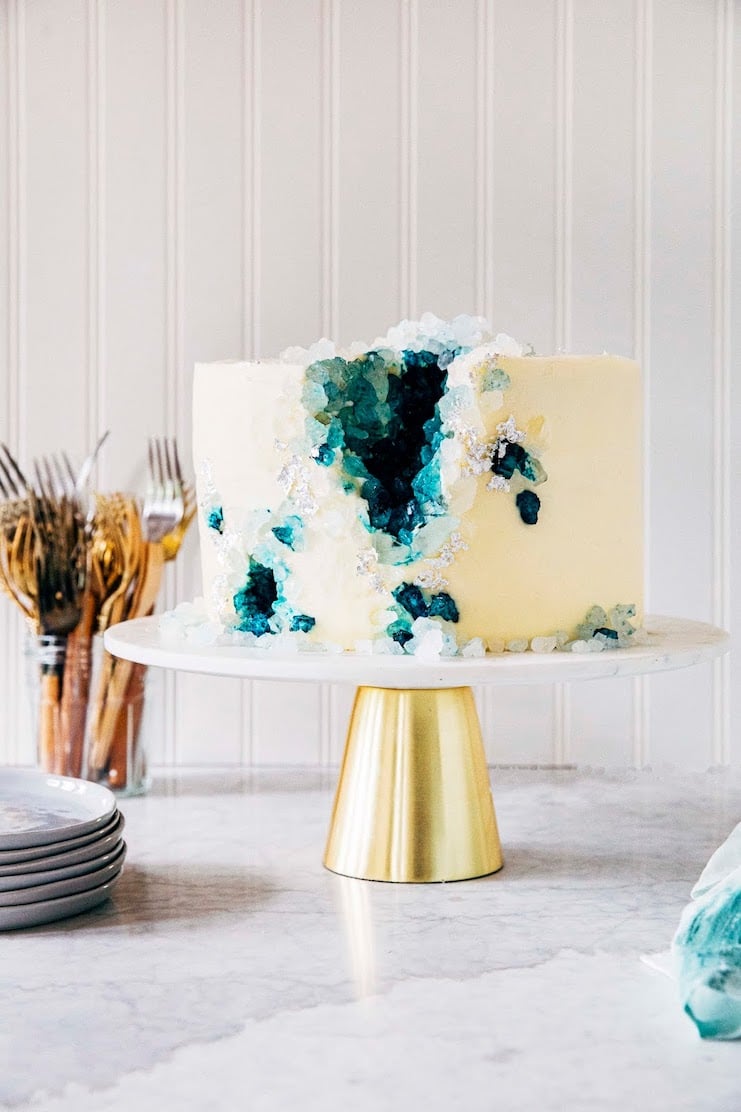
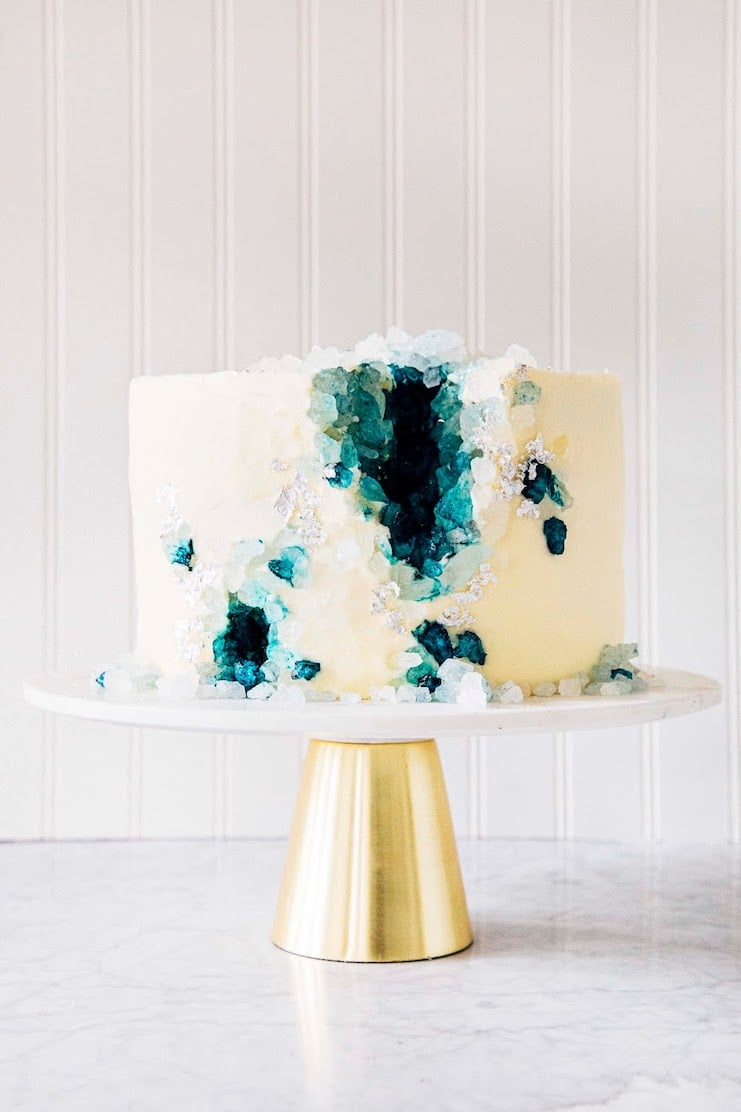
Geode cakes are meant to mimic the natural rock formation, with the baker typically carving out chunks from the cake and filling the cut-outs with “edible crystals” made out of rock candy or isomalt shards. The crystals are then painted multiple colors to emulate the look of real geodes themselves.
Pros and Cons of A Geode Wedding Cake
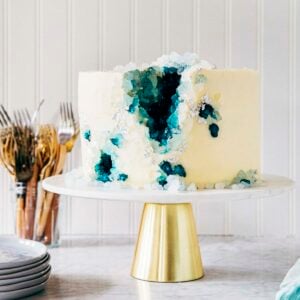
Geode cakes are a bit of an internet phenomenon on both Instagram and Pinterest (seriously, look up #geodecake); it was easy to feel inspired by photos of epic centerpieces that towered way over my head, with veins of edible gold running through the cake (like this one!).
After scrolling through all those photos, all I wanted to do was try making one myself! I had this crazy idea to make a geode cake that looked like the non-traditional engagement ring I chose—a cornflower blue sapphire haloed by diamonds on a platinum band. I was so excited that I forgot about two very important issues with geode cakes:
A lot of geode cakes look like vaginas.
There, I said it. Let’s get that elephant out the room early, lol. Granted, there are some cakes that worst offenders than others—pink geode cakes are notorious for looking like vaginas (there’s actually a famous bakery that sells pink ones they call “vageode cakes”… yikes!). I also think that ones that are painted ombre (where the center of the geode cutout is a darker color that gradates to a lighter version of that same color) look vaginal, too. I don’t know if I just have a dirty mind, but according to the response to my Instagram Stories, I don’t think I’m alone in my opinion. In any case, it’s weird that something so phallic (er… what’s the opposite of phallic? vaginal?) became the edible centerpiece in what’s often dubbed as “the most important day in a woman’s life”. But maybe that’s on purpose, lol.
Geode cakes are actually terrible to eat.
I don’t know if anybody saw my Instagram Stories last week, in which I made my very first geode cake ever (this one!) and taste-tested it, too. But spoiler alert: it turns out all those large chunks of rock crystals ruin the texture of a very soft, pillowy cake covered in even silkier buttercream. Plus, you could potentially chip your teeth on one of the sugar chunks!!! Many of you guys DM’ed me that, similar to most fondant wedding cakes, you’re not actually supposed to eat the crystals. That is, most people peel off/pick off/eat around the fondant parts of a wedding cake—you’re supposed to do the same with the crystals and not sit there and eat the entire thing like I was doing. Oops.
While this makes sense to me on a theoretical level, it also low key offends me. I want all parts of my wedding cake to be tasty—I don’t want to be picking around the gross/inedible parts of a colorful cake while wearing a very expensive white dress! Besides, there are so many good cake recipes (and designs!) out there that don’t require you to even do this kind of work to eat it. I quickly came to the consensus that a geode cake is NOT what I’m going to be making and serving at our wedding. Womp.
That being said, I still think that making a geode cake at home is a fun and creative way to spend your time. Besides—these cakes usually cost an arm and a leg to have custom made, and it turns out they’re actually quite easy to make at home! Here’s how:
Ingredients To Make A Geode Cake
Here are the key ingredients to make a geode cake design:
A Really Good Cake Recipe For The Base of Your Geode Cake
This should go without saying, but a good cake design should start off with a good cake recipe. One that’s tasty and comes together quickly because you’re going to be spending so much time on assembling the cake itself. For our cake today, I went with the chocolate cake recipe in my cookbook, Weeknight Baking. It’s ALMOST one bowl (technically you need two bowls: one for the dry ingredients, the other for the wet ones), and you don’t even need to pull out your stand mixer—you can just mix everything by hand!
A Really Good Frosting Recipe To Cover and Decorate Your Geode Cake
Good frosting recipes are silky and easy to smooth, but will hold its shape when applied to the cake. For this reason, most decorators choose a meringue-based buttercream like Swiss meringue or Italian meringue buttercream frosting. But these buttercream frostings are time-consuming to make, and between you and me, I like the taste of classic American buttercream—which is made with just confectioners’ sugar, butter, and vanilla—much better.
The key is to find a good buttercream frosting that “crusts” and hardens slightly when applied. For this cake, we’re going with a classic birthday cake type frosting from this awesome recipe in the Hummingbird High archive. Unlike most traditional American buttercream frostings, this recipe also has cream cheese (making it more of a cream cheese frosting tbh), giving it a wonderful tang that pairs well with the chocolate cake.
Rock Candy For Decorating Your Geode Cake
Food Coloring For Painting Your Rock Candy
You’ll need food coloring to paint the rock candy colors to mimic a geode. I used two different types of blues from this Americolor food coloring kit. In a pinch, you can get away with using just one color—you’ll still need to make two batches of food coloring for the full effect, but dye one with a higher quantity of the same food coloring to get it a darker shade than the other.
Alternatively, if you’re feeling lazy and/or don’t want to deal with buying a paintbrush (see next section), you can just buy different shades of rock candy on Amazon (in addition to the clear rock candy I got fleeced on, I briefly considered buying this dark blue shade and this light blue one of rock candy).
Vodka For Painting Your Rock Candy
If you’re using a food coloring gel like I am, you’ll need to thin the gel out with some vodka. The vodka also helps apply and adhere the color onto the rock candy without dissolving it completely like water would.
Edible Gold Or Silver Leaf For Decorating Your Rock Candy And Cake
Most geode cakes usually incorporate some sort of metallic, glittery patterning (see this cake as an example) to really bring life to the rock formation design. The best way to do this is with edible gold leaf, which is easily purchasable through Amazon.
For this cake, I used edible silver leaf I bought on my last trip to Japan—I thought that silver leaf was a rarity in the US, but it turns out you can also purchase it quite easily on Amazon. Good thing I lugged it back all that way, ha.
Baking Equipment and Tools To Make A Geode Cake
You need a handful of tools to make a geode cake:
A Rotating Cake Stand
Most geode cakes start with a perfectly smooth frosted cake. The best way to frost a perfectly smooth cake is with a rotating cake stand. I use a heavy-duty metal one that I got from a restaurant supply store; it’s very similar to this one by Ateco.
Metal rotating cake stands are great because they won’t move at all even if you accidentally knock it with your elbow (which I’ve done many times). But in a pinch, you can also use lighter weight plastic ones—I like this one by Wilton, which allows you to tilt the cake side by side to help with decorating.
Offset Spatulas
You’ll need a large offset spatula to smooth the cake’s sides, and a smaller one to cover the cake’s cut-outs with frosting. I know I sound like an ad for Amazon, but they actually sell reasonably priced sets of different sized offset spatulas that are perfect for this recipe.
A Serrated Knife
A sharp serrated knife is the best way to slice out the cut-outs for geode cake’s rock candy crevices. Try to get a smaller/shorter one, like this 5-inch one by Wusthof—the shorter length will make it easier to carve your cut-outs more accurately. In a pinch, a sharp paring knife will do, but a serrated knife will work better against the chilled cake crumb (more on that in a second).
A Small Paintbrush
If you didn’t buy colored rock candy, you’ll need a small paintbrush to paint food coloring onto your rock candy. I actually didn’t have a paintbrush on hand (I tried to buy one specifically for this project, but after biking to Fred Meyer’s in the pouring rain, I discovered I left my wallet at home and let out a roar of frustration so loud that the person in line behind me jumped lol), so I used a brush meant for brushing egg wash onto pies.
Because it’s much larger than the kind of paintbrush I wanted (which was something like these brushes), my coloring is more all over the place and less of the ombre coloring that’s traditional in geode cakes. But I actually ended up liking it more since it looked a lot less vaginal, so there’s that.
Tweezers
Finally, you’ll need some tweezers to apply the edible gold (or silver) leaf onto the cake.
How To Make A Geode Cake
Once you’ve frosted a perfectly smooth cake, it’s time to make your geode cake design!
1. Use a small serrated knife to carve out cut-outs in the cake.
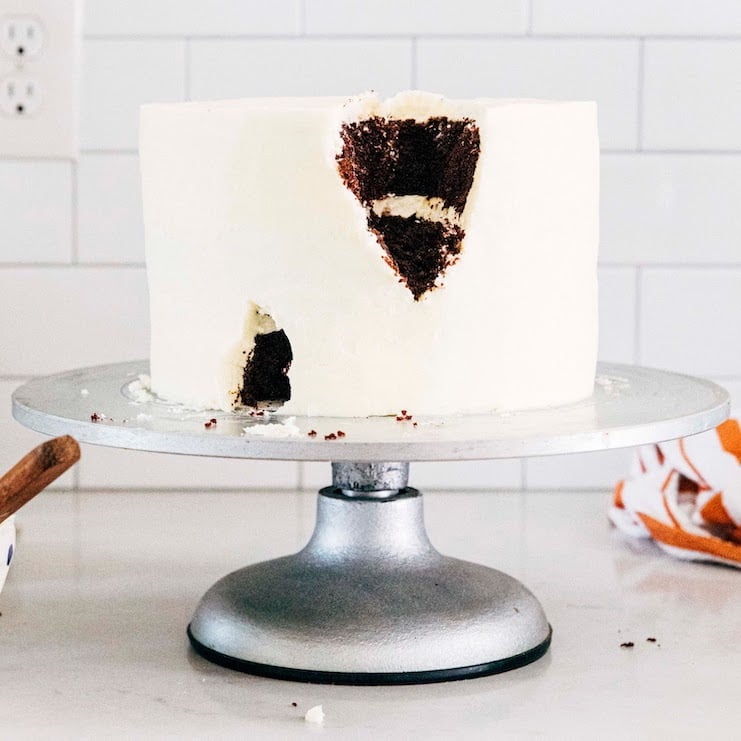
Don’t worry too much about the shape and size of the cut-outs—just do what feels easiest! I literally just sliced out a chunk without thinking too much about it. You can do one giant cutout (which is traditional for geode wedding cakes), or do multiple ones like I did to make it look less vagina-y.
2. Use a small offset spatula to cover the cut-outs with frosting:

After you make your frosting, be sure to set aside at least ¼ cup to ⅓ cup of the frosting to use for this purpose. Unlike the rest of the cake, you don’t need to perfectly smooth the frosting on the cut-outs—after all, you’ll be covering it with rock candy! Also, don’t worry if any cake crumbs get into the frosting in the cut-outs. Again, you’re going to be covering that area anyway.
3. Use tweezers or your fingers to cover the cut-outs with rock candy:

The rock candy will be held in place with the frosting. You want to press firm enough so that the rock candy holds its place, but not so hard that you end up denting or destroying the cake inside. You’ll also want to cover any crumbs or exposed parts of cake with rock candy to hide them.
4. Use a paint brush to paint the centers of the rock candy-covered cut-outs with a darker color, then paint the cut-outs’ outer edges with a lighter color:

To make your “paint”, mix as many drops of food coloring as necessary to achieve the color of your choice with 1 teaspoon of vodka.
5. Tweeze gold or silver leaf onto the cake to finish the design:

Bakers making traditional geode wedding cake designs typically create a gold leaf border around the cut-outs. Again, I avoiding doing so because I thought this enhanced the vagina effect of the design, lol. So instead, I just placed silver leaf at random throughout the cake. But you do you!
Make It Weeknight Baking
Although I broke this down fairly easily, it can be time-consuming to make a geode cake—in fact, it took me almost the entire afternoon just to assemble, frost, and make the geode design. It would have taken all day if I’d made the cake in the same day, too.
Because I don’t like to spend eight consecutive hours in the kitchen all at once, I divided the recipe over a few days. I actually do this for many of the cake recipes in my cookbook, Weeknight Baking. Here’s how it went down:
-
- Day One: Make the Cake! (around 1 hour, including Bake Time)
Follow the instructions in the recipe below to cool the cakes to room temperature, then turn each layer out into its own individual sheet of plastic wrap. Cover tightly with the plastic wrap and freeze overnight—do NOT refrigerate! Refrigerating cakes dries them out, while freezing the cakes locks the moisture in. In a pinch, I’d rather you leave the cakes wrapped at room temperature. However, I don’t recommend doing so; the cake has such a soft crumb that it’s much easier to carve when it has frozen overnight. So freeze the cakes!
- Day One: Make the Cake! (around 1 hour, including Bake Time)
-
- Day Two: Make the Frosting and Frost the Cake (around 1 to 1 ½ hours)
In general, it will take about 10 minutes to make the frosting and then the rest of the time to assemble the layer cake and frost it perfectly smooth. Depending on your experience with frosting cakes, it could take far less (or far more!) time to do so—I’m a bit of a perfectionist, so it always takes me at least an hour to smoothen out my cake. Don’t forget to save at least ¼ cup to ⅓ cup of the frosting for your cut-outs the next day; you can place this frosting in an airtight container and refrigerate overnight.
- Day Two: Make the Frosting and Frost the Cake (around 1 to 1 ½ hours)
- Day Three: Make the Geode Cake Design (around 1 ½ hours) and Serve!
Follow the instructions above to complete your geode cake. You may want to warm your frosting before using on the cake—simply scoop it into a heatproof bowl and microwave it on low in 10 to 20 second bursts until creamy, using a rubber spatula to mix it up.

Best Geode Cake Tutorial Tips
-
- {Ingredient Tip} I’m not usually one to harp on sifting ingredients (see: this article in Bon Appetit, where I talk about why you don’t really ever need to sift your flour), but for the frosting recipe, it’s especially important that you sift your confectioners’ sugar. The recipe uses a LOT of it, and you don’t want any lumps showing (especially when you’re trying to perfectly smooth a cake!).
-
- {Cake Making Tip} For this cake recipe, it’s especially important to add the coffee while it’s still hot (almost boiling, if possible!). The hot coffee will bloom the cocoa powder in the recipe, giving it a deeper flavor and an extra-dark color that’s signature to this cake.
-
- {Cake Making Tip} For even cake layers, I like to actually weigh out the layers with a digital scale to make sure they’re even. The easiest way to do this is to set a prepared cake pan on a digital scale and tare it to “0”. Pour batter into the pan until the scale registers the weight listed in the recipe (because yes, I’ve included the approximate weight of the batter needed for each pan!). Repeat with the second and third cake pan.
-
- {Decorating Tip} In general, chilled cake is easier to carve; even if you don’t follow the weeknight baking schedule above (I get it, three days is a long time to wait for a cake!), I recommend baking the cakes the day before and freezing them overnight. Before making the frosting, set the cakes out on the counter and let them thaw slightly while making the frosting. Assemble and frost the cake as instructed above—at this point, the cake will be the perfect temperature (not rock hard, but still pretty chilled) for carving the cut-outs.
- {Decorating Tip} When filling your cut-outs the rock candy, start by placing the candy on the outside of the cut-outs and work your way in. The outer rock candy will help protect your hands from the frosting (though you’ll definitely still need to wipe them off as you go—this is a messy job!).
Get the Recipe: Geode Cake Recipe
Ingredients
For the Chocolate Cake
- 3 cups (12 ounces or 340 grams) cake flour
- 3 cups (21 ounces or 595 grams) granulated sugar
- 1 cup plus 2 tablespoons (3.35 ounces or 95 grams) natural unsweetened cocoa powder, sifted if lumpy
- 1 Tablespoon baking soda
- 1 ½ teaspoons baking powder
- 1 ½ teaspoons kosher salt
- 1 ½ cups (12 ounces or 340 grams) buttermilk
- ¾ cup (6 ounces or 170 grams) canola oil
- 3 large eggs
- 2 teaspoons pure vanilla extract
- 1 ½ cups (12 ounces or 340 grams) boiling hot coffee
For the Vanilla Cream Cheese Frosting
- 2 cups (16 ounces or 454 grams) unsalted butter, at room temperature
- 2 cups (16 ounces or 454 grams) cream cheese, at room temperature
- 1 tablespoon pure vanilla extract
- ¼ teaspoon kosher salt
- 8 cups (32 ounces or 907 grams) confectioner's sugar, sifted
Instructions
For the Chocolate Cake
- Position a rack in the center of the oven and preheat the oven to 350°F. Generously spray three 8-inch cake pans with cooking spray and line the bottom of each with a parchment paper circle. Spray the parchment, too.
- In a medium bowl, whisk together the flour, sugar, cocoa powder, baking soda, baking powder, and salt.
- In a large bowl, whisk together the buttermilk, oil, eggs, and vanilla. Gradually whisk in the dry ingredients until just combined. Slowly pour in the coffee. The batter will be fairly runny; use a rubber spatula to scrape down the bottom and sides of the bowl. Use the rubber spatula to finish mixing until smooth and well combined, 2 to 3 minutes more.
- Divide the batter evenly between the pans; if using a digital scale to measure out layers, note that this recipe makes around 72 ounces (2041 grams) of batter—pour 24 ounces (680 grams) of batter into each cake pan. Bake for 35 to 40 minutes. When done, the top of the cake should bounce back when gently pressed and a skewer inserted into the center of the cake should come out with a few crumbs attached. Cool completely in the pans on a wire rack before frosting.
For the Vanilla Cream Cheese Frosting
- In the bowl of a stand mixer fitted with the paddle attachment, beat the unsalted butter on medium-low until soft and creamy, 2 to 3 minutes. Scrape down the bottom and sides of the bowl with a rubber spatula. With the mixer on low, add the cream cheese, half cup at a time, scraping down the bottom and sides of the bowl as necessary. Once the cream cheese is combined, add the vanilla and salt, then beat on medium-high until the frosting is creamy and smooth, 1 minute. With the mixer on low, gradually add the confectioners' sugar and beat until combined. Scrape down the bottom and sides of the bowl once more, then beat on medium-high until the frosting is creamy and smooth, 2 to 3 minutes.
Did you make this recipe?
Please leave a comment and rating for the recipe using the form below!
Your ratings make it easier to find the recipe online, and I’m always looking for ways to improve Hummingbird High.
get new recipes via email:

buy the book
Weeknight Baking:
Recipes to Fit your Schedule
Over the past several years of running Hummingbird High, I kept a crucial aspect of my life hidden from my readers: I had a full-time, extremely demanding job in the tech world. In my debut cookbook, Weeknight Baking, I finally reveal the secrets to baking delicious desserts on a tight schedule.
this looks amazing but can a whipped cream frosting be used to cover and coat the cake
Hm, whipped cream would probably be too unstable to hold the geode candy pieces in place. Unless you were to add gelatin to help “set” the whipped cream.
Im making this for my daughter’s birthday. Do you have recipe for a white frosting without cream cheese?
I made this cake for my daughter’s 10th birthday and it was amazing! Super moist, a deeper chocolate flavor than any other I’ve made. The ‘geode’ cutouts took a while, but she loved it! Thanks for the recipe, I’ll be sharing this for sure and it will be a go-to for future cakes!
I’m sorry- I’m just here to add how HILARIOUS the vagina comments are because right before I landed on this site I was literally just telling my husband how all I see is the vag and can’t un-see them on geode cakes. Cheers!
Hi I’m wanting to make this cake for my sons birthday so will want to finish the geode design the night before as I wont have time on his actual birthday. If I put the cake in the fridge for the night will the geode paint run?
No! It should be fine. But I recommend keeping it out at room temperature overnight to guarantee that it won’t run. It should be fine as long as the cake is completely covered and you don’t live somewhere really warm/tropical.
Thank you! We do love in Cyprus & uts about 19° at the moment
So unsure what will be the best option for me!
Wonderful instructions. I have wanted to try this type of cake. So concise and easy to follow. Thank you. Also agree about pink rocks!!!
About how much rock candy is needed for each cake tier? I’m trying to estimate how much to buy. TIA!!
It really depends on how big your cutouts are. I will say though that I bought a 1lb bag from Amazon and ended up using about 1/3 of the bag… hope that helps!
Hi there- do you refrigerate your geode cake after completing? I wasn’t sure if the fridge effected the rock Candy. Thanks in advance!
Great question! It depends on how long you’re planning on waiting to serve it. If you made the cake and are planning to serve it within the next few hours, don’t refrigerate it! But if you’re planning to serve it the next day, go ahead and do so. Refrigerate uncovered, preferably in a box or so of some kind.
Hey, I have question , if i wont do do this kind of cake for my birthday party, do i have to even try to make it pretty, or its vwery hard to make those geodes.
???
You can skip the geodes if you want to! The cake and frosting taste good without it!
Just wondering if the fully decorated cake can be frozen and thawed?
Hm, I wouldn’t recommend it! As it thaws, the moisture seeps into the sugar candy and makes it runny. You can refrigerate the assembled cake, unsliced, for up to 1 week though.
Can you use white icing with this recipe? My husband is being the biggest child in my house right now, he doesn’t want buttercream.
What kind of white icing? Like… royal icing?
Hi!
Hoping to get some clarification. I plan on making this cake the night before I take it to work. 2 different people asked about storage. In 1 response you said leave it at room temperature overnight. In the other response you said to refrigerate uncovered but in a box. Do you mean a cake box? And which method is better? Even with the ac going our house is about 75 degrees F so I’m a little bit worries about food safety leaving it out….
If you live in a warmer climate (I’d consider 75 degrees warm), I recommend refrigerating it. If you live in a cooler climate (where the inside of the house is 55-65 degrees), I recommend leaving it out on the counter in a cake dome.
So fun. I am using this for my assignment in class. I am in 6th grade. I l love this! I am making it for a cooking assignment. The gold is expensive but I will work though it. I think it is awesome! Thank you very much.
Love It!
Can I possibly do this to an ice cream cake ??