

Using Microsoft Planner to increase your productivity
/I am someone who has spent a lot of time learning what I can do to maximise what I can achieve during my workday, ensuring that I am always-on-top of things and equally that I am able to relax at the end of the day knowing that everything is in hand. Whilst this will be a constant journey. I have learnt a lot along the way. In this blog post, I want to expand on some key information that I have learnt and how I have implemented some important steps in Microsoft Planner.
Important Resources
Before I start I wanted to share some resources that have been pivotal to be implementing the steps that help me keep organised on a daily basis. Please be sure to check these out for yourself.
Steps
One of the most important elements that are spoken about in Getting Things Done and Productivity Ninja is the need to get everything out of your mind and into an organisational system or a second brain. This allows you to free up your mind to give you clarity and control whilst allowing you to focus on what matters.
Why Microsoft Planner?
Microsoft Planner is a key part of Microsoft 365 (Office 365) and many organisations have already rolled this out within their organisations, couple this with the fact that it can be accessed via a web-browser, Microsoft Teams as well as on mobile apps makes it the ideal companion to manage your second brain!
What other tools are available?
The most important element is having a system that you use and whether it is Microsoft Planner, another application or pen and paper as long as it works for you and you trust it that is all that matters.
I have used the following tools in the past and I would recommend you take a look at them to see what works for you.
OmniFocus - Organisational tools for Mac users
I used this tool extensively whilst I was using a Mac, however, they just focus on Mac and whilst I think there was an iPad app I needed to look for an alternative platform when I moved back to Windows.
Nirvana is another fantastic application aligned to the GTD methodology, this is a fantastic application but as it is not integrated with the tools I use regularly (Microsoft 365) and as there is no dedicated Windows application just a web application it was time for me to look at the options in Microsoft 365.
How I use Microsoft Planner
This blog post isn’t about the basics of Planner, but specifically how I use Planner to organise myself and my tasks. So let’s get on with it.
The first and most important thing is to create a Plan in Microsoft Planner that is just for you and not shared with anyone else. This is important as you want to be able to use this to get everything off your mind and this may include personal and professional tasks. You can always create further Plans to work on projects with your colleagues etc.
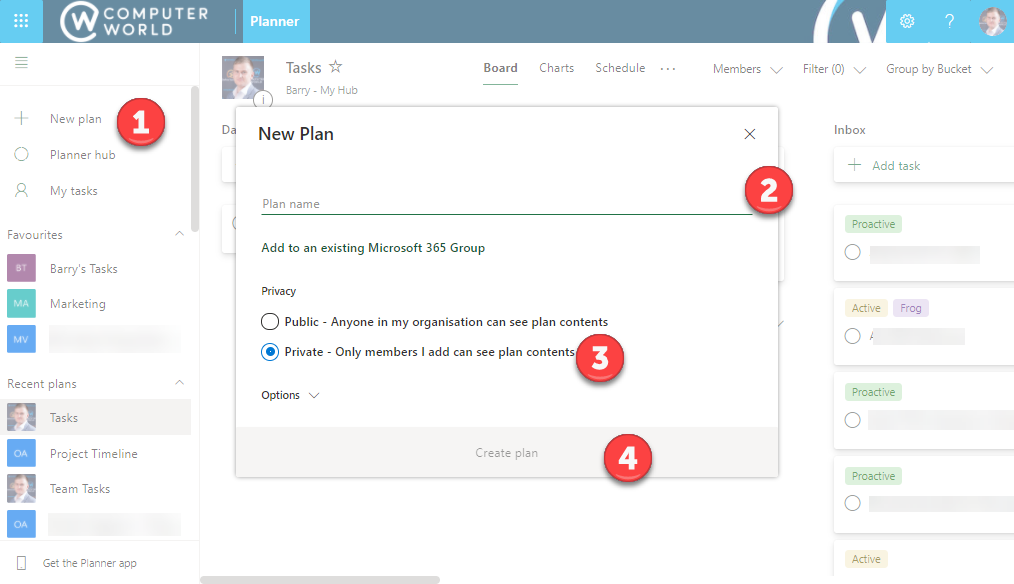
To create a new plan, visit office.com and sign in with your work credentials, select Planner from the list of applications. Once within Planner select New Plan, complete the wizard selecting Private before creating the plan.
Within Planner, you are able to create buckets to place your tasks. You will want to create the buckets within your Planner that work for you, I have found the following works well for me.
Daily - Microsoft Planner doesn’t currently allow reoccurring tasks * Please vote for this feature here * as such I have a list that I don’t tick the tasks off daily but I review daily.
Weekly - As above but I use this for my weekly reviews * Check out this article regarding the weekly checklist *
Today - I use this bucket every morning to move the tasks that I am going to be working on today
Inbox - This is where I collect all the thoughts in my head, things that need doing prior organising and scheduling them
Master Project List - This is where I keep track of all the projects that I am running or am involved with, I will come back to how I use this bucket a bit more later
Ideas - I use this bucket to capture all the ideas that come into my mind. This allows me to review and think about how I am going to progress these ideas as appropriate.
Reading Material - It does what it says on the tin!
Assigned Tasks - This is where I keep track of tasks that I have assigned to others
Master Project List
When it is clear that something on my list is more than a few actions it should be treated as a project. If it is a smaller project, something I am going to be working on I will create a bucket for the project with the associated tasks then created in this bucket. For a larger project, I will create a dedicated Plan and then link to it from the master project list. The master project list allows me to review the projects I am working on at a high-level and think if I need to do something else with them.

You can create a link to another plan easily, click the ellipses at the top of the screen and then select copy link to the plan.

I then paste this link into the Notes section of the task within the Master Project List.
When I am in the review phase I use tabs to help me further prioritise my tasks to ensure I am as productive as I can be. At present, I am using four tags as follows:-
Inactive
Active
Proactive
Frog
The first three focus on what attention level you need to complete the task in hand, you can read more about this on the Think Productive blog, when I am reviewing my tasks I mark them with what attention level I will require when completing said task. Once this is completed you are able to ensure you schedule your tasks to match your attention levels, it also helps you find tasks to work on based upon your attention levels at any specific time.
The final tag is Frog or Big Rock, this is for me to highlight those tasks that require some heavy lifting, the idea being you should aim to eat that frog or attach a big rock first thing in your day. If you can get that difficult task knocked on the head first thing in your day it is only going to get older from that point onwards! Read Eat that Frog mentioned above.
Other useful tags could be the location you need to be in, or the type of activity like email or phone call to help you group similar activities together.
My workflow
I love the CORD productivity model and I utilise this to manage my workflow. The first stage is capturing everything in my Inbox bucket. I will sit down and keep on adding to it until everything is off my mind. The next stage is to organise through the tasks, this includes:-
Thinking what completing the task would entail
From here create a project or the additional actions as required
Add notes and attachments to the task as required
Update the tasks with the appropriate tags
Schedule the tasks where possible
When doing this it is important to schedule time for the work to be completed in your calendar
The next stage is the Review phase, every morning I review the tasks that I am going to work on that day and move them to the today bucket, I will review the attention that I require for these tasks and ensure I am eating the frog first! Next is my weekly review, here I will review all of my tasks and projects, update as required, add any more tasks that are needed, chase updates on delegated tasks and review upcoming meetings and actions to ensure I am prepared. Finally it’s time to get on a Do the tasks, make sure you bake in using your lists and updating them as you go to ensure it doesn’t become another task to do!
Conclusion
Whilst there are numerous tools available to help your plan and organise your day Microsoft Planner has a number of benefits if your organisation is using Microsoft 365. Spend some time to figure out what your system is and how you can use Microsoft Planner to help put it into action.