

Introduction: 3D Printed Bobblehead


Nothing beats having a desk companion that will agree with everything you say.
A popular saying for this kind of support, is having a 'Yes Man (or Woman)' – and a 3D printed bobblehead is a simple and accessible way to get an agreeing nod whenever you need one!

Photo credit: Aurbina, public domain
For my 3D printed bobblehead, I wanted a serious and statuesque Moai* to deliver my support nods because they look like they mean business, but in a pleasant way. :D
(*Moai, or mo‘ai, are monolithic human figures carved by the Rapa Nui people on Easter Island in eastern Polynesia between 1250 and 1500 A.D.)

I'll be using one of Autodesk's cloud based 3D software programs called Tinkercad, which is FREE and very simple to use (even for a complete newbie!).
For instructions on how to sign up for a Tinkercad account, follow along with lesson 1 of JON-A-TRON's Easy 3D Printing Class.
And to watch me model this project step by step in Tinkercad, check out this recording of my live webinar:
Step 1: The Moai (Easter Island Head) File
I found a great creative commons 3D file of a Moai Easter Island head on Thingaverse by Microsoft Store (here's the creative commons file license info). The maker of that file has since removed it from Thingaverse, so I'm VERY glad that I downloaded it in time! It's such a great shape.
The link to download this file is at the end of this step.
You can either download and use the Moai file attached to this step and follow along to make the same bobblehead as me, OR you can design your own using Tinkercad's shapes to create your own nodding head and supporting body.
You can watch me do the first few steps here. I'll also cover the necessary Tinkercad functions used in this project, so you can see them in action!
If you'd like to make your own, but haven't used Tinkercad before, I recommend taking my coworker JON-A-TRON's class: Easy 3d Printing.
Attachments

Step 2: Supplies & Tools

Here are the tools and supplies you'll need to make a 3D printed bobblehead.
- 3D Printer*
- PLA filament (white & grey - if you're making one like mine!)
- Wide painter's tape
- Credit card for smoothing out the tape on the print surface
- Rubbing alcohol or an alcohol based lens cleaner
- Sharp chisel
- Small tube of E6000 or Superglue (not pictured)
*To read a great overview of good quality hobby 3D printers – and to find info on where to have your pieces printed if you don't own a 3D printer – read through lesson 1 of JON-A-TRON's Easy 3D Printing Class!
Step 3: Importing the Moai File Into Tinkercad

Once you've downloaded the Moai file, create a new design in Tinkercad and re-name it '3D Printed Bobblehead'.
Then click on the IMPORT button in the top right corner of the screen.

A small window will pop up. Click on the CHOOSE A FILE button.

Find the Moai file, select it, and click on OPEN.

Another small window will pop up. Leave the scale at 100% and click on IMPORT.

The Moai model will then be imported and centered on your workplane.
Step 4: Scaling the Model
The objective of this step is to resize (scale) the model so that it's 34 mm wide from ear to ear.
You can scale the model in two ways:
1) Click and drag a box around the model to SELECT it. Then hold SHIFT down while you click on, and drag out, one of the CORNER SCALING BOXES until the width of the model is 34 mm.
2) Sometimes it can be tricky to drag to exact dimensions, so another way of scaling is to SELECT the model, hold down SHIFT and drag a CORNER SCALING BOX a little bit. Release SHIFT and click in the WIDTH dimension box. Type the number 34 into the dimension box using your keyboard.
NOTE: Following the steps in option 2 will scale the entire piece proportionally. If you click and add info into a dimension box without doing the SHIFT + CORNER SCALING BOX drag, the model will scale that dimension direction only, wonkifying your model.
The width of the model should now be 34mm.
Step 5: Separating the Head and Body
In order to achieve the ability to bobble, aka bobblebility, we must make the head and the body two separate pieces. If you're going to build your own bobblehead from scratch, you can skip this step.
First step: switch to the ORTHOGRAPHIC view setting.

This will help you achieve precise placements of pieces without perspective getting in the way.
To do this, bring a BOX in from the Basic Shapes side menu and make it slightly wider than the figure's body and high enough to reach the connecting line between the back of its neck and body.
Make sure you are
Next, make the box a HOLE so you can see through to the figure, making lining the box up easier. Play with the positioning and height of the box until it's aligned with the neck connecting line and the right hand end of the jawline.
Duplicate the BOX HOLE and, holding SHIFT down, click and drag the duplicated box to the left towards the figure's chin.


Change the angle to -15 degrees and line the upper right hand corner of the second angled box to the top left hand corner of the first box.

Go to the top view and make sure that the BOX HOLES are placed so that the figure is completely within the boxes.


Select the figure and both boxes – and move them to the right side of the workplane. While the 3 objects are still selected, duplicate them. Hold SHIFT down while clicking and dragging the duplicates to the left of the originals.
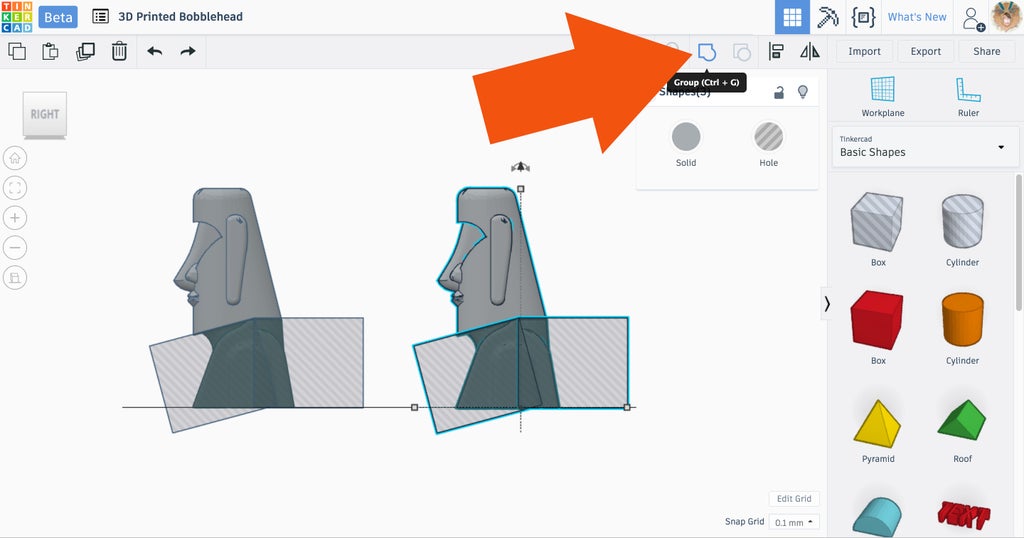

Select the right hand figure/boxes and hit GROUP. This will 'erase' the body, leaving only the head.

Go to the TOP view and move the newly separated head off the workplane. We'll come back to him in a bit.
Now to make the body...
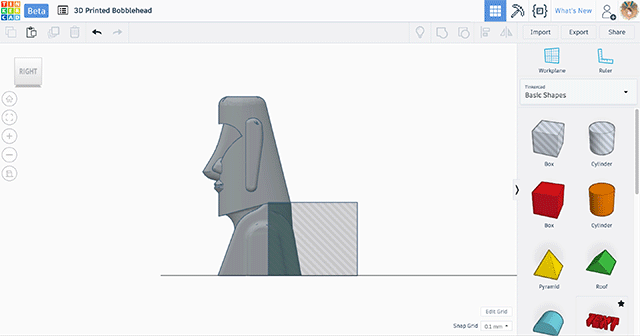
Delete the left HOLE BOX. Make the remaining box taller and raise it up so that the bottom edge lines up with the neck line.
Next, DUPLICATE the box, and while holding down the SHIFT key, click and drag the duplicate box to the left. Change the left box to a -15 angle. Lower the left box so that it's lower edge lines up with the lower left corner of the right box.
SELECT all three objects and click on GROUP to 'erase' the head, leaving the body.
We now have our two separate pieces, which means we're one step closer to bobblebility!
Step 6: Adding Stability to the Body

Now that we have our two pieces separated, we need to add a wider base to the body for stability.
NOTE: You don't have to use the same shape as I do to make the base. Feel free to use any shape you like!
IMPORT A SHAPE FOR THE BASE

Drag your preferred shape onto the workplane. I used the ROUNDED CUBE from the Community Shape Generator drop down menu.
Resize the shape to 50mm x 60mm x 10mm High holding down SHIFT and clicking and dragging the little boxes OR by entering the dimensions into the white text boxes.
FLATTEN BASE SHAPE

Next, we're going to cut off the bottom of the new base we just made so that it's flat and will sit securely on a table or other surface.

Bring a box in from the Basic Shapes menu and resize it so that it's bigger than the base. Move the new box so that it completely surrounds the base.
Then, make the new box a HOLE. Select both the base and the hole box and click on GROUP.
Lower the newly flat bottomed base to meet the workplane.
NOTE: If you used a different shape for the base that already had a flat bottom, you can skip this step and just make your chosen shape 4-6mm tall.
ALIGN BODY AND BASE

Now that we have the two parts we need to make a solid foundation for bobbling, we need to put them together. The first step to doing this is to align the pieces. Switch to ORTHOGRAPHIC VIEW.

And go to the TOP VIEW. Before we align the pieces, we need to rotate the body by 90° so that it's facing the bottom of the screen. SELECT both pieces and click on the ALIGN button. Click on both of the middle black dots to align the pieces both vertically and horizontally.
ADJUST AND GROUP

Now for last few steps towards stable base awesomeness...
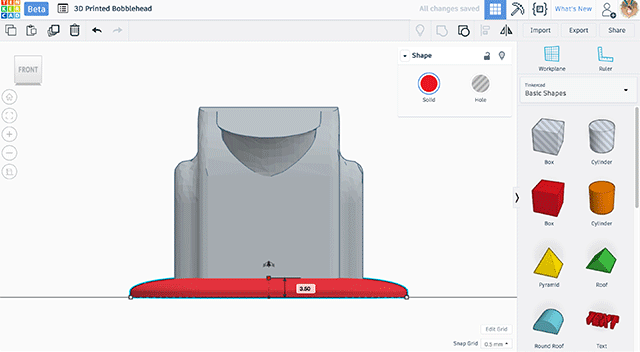
Click on the base to remind yourself of how high it is. Mine is 3.5mm. Raise the body up by .5mm less than your base height. For me that was 3mm.
In order to make sure that the body is imbedded in the base on every side, click on the base and make it a hole. This makes the part transparent so that you can see how the body is sitting into the base. If it's properly imbedded, there will be a solid grey line all the way around. If there's not a solid line, move the body down in .25mm increments until an unbroken line is achieved.
SELECT both parts and click on GROUP to join them, making them one part.

You have successfully make the body of your bobblehead. Great work! Now we'll move on to hollowing (shelling) out the head to make room for the spring.
Step 7: Making the Head Hollow
Now it's time to prep the head!
In order to create space for the spring and and the bobble movement, we need to hollow out a section of the head (which is currently a solid). This is also known as 'shelling'.
If you're making your own head using the basic shapes provided in Tinkercad, and you haven't added any facial features like a nose, eyes, and ears, follow along with all the steps except for the ones where we cut away the features on the hole we'll use to shell the head with.
The steps below show you a very precise way of shelling a shape with protruding features. If you'd prefer to learn a quicker, although less precise, way of hollowing out the head, watch this video of a live webinar I did going over the basics of Tinkercad navigation, the first few modeling steps, and of course a faster way to shell this thing!
LOWER & DUPLICATE
 Move your body base off the side and bring your head into the middle of the workplane.
I like to start with a side orthographic view.

Lower* the head until it's sitting on the workplane. SELECT and DUPLICATE it. Hold down SHIFT while clicking and dragging the new head to the right of the old.
*Lowering the head before working on it is optional. I just like the pieces I'm working on to feel grounded on the workplane.
RESIZE & ALIGN

Click on the original, full size head to remind yourself of its dimensions. Mine is 45mm x 62.67mm.

This duplicate is going to become the hole that we use to hollow out the head and we want the remaining wall thickness after deleting that duplicate hole to be at least 3mm, which means taking 6mm off of the width when scaling while holding shift. For me, that meant making the width of the duplicate 39mm.
Once the duplicate is scaled, select both heads and ALIGN to the middle dots on width, length, and height.
Select the larger outside head and make it a transparent hole so you can see how it's lining up with the inner duplicate. Then click on the exposed brow of the duplicate and make it a bright color, so you can see more clearly where it is sticking out of the outer one.


ADJUSTING THE INNER DUPLICATE TO WORK FOR SHELLING

This particular shape is a great example of why it's more challenging to hollow out or 'shell' shapes with raised surface features.
The protruding features will shrink down and in – instead of offsetting from the profile of the original – which results in parts poking through the wall of the original or being so close to the surface that there isn't enough room for material to print, which will result in a hole.
To get around this issue, we will be removing the features of the inner duplicate shape (head) using BOX HOLES.

We will also be adding another section to the bottom of the inner duplicate because we need it to go all the way to - and just past - the bottom of the original, so that it creates an opening when grouped.

To start, move the original (outer) head to the left.

DUPLICATE the inner yellow head and move both the original and new duplicate head off the workplane, like pictured.
REMOVING THE EARS

Now we're going to remove the protruding features from the head that will be used to create the cavity in the original head.
Drag a box from the BASIC SHAPES menu onto the workplane beside the head.

Go to the top down orthographic view and line the square up next to the side of the head so that it remove the ear. DUPLICATE the box and move the duplicate to the ear on the other side of the head. Line that one up the same way you did the first.
Go the the front view. Select both boxes and raise them up until they are covering both ears entirely.
Make the two boxes HOLES, select all three shapes and GROUP them to cut away the ears.
NOTE: A bit of the back side of the ears will remain, but is ok!

This is what your 'cavity' head should look like at this point.
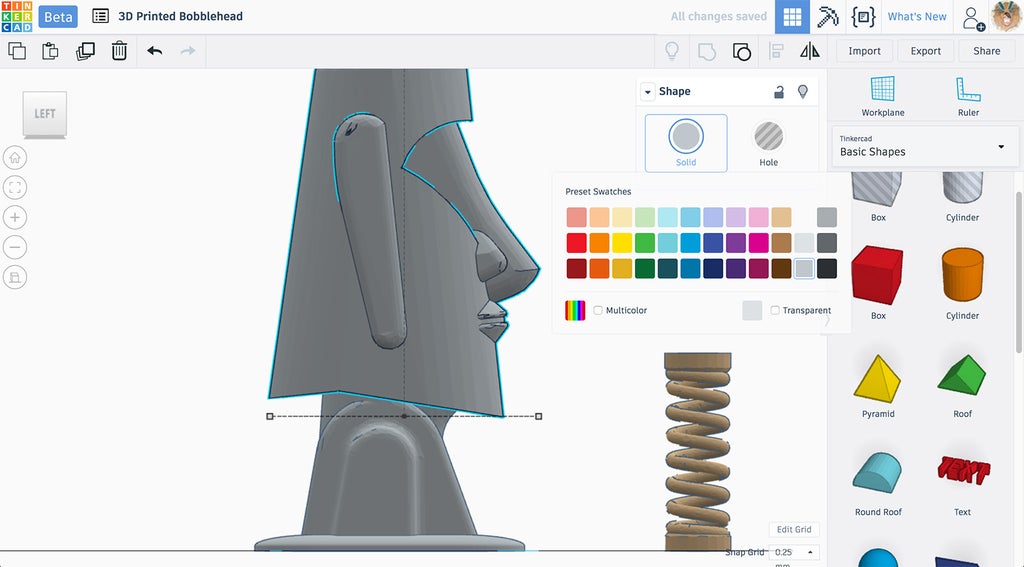
REMOVING THE LIPS & NOSE

Bring a box onto the workplane.

From the side orthographic view, make the box a HOLE and line it up with the front of the 'chin'.
Resize the box hole vertically, until it covers as much of the nose as it can touch.
Go to the top view and duplicate the box hole, rotating the -22° degrees. Move the second box hole until it lines up with the side of the nose/nostril. Repeat this process for a third box hole – rotating it 22 degrees.

We are almost ready to group and remove the features. There's just one more box hole to make and place!

SELECT the center box hole.

Then from the side view, DUPLICATE that box hole and change the duplicate's angle to 22°.
Reposition it that it covers about half of the nose, like pictures in the GIF slide show above.
SELECT the four box holes and the 'cavity' head and hit GROUP.

You now have a creepy, featureless head shape! Great work.
NOTE: We'll be lopping off the top of this 'cavity' head and that's why I didn't bother removing the features on the top half of the head!
Next, we will be cutting off the bottom section of the second yellow head (the duplicate of the duplicate) and adding it to the bottom of the 'cavity' head, so that it will be long enough to cut all the way through the bottom of the main head, creating the opening we need to add the spring and give room for the bobbling to occur.
EXTENDING THE BOTTOM

Drag the second yellow head onto the workplane so that it sits in front of your featureless 'cavity' head, so you can see it in fully when in side view.

Bring a box onto the workplane and resize it so that it covers the second head from the top down view.
Make the box a HOLE and raise it up so that its bottom JUST covers the lips and ears.
SELECT the head and hole and GROUP them, removing the top of the head.

Like this! We will now add this bottom bit to the 'cavity' head.

SELECT both the head and partial head.

Click on ALIGN and then on the two center align marks.
Go to the side orthographic view and raise the head about 9.75 mm. Make the head a HOLE.
Select the bottom extension piece and use the side dimension marks to resize it to line up with the edges of the 'cavity' head.

Select the 'cavity' head and make it a solid again. GROUP the two pieces and make sure the final piece stayed yellow.
ADDING ANGLE

We're also going to angle the heads back a bit so they have a bit more of the classic Easter Island head look.

Change the angle of both heads to 6°. This will make the heads tilt backwards a wee bit, if you're set on the left side view.
Next, SELECT both heads and ALIGN them using the back middle align mark only.

You will notice that the inner 'cavity' head is sticking out the bottom just enough to create an opening once it becomes a hole. Move the inner head to the left or right, whichever direction it needs to go in to be approximately centered from the side.
Next, in order to keep the final hollowed out head as balanced as possible, we need to remove some of the inner lower nose material by adding a box that will fit inside the nose and still leave enough wall thickness for the printed material.
ADDING NOSE CAVITY

CLICK and drag a box onto the workplane.

If you're following along with me and making the Moai Bobblehead, make the box: 5.75 x 13.5 x 34mm H.
Go to the side orthographic view. Raise the nose box up and change the angle to 32°.
Move it until the space in between the actual nose and the nose box is close to that of the side wall thicknesses.
SELECT all three pieces and ALIGN them using the back center mark.

You should end up with something like this! And don't worry, we're ALMOST DONE this process of hollowing out the head! You have been champions to stick with it.
OFF WITH (THE TOP OF) HIS HEAD!

Drag a box onto the workplane.

Raise the box up 50mm off the workplane and resize it so that it covers the entire top of the heads.
SELECT the box and make it a HOLE.
SELECT everything except the box hole. Hold SHIFT down and click on the main/outer head to deselect it. The inner head and nose cavities will remain selected.
Hold SHIFT down again and click on the box hole. Now the everything except the main/outer head should be selected.

Click on GROUP to cut the top of the inner head off! You will be left with the main/outer head and the lower half of the inner head, as pictured above.

SELECT the inner 'half head' and make it a HOLE.

SELECT the main/outer head and make it a SOLID.

Select both shapes.

Click on GROUP.

Wh have successfully hollowed out (shelled) the interior portion of the head necessary to accommodate the spring and the space for bobble movement.

Check out the beautiful and even wall thickness! Ooh la la. It's now time to put the two halves together, import the spring file, and add the last few finishing touches – and then it's time to print our parts!!
NOTE: There's no need for you to turn your head like I did above. I just wanted to show you what the inside will look like. :)
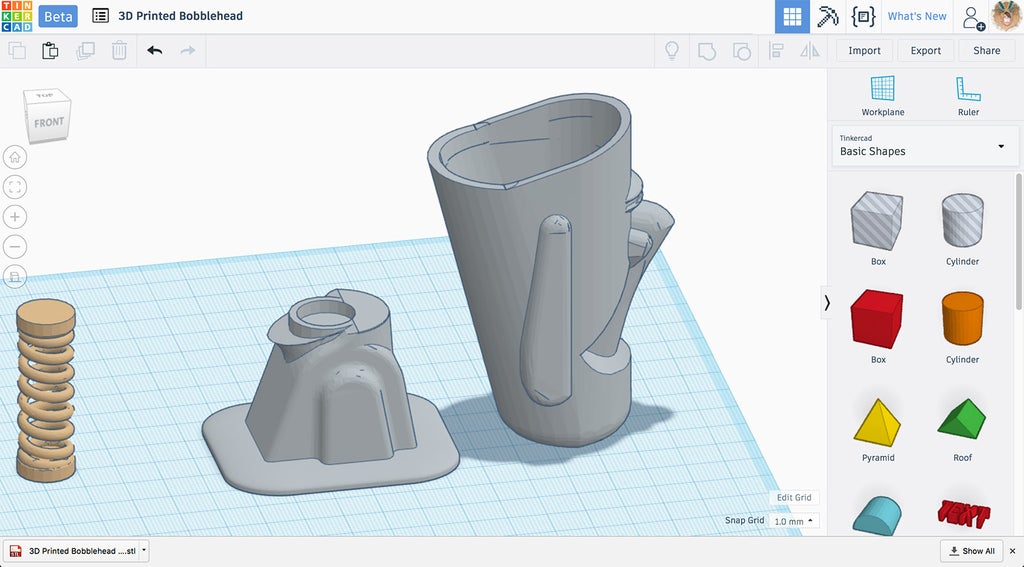
Step 8: Spring & Shims
Download these files to your desktop. Instructions on what to do with them will come in the next few steps!


Step 9: Adding the Spring Holes


This is it people... THE FINAL 3D MODELING TO DO BEFORE PRINTING OUR PARTS!
*Sorry for shouting, I'm just excited that we're getting close to bobble time.
In this final 3D modeling step, we're going to:
- Import the spring
- Add holes for the spring to sit securely in the head and body
- Export the files for printing

In preparation for this, bring the body base back onto the work plane and arrange the head and body with space in the middle.
IMPORTING THE SPRING
In the last step, I had you download the spring .stl file. Now it's time to import it into the workplane.

Click the IMPORT button in the upper right hand corner. Follow the prompts to choose the Bobblehead Spring File.stl. Don't make any changes to the percentage or size of the file.

The reason I built the spring for you and provided the file, is that it took quite a few iterations to get right and I wanted to save you the effort. But if you are interested in learning how to import springs with quality geometry for 3D printing, check out my instructable on how to Import McMaster-Carr Parts Into Tinkercad.
LINING THEM UP

SELECT the head and body base. Make them HOLES so that working out their alignment will be easier.

Move the little spring off the workplane. We won't need it until the end of this step.

Drag a cylinder onto the workplane.

Change the cylinder's dimensions to 18.5 x 18.5 x 6mm.
ALIGN it with the body base using the back middle align mark. Then raise it up and move it onto the top of the body. Make the top of the cylinder line up with the top of the body's neck.

Bring the head over to the body base.

SELECT all and ALIGN using the back middle marker.

Raise the head up until the bottom is JUST a smidge lower than the lowest point of the neck, then move it the left or right, until there is equal hollow head space on either side of the neck.
MAKING THE HOLES HOLE :)

Drag a cylinder onto the workplane.

Change the cylinder's dimensions to 15 x 15 x 44mm. The spring's diameter is 14.5mm and we need to make the holes it fits into a bit bigger in order for it to fit. This is called tolerance.
ALIGN the cylinder with the head, body, and short stout cylinder, using the back center marker (assuming you're view is set to the LEFT side).
Center the 44mm cylinder vertically between the head and base, so that there is equal amount of green on both ends. Then move it left or right to center it lengthwise in the head.
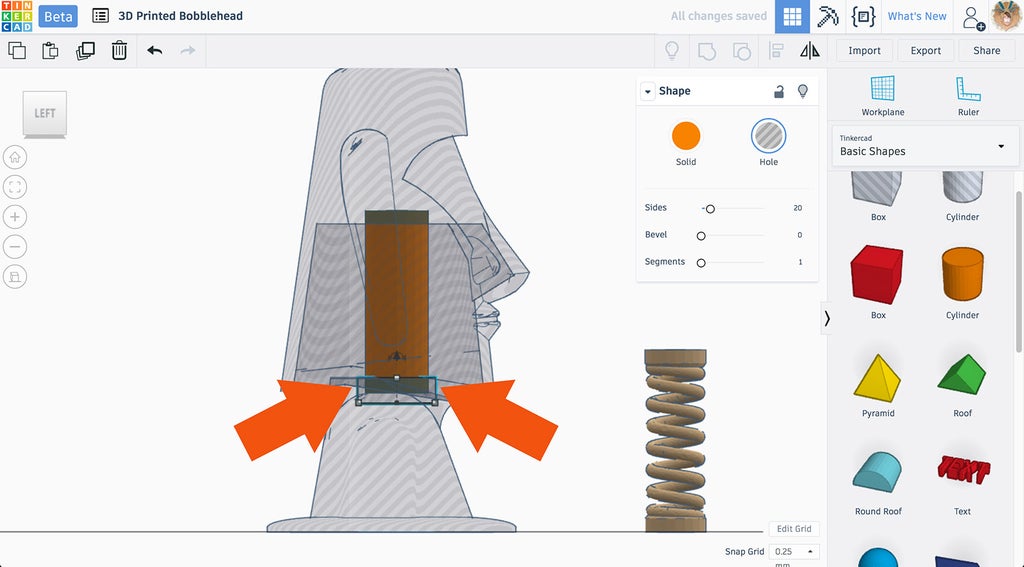
Once you've found center for the cylinder, move the short stuffy cylinder so that it's centered around the tall cylinder.

SELECT the body base and the short squatty cylinder that we added it to it. GROUP them so that they become one piece and make them SOLID.

SELECT the tall cylinder and make it a HOLE.
NOTE: to select something that's within another shape, select both, then hold down SHIFT and click on the outer shape. This will leave the interior shape selected.
Select the head make is a SOLID.
Now we're ready to finish out two main bobblehead pieces: the head and the body.
LET'S GET OUR HOLLOW ON

Go the front view and select everything except the spring. DUPLICATE the shapes and move them to the right of the spring.
SELECT the bottom right body and the upper right head (being careful to leave the tall HOLE cylinder).
SELECT the left hand body + hole cylinder and GROUP them. This will leave the body with a spring sized hole in it! Repeat this process for the right hand side head/hole cylinder.

Yay!! Our parts are now complete! Now all that's left to do is reposition them and export them for printing!
REPOSITION & EXPORT
SELECT the head and rotate it 174° (or -174° depending on what side you're viewing from), so that when you bring it down to the workplane, the top of the head will sit flush/flat.
Then rotate and reposition the body and head so that they are side by side and back to back. I find the most clean up of 3D printed parts occurs at the traveling points if more than one part is printed at the same time. Doing this will keep the clean up points (if any) on the back side of each piece.

To export the part files, SELECT both shapes and click on EXPORT in the top right corner.

A window small download window will pop up. Click on STL and your parts file will download to your computer.
And that's it for the 3D modeling! Great work you guys. If you have any questions about this step, please don't hesitate to ask.
Next up...3D printing!!!
Step 10: Printing the Pieces
Before you can 3D print the pieces, you'll need to import their files into what's called a slicing software. There, you will choose settings like what percentage the infill material will be (how dense), the temperature of the extruder, and the print speed. The software will then render your piece into tool path slices (layers) for the 3D printer to follow.

For excellent instructions on how to do this, read through lesson 3 of JON-A-TRON's Easy 3D Printing Class. He even covers the same program I used to make the Bobblehead pieces, Autodesk's free slicing software Print Studio. The only difference being that I used a MakerBot printer instead of the Dremel JON-A-TRON used and set my Print Studio workspace to correspond with that.
SETTINGS
Head & Body: 15% Fill with NO SUPPORTS
Spring: 15% Fill with SUPPORTS
IMPORTANT NOTE: Even if you normally use a different slicing software, I HIGHLY recommend using Print Studio (It's free!) to, at the very least, prepare your spring for printing. I tried a few different slicing programs and Print Studio had by far the best results and their branch-like supports are super easy to remove with no clean up required.
Printing the Head & Body

Once you've sliced and saved the correct file type for your particular 3D printer, load up the grey PLA filament and print the head and body parts.
For very clear instructions on how to do this, read through lesson 4 of JON-A-TRON's Easy 3D Printing Class.


My Bobblehead and body pieces on a MakerBot took just under 4 hours to print with a 25% interior fill.

The head will come off the build surface super easily just using your hands.

The flat bottom of the body section will require the gentle use of a sharp chisel to be removed. Carefully wiggle the chisel end under one corner at a time, going round a few times, until it pops off the build surface.

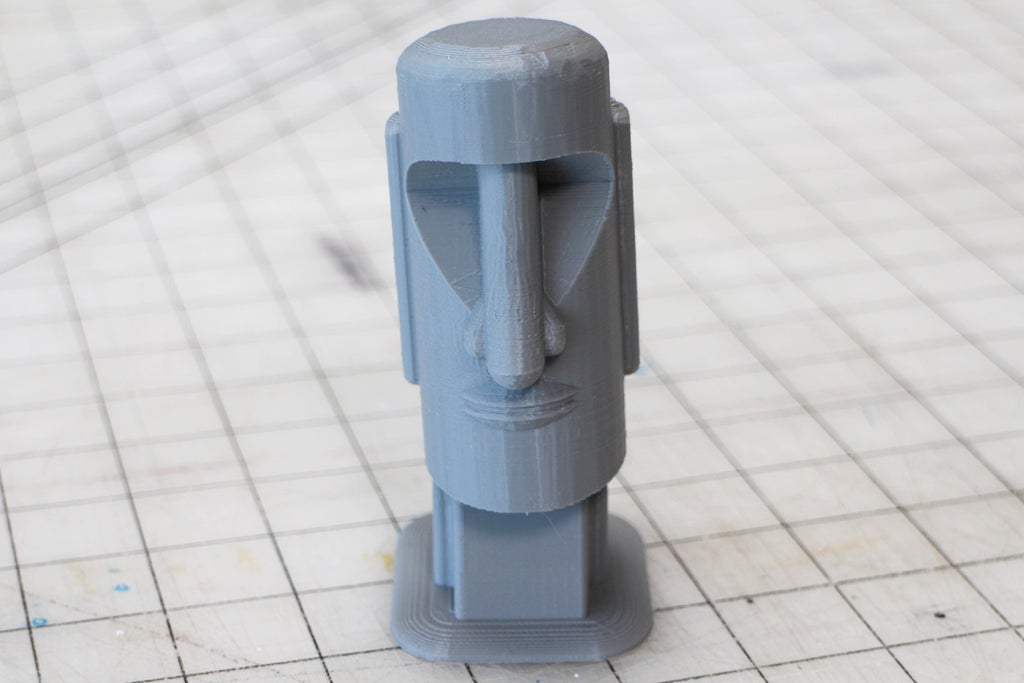
Ta da! If you'd like, you can lightly sand (use 320 grit) or sandblast them to give them a more authentic 'stone' look before putting the parts together, like I did for the one I photographed for the main image.
Printing the Spring & Shims

When slicing the spring file in Print Studio, be sure to include supports. This will ensure quality, long lasting bobble action from a well printed spring.
For some reason, the spring works best when printed in white PLA filament. I don't know if the color additives in the grey have anything to do with it having poorer results, but white just worked best for me, so that's what I recommend using. The spring will be hidden inside anyway, so the color doesn't matter!
NOTE: The underside of the coils will look a tiny bit frayed, but that won't affect the effectiveness of the spring!


Once printing is complete, use your fingers to pry the spring off of the build surface.

Use your fingers to pinch the supports together, releasing their tips from the spring's surface. This piece requires no further clean up.

Use the chisel to carefully remove the shims.

Now that you have your parts made, you're ready to move on to the next step of putting them all together to achieve bobblebility!
Step 11: Putting the Pieces Together!
Before you assemble your bobblehead, if you'd like to give the pieces more of a stone look, there are a few great finishing options:
- Sandblasting - If you are lucky enough to have access to a sandblaster, a light round of blasting takes the shine off the pieces and leaves a smooth, matte stoney surface. Be careful not to do too much on the head or you might blow a hole in your thin-ish wall.
- 320 grit sand paper - In lieu of a sandblaster, sand paper, patience, and elbow grease can give very good results.
- Spray on finish - Check out this great instructable by instructables member gravitisweak on how to give this guy a textured stone surface! (He even used the same file I did!)

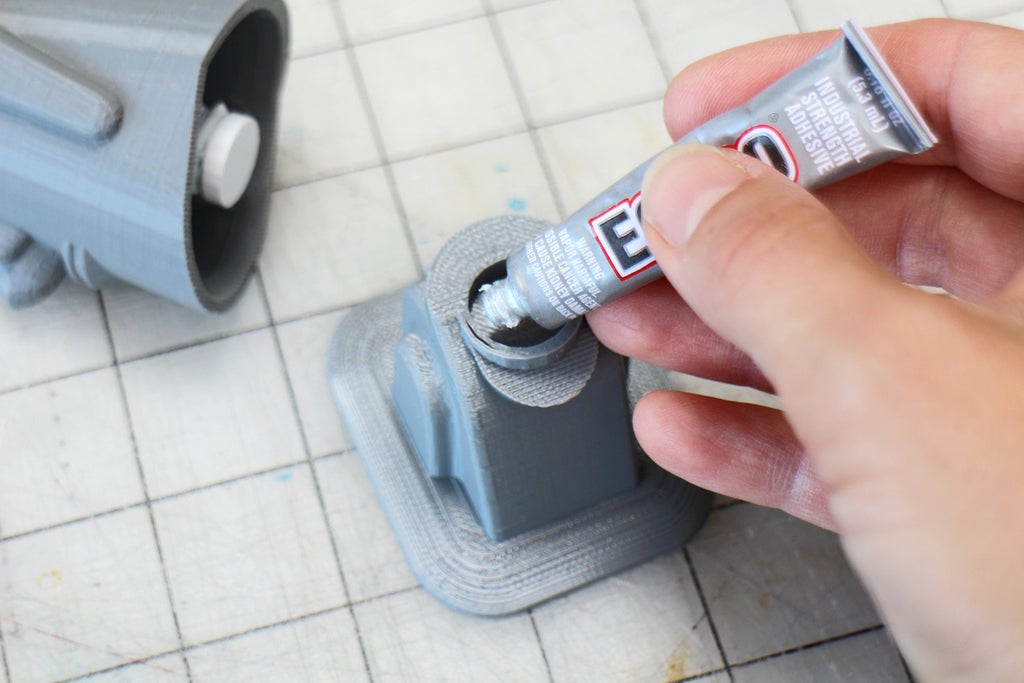
All you need to assemble your bobblehead, other than your printed parts, is a small tube of E6000 glue or Superglue.

The end of the spring that was printed first – the one that was in contact with the build surface – has a little ridge, which gives it a good press fit. This is the end we will put into the hole in the head.

Add a small dab of glue into the recessed hole inside the head.

Put the ridged end of the spring into the hole.

Use your thumb to compress the spring, pushing down in all directions, to ensure that the end of the spring is flush with the bottom of the hole.
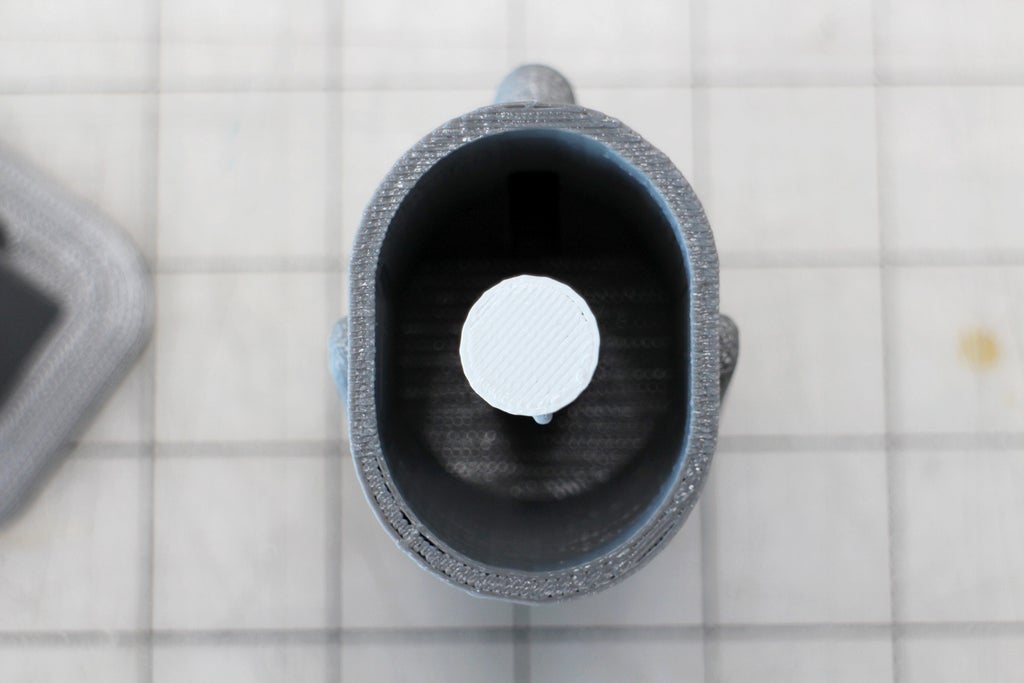
Keep doing the above compression process until the near end of the spring is centered in the void of the head. Let the glue dry (read your glue instructions for drying time) before moving on to the next step.

Once the glue has dried, place the other free end of the spring into the recessed hole on the body BEFORE adding any glue.

It's important to check whether or not the spring glued in place properly before committing to gluing the two halves together. The head should sit straight up and down.
If the spring wasn't seated properly after all and the head is tilting at all, this is where the shims come in!

Play around with the three thickness of shims and the position of the shim in the hole to find the best combination where the head sits up properly.
Now it's time to glue the parts together. If you need to add a shim, add a tiny dab of glue on the bottom and find it's place again in the hole before gluing in the spring.

Then add glue on top of the shim and glue the head in place. If you didn't use a shim, put the glue directly in the hole and add the head.


Immediately position the head so that the front of the face lines up with the front of the body. Let the glue dry before being tempted to bob!!
Step 12: Congratulations, You Have Achieved Bobblebility!

TIP: I recommend using double stick tape to secure your bobblehead to your desk, so it stays put while bobbling.
Thanks for reading through my project! If you end up making a bobblehead of your own, please be sure to post pictures in the comments section below. I'd love to see what you make!
Best,
Paige


