Change your home screen wallpaper

Changing your Moto E4’s wallpaper may not sound like a big deal, but depending on which one you choose, it can be the most meaningful — and personal — customization you make.
To get started, open Settings and go to Display, where you’ll get the option of choosing between your own photos or a gallery of custom and animated wallpapers from Motorola. Alternatively, you can browse the many backgrounds available in the Google Play Store — or check out our list of the absolute best Android wallpaper apps.
Once you’ve made a selection and specified whether you’d like the wallpaper to appear on the home screen, lock screen, or both, that’s it — your newly selected background will take the place of whatever artwork or photo was there before it.
Enable gestures and actions through the Moto app
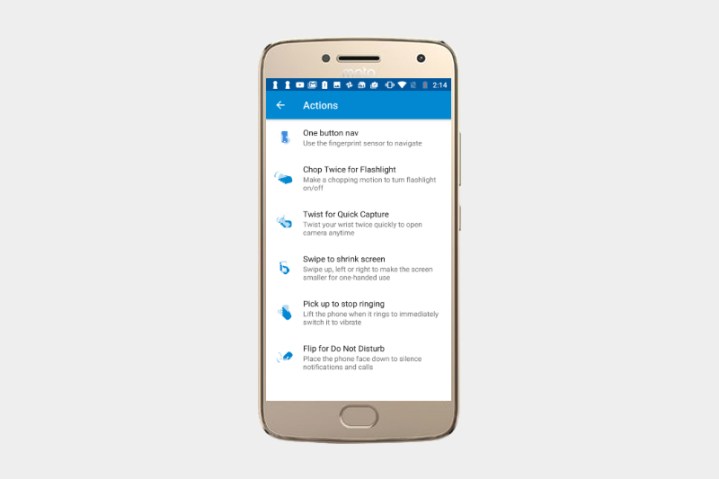
Motorola’s clever Moto Display and Moto Actions save time by condensing multiple steps into single taps and swipes. Take Moto Actions, for example — you can place the phone face down to silence notifications and calls, or lift it to switch incoming calls to vibrate. With a single-finger swipe downward, you can shrink the Moto E4’s interface for one-handed use. And you can use the phone’s fingerprint sensor to navigate menus, home screens, and apps.
Moto Actions and Moto Gestures are easy to enable. Find the Moto app and tap it — you’ll see settings related to Moto Actions and Moto Display. Want to hide sensitive notifications on the Moto E4’s lock screen? Select Moto > Moto Display and tap which apps can show notifications and how much they’ll display. From the same screen, you can switch on Moto Display’s pause feature, which stops your music when the Moto E4 goes to sleep, and night mode, which discretely shows notifications from your lockscreen between sunset and sunrise.
Extend your battery

We were impressed by the Moto E4’s battery in our review, which tended to last about a day. But the phone’s power-saving features can boost it further.
The easiest is Battery Saving Mode, Android’s built-in power-saving mode that disables nonessential features like vibration, global positioning, and apps that rely on background data (like email and messaging). You’ll have to put up with poorer-than-normal performance, but it’s useful in a pinch if you’re away from a charger.
To enable Battery Saving Mode, open Settings, tap Device, and select Battery. Then tap Menu and enable Battery save.
Battery Saving Mode isn’t the only way to stretch your phone a few extra hours. Try lowering the screen brightness by swiping down on the Moto E4’s quick toggle menu and dragging the brightness slider toward the left side of the screen. Alternatively, try adjusting the screen timeout duration: Open Settings, scroll down to Device, tap Display, select Sleep, and select a lower timeout value.
Get the perfect shot, and share it with friends

The Moto E4’s camera takes pretty good shots, but with a little tweaking, you can make them even better; try enabling high dynamic range (HDR), which captures greater luminosity and color contrast than your average camera. Open the Camera app, look near the top of the camera or video screen, and tap HDR. The next time you take a shot, the Moto E4 will automatically adjust brightness to your surroundings.
By default, the Moto E4’s camera app calibrates most settings automatically, but you can adjust them manually in Professional mode. To enable it, open the Camera app and tap the three-circle Menu button. Then tap Professional mode and tweak the white balance, aperture, shutter speed, and focus to your heart’s content.
You can make selfies look better with the Moto E4’s Beautify mode, which applies an obscuring blur effect to wrinkles, blemishes, and damaged skin. To switch it on, open the Camera, select Beautify, and choose between Auto, Manual, or Off.
To share your best shots with friends, family, and others, use the Camera app’s built-in sharing features. Swipe up, then tap Photos. Select a thumbnail to open it and tap the triangular Share button to see a list of options and contacts. To select multiple files, open a folder, touch and hold a photo, and then tap others. Finally, select the Share button and choose which apps/people you’d like to share with.
Pin important shortcuts to your home screen

If you need quick, easy access to an important document (say, a boarding pass), no worries — the Moto E4 has you covered. Screen pinning lets you pin a persistent shortcut to the screen for easy access no matter what you’re doing.
To set up screen pinning, swipe up in the Settings menu, then head to Security > Screen pinning. (If you want to secure your phone when you activate screen pinning, tap Lock device when unpinning now.) Tap the switch to turn it on, and pin something by opening an app, touching and holding the Recents button, and tapping the thumbtack icon.
Unpinning is just as simple. To get rid of the apps you’ve pinned to the screen, touch and hold the back button until you see the Screen unpinned message.
Transfer your data to the Moto E4

If you’re migrating to the Moto E4 from another device, no need to fret about getting your contacts, settings, and preferences onto your new smartphone — Motorola’s Moto Migrate software takes the pain out of data transfer by restoring your messages, call history, and settings automatically.
Get started by downloading Motorola Migrate from the Google Play Store on your Moto E4. Open it and select Send data TO this device, and tap until a QR code appears.
Next, install Motorola Migrate on your old phone. Open it and select Send data FROM this device, and tap until a QR code scanner appears on your old phone. Point your Moto E4’s rear camera toward the QR code to start the transfer, and wait until it finishes.
Send a distress signal

If you run into trouble, the Moto E4’s Motorola Alert app can signal for help. Once configured with your preferences, it’ll alert close friends and family to your location with a single click.
To set up Motorola Alert, find the Alert shortcut on your phone’s home screen or in the app drawer. Accept all the terms and conditions, and hit the Next button until you reach the Pick Alerts contacts screen. Enter the names of the contacts you want on your emergency alerts list, and tap Next when you’re done. You’ll see an option to send them a message saying you’ve made them an emergency contact.
Once you’ve done that, you can set up messages for different modes on the main menu: Emergency, Meet Me, or Follow Me. In Emergency Mode, you can set the app to ring local emergency services in addition to the contacts you’ve specified.
Once everything’s set up and configured, tap any of the big buttons on the main Alert screen to activate them.
Editors' Recommendations
- iOS 15 tips and tricks: Make the most of your iPhone
- Nokia 5.4 vs. Motorola Moto G Power (2021): Budget battleground
- Will that unlocked phone work with your wireless carrier? Here’s how to tell
- Google Pixel 4 and Pixel 4 XL tips: How to set up your new phone
- Google Pixel 3 and Pixel 3a: 10 amazing tips and tricks