


This tutorial was originally published in February 2009 as a Tuts+ Premium tutorial. It is now available free to view. Although this tutorial does not use the latest version of Adobe Photoshop, its techniques and process are still relevant.
This tutorial shows step by step how to create separated artwork for a screen-printed T-shirt. Screen printing is regarded as the best method of printing onto apparel because of the quality it produces. It should not be confused with the inferior four-color heat transfer printing, which does not look as good or last as long.
The tutorial also demystifies how to manage special or spot colors using Photoshop's channels.
To start off, you'll assemble a CMYK illustration, and then create a convincing mockup on a T-shirt. You'll then make full use of Photoshop's selection tools to create the necessary channels for screen printing, and you'll discover how certain colors will maintain their vivacity by under-printing with white. Finally, you'll apply the often misunderstood concept of trapping to your artwork to counteract any slight misalignment that may occur on press.
Want to add cool effects to your images? Browse our incredible selection of Photoshop Actions from GraphicRiver and Envato Elements to add artistic effects like the ones below.
1. How to Edit the Initial Image
Step 1
Note: The images included with this tutorial are no longer available, so feel free to use your own stocks.
Open a girl image (no longer available). You'll be isolating the figure next, so trim the excess background with the Crop Tool (C) as shown.


Step 2
Choose the Pen Tool (P) with it set to the Paths option to carefully plot your paths around the girl—don't sweat over the hair because you'll fix that later. I've stroked the path with red for clarity in the screengrab. Now select the Subtract From Path Area option to create the inner path on her right arm.
Remember to use the Alt, Command and Shift modifier keys as you work. You can also fine-tune your path by holding the Command key to access the Direct Selection Tool to adjust the direction/anchor points.


Step 3
Now we'll make a density mask for the hair. Switch to the Channels palette and cycle through each one in turn to determine which holds the most contrast for the hair—in this instance it's the "Blue" one. Duplicate it by dragging its thumbnail onto the Create New Channel icon, and then hit Command-L to access the Levels dialogue box. Increase the contrast by setting the Midpoint to 0.25 and the Whitepoint to 235.


Step 4
Switch to the Paths palette and Command-click your path thumbnail to generate a selection. Now, back in your Channels palette, target the "Blue copy." Ensure white is set as your Foreground Color, and hit Delete to fill the selection with black. Don't deselect just yet.
It's worth remembering that you can fill channel selections with white by switching the foreground color to black (press X) and hitting Delete.


Step 5
The mask is looking good apart from the right-hand shadow. Hit Shift-Command-I to Inverse the selection, and then enable the visibility of the top composite channel (you can also Double-click the channel thumbnail to adjust its opacity to suit). Use a large, white Hard Brush to Erase the right-hand shadow and hair.


Step 6
Zoom in and continue Erasing the hair using a smaller brush to create a clean edge. Remember to toggle the visibility of the composite channel as you work.


Step 7
Now go to Image > Adjustments > Black and White and use the drop-down menu to select the High Contrast Red Filter preset.


2. How to Create the Background
Switch to the Channels palette and Command-click the "Blue copy" thumbnail to generate a selection. Inverse, and then target the top composite channel and Copy it to the clipboard. Now use the Color Picker to select 63C, 76M, 38Y, and 22K as your background color. Create a New Document 7.5" wide x 12" high, with a Resolution of 300 dpi (print resolution). Set the Color Mode to CMYK and the Background Contents to Background Color.
Now Paste your selection as a New Layer, and go to Layer > Matting > Defringe by 2 px to erase the white halo and Transform as shown. This purple background is only a visual representation of the T-shirt color.


3. How to Create the Halftone Effect
Step 1
Generate a Selection from the layer by Command-clicking its thumbnail, and then switch to the Channels palette. Click on the Create New Channel icon and then Fill the selection with white, labeling it "Girl Alpha." It's always a good idea to store commonly used selections as alpha channels, as you'll see later.


Step 2
Screen inks tend to spread a little—this is one of the reasons why screen printing doesn't do a very good job of printing fine halftones, at least compared to other printing methods. When dots increase in size, they cause the tints in the image to grow darker, which is technically known as dot gain.
To combat this, we'll integrate a coarse line halftone to the girl as part of the design, but first we need to bump the contrast by adding a Levels Adjustment, setting the Blackpoint to 64, the Midpoint to 0.88, and the Whitepoint to 216.


Step 3
Add a white filled New Layer below the girl, highlight both layers, and hit Command-E to Merge them. We now need to make a bitmap halftone of the girl—the best way to achieve this is in a new document, so Select All and Copy to the clipboard.


Step 4
Create the New Document using the clipboard as the preset and setting the Color Mode to Greyscale. Paste your selection and Merge Down. Now go to Image > Mode > Bitmap, and under Method choose Halftone Screen. In the next dialogue box, use the following settings: Frequency: 22, Angle: 45, and Shape: Line.


4. How to Create the Line Art
Step 1
Select All and Copy > Paste into your working document and label it "Girl lineart." Next, set the Blending Mode to Multiply and Delete the original girl layer.


Step 2
Make a Selection from the "Girl Alpha" channel, add a New Layer beneath the girl, and Fill the selection with white. Label the layer "White fill." Now place the "Girl lineart" and "White fill" layers into a Group folder labelled "GIRL."


Step 3
We're now going to Fill the girl's shirt and shoes with pink; first draw some closed paths (indicated in red on the screengrab) that extend outside the figure as shown—you'll be using the extra channel to fix these areas next.


5. How to Add Color
Click on your Foreground Color to access the Color Picker, and select Color Libraries. In the next dialogue box, select PANTONE solid uncoated, then PANTONE 238—rather than using the slider, you can access it by typing 238 swiftly. We'll be using this four-color equivalent to create the CMYK illustration before using the spot color channels in the final steps.
Generate a path-based Selection, add a New Layer above the "White fill", and label it "Pink clothes." Now Fill the selection with the Foreground Color. Next, make a Selection from the "Girl Alpha" channel, ensure the new layer is targeted, Inverse and hit Delete to trim away the excess.


6. How to Add Graphics
Step 1
Note: The images included with this tutorial are no longer available, so feel free to use your own stocks.
Open a brushstroke image and choose the Magic Wand Tool (W), setting the Tolerance to 44 and Unchecking the Contiguous option. Now click within the black area to generate a Selection, fill with white, and Copy to the clipboard. Close, but don't save the file as you'll be needing it later.


Add a New Group folder within your working document below the Girl and label it "WHITE GRAPHICS." Paste the selection within the folder, label it "Paint 1", and Transform as shown. Follow the same procedure using another brushstroke image, and then feel free to Duplicate/Transform and label accordingly.
You'll be Pasting a lot of elements throughout this tutorial, so remember to use the Defringe command. A setting of 1-2 pixels is usually enough to remove any white halo.


Step 2
Add a New Group folder below the Girl and label it "PINK GRAPHICS." Open a line-based graphic and convert to CMYK mode, and then use the same selection techniques to Fill with PANTONE 238.
Now Copy > Paste into the new group folder, Transform as shown and label it "Squiggle 1."


Step 3
Paste the same graphic using the same method. Feel free to Duplicate and Transform as required. Next, open a spray image and use the same technique again, positioning it behind the figure. Remember to name your layers—this will make things much easier later.


Step 4
With PANTONE 238 as your Foreground Color, use the Custom Shape Tool (U) with the Ellipse and Fill Pixels options selected to add some circles behind the girl. When using the Fill Pixels option, you need to add a New Layer beforehand, so the shapes will be drawn on independent layers. This way they can be positioned and resized as required.


Step 5
Create a new 600 px by 600 px sized CMYK Document, with a Resolution of 300 dpi and the Background Contents set to Transparent. We now need to add some central guides; a quick way to do this is to work in Full Screen Mode, and then snap the Crop Tool (C) to the document bounds. Now drag in your guides, which will snap to the crop tool's centre points, and then cancel the crop prompt.
Next, make sure PANTONE 238 is set as the Foreground Color. Select the Custom Shape Tool using the same Ellipse and Fill Pixels options as before. Use the drop-down menu to select Fixed Size and type 550 px in the Width and Height fields, and then check the From Center option. Now click in the centre of your canvas to create the shape.


Step 6
Switch your Foreground Color to white and add another circle set to 500 px by 500 px on the same layer. Continue adding alternating color circles, each one Decreasing in size by 50 px. When you've completed the last white circle, use the Magic Wand Tool (set to Contiguous) to select it and hit Delete.


Step 7
Drag and Drop the graphic at the top of the layer stack within the "PINK GRAPHICS" folder. Next, Duplicate, Resize and Position as required. Feel free to add variations of the circles (I created a version with a pink fill). When you're happy, highlight their layer thumbnails and Merge. You can now label the resulting layer "Bullseyes."


Step 8
Open the second brushstroke image again and Convert it to CMYK mode. Fill with PANTONE 238 and Copy > Paste at the top of the layer stack within the "PINK GRAPHICS" folder.


Step 9
Follow the same techniques with flower images and position as shown.


Step 10
Now open the line files again and use the same selection techniques to Copy > Paste into a New Group folder labelled "BLACK GRAPHICS." Ensure this folder is positioned above the "PINK GRAPHICS" folder.


Step 11
Open the spray file again, make a Selection and Copy > Paste at the top of the stack within the "BLACK GRAPHICS" folder, and position it behind the girl as shown.


Step 12
Use the same method to add the remaining hand-drawn elements; they'll include additional clouds and stars.


Step 13
Download and open the birds image (no longer available), select the birds with the Magic Wand Tool (with Contiguous Unchecked), and Copy > Paste at the top of the layer stack within the "BLACK GRAPHICS" folder. Now resize and position to the left—also feel free to delete individual birds with the Eraser Tool (E).
Next, generate a Selection from the "Bullseyes" layer and, with the "BLACK GRAPHICS" folder targeted, go to Layer > Layer Mask > Hide Selection.


Step 14
Add a New Layer at the top in the "BLACK GRAPHICS" folder, and draw a black circle as shown with the Elliptical Custom Shape Tool (using Fill Pixels). Next, open a splash image and use the Magic Wand Tool (with Contiguous Unchecked) to select, Copy > Paste above the circle later, and then Transform and Merge Down.


7. How to Add Lettering
Create your own lettering and Drag/Drop above the circle. Then add a PANTONE 238 heart on a New Layer using the Custom Shape Tool (set to Fill pixels). Now's the time to scrutinize your image and carry out any amendments: I added some small white circles on a new layer within the "WHITE GRAPHICS" folder. Once you're happy, Save but don't close it.


8. How to Create a T-Shirt Mockup
Step 1
Now we'll mock the finished design onto a T-shirt. I drew inspiration from this Go Media tutorial.
Download and open the wood image (no longer available), and then go to Image > Rotate Canvas > 90 Degrees CW. Next, create a new 300 dpi, RGB document 10 cm by 10 cm, and then Drag/Drop the wood as a New Layer, Transform and Merge Down.


Step 2
Download and open the T-shirt image (no longer available), and Crop it. Make a Selection and Copy > Paste as a new layer in your working document. Give it some depth by adding a Drop Shadow. I used the following settings: Blending Mode: Multiply, Opacity: 75, Angle: 50, Distance 6, and Size: 21.


Step 3
To alter the T-shirt color; click Create New Fill or Adjustment Layer and use the drop-down menu to select Color Fill, and then pick the same purple used in your CMYK illustration (63C, 76M, 38Y and 22K). Don't worry about this altering the color of the wood—we'll fix that later.


Step 4
Back in your CMYK illustration, access the History palette (Window > History) and use the pull-out menu to create a New Snapshot. Delete the purple background layer and target the "Girl lineart" layer.
Next, use the Magic Wand Tool (set to Contiguous) to select the white background (it's there, just not visible because the layer's Blending Mode is set to Multiply) and hit Delete. Finally, press Shift-Command-E to Merge Visible.


Step 5
Drag/Drop the resulting layer into your T-shirt document above the Color Fill, and label it "Illustration." Resize to fit the T-shirt—this is best done in stages, adding small amounts of Smart Blur each time to retain the sharpness. Now switch to your CMYK illustration and click on the Snapshot you created in the previous step to restore its saved state.


Step 6
To make the print look realistic, Duplicate the T-shirt layer and position it at the top of the layer stack, and label it "T-shirt multiply." Now set the Blending Mode to Multiply and drop the Opacity to 70%.


Step 7
Target the T-shirt multiply layer and Alt-click between the Illustration, Color fill and the original T-shirt layer icons to create a clipping group. This has now made the non-transparent areas of the uppermost layer serve as a Mask for the clipped layers. Because clipping groups use one mask, there is no edge interference from underlying layers.


Step 8
As a finishing touch, drop in the original illustration at full size above the "Wood" layer. Duplicate and position either edge of the canvas. Now set both layers' Blending Mode to Soft Light so as not to overpower the illustration.


Step 9
That's the T-shirt mockup complete. Remember it's also very quick to visualize how your design will look on different colored material by simply adding Color Fill Adjustment Layers and toggling their Visibility. Your screen printer will also be able to supply various material swatches, so it's just a case of matching them on-screen.


9. How to Set Up Your Art for Screen Printing
Step 1
In the final part of this tutorial you'll be creating the artwork for screen printing. Revisit your CMYK illustration and hit Shift-Command-S to Save As, giving it a memorable name such as "Spot_col_artwork."
The white ink will be printed first, followed by the pink and then the black. To optimize the pink ink, it's best to add white beneath it. Sometimes your printer will add a double pass of white ink, depending on the darkness of the material being printed.
The thing to bear in mind is that you need to build in a certain amount of trapping to these white areas. This means contracting (choking) or expanding (spreading) areas to compensate for any slight shift which may occur when the T-shirt is printed. The diagram bottom left shows what may happen with no trapping—as you can see, the T-shirt material is showing through. You'll learn more about this later.


Step 2
Disable the Visibility of all folders except for the "WHITE GRAPHICS" folder and the colored "Background" layer. With the "WHITE GRAPHICS" folder targeted, hit Command-E to Merge Group.


Step 3
Generate a Selection from the resulting layer and switch to the Channels palette. Use the fly-out menu to select New Spot Channel, label it "White", and then click the Color Swatch to access the Color Picker. Now set the CMYK values to 0 and click OK—the active selection will now appear as black on the new channel.
You'll notice that by toggling the visibility of the "CMYK" composite channel, the "White" channel appears either black or white, which is correct—all artwork on spot channels is represented in black, regardless of its actual printing color.


Step 4
Move the "Bullseyes" layer out of the "PINK GRAPHICS" folder so it sits beneath the "BLACK GRAPHICS" folder, and then Merge the "PINK GRAPHICS" folder. We now need to add this layer content to the "White" channel, but first we need to choke or shrink it. Most printers work in points, and I was given a trap value of half a point (0.5 pt), but different printers' trap requirements will vary, so it's vital to check beforehand.
Here's a little equation to convert points into pixels: There are 72 points to an inch, so to find out how many half points there are to the inch, divide 72 by 0.5, which equals 144. Now divide the document resolution, (which is 300) by 144, which makes a trap value of 2.
Generate a Selection from the merged pink layer and go to Select > Modify > Contract by 2 px. Now target the "White" channel and Fill the selection with black.


Step 5
Generate a Selection from the "Bullseyes" layer, Contract by 2 px, and then Fill the active selection with black on the "White" channel. Next, generate a Selection from the "Girl Alpha" channel and Fill with black on the "White" channel also.


Step 6
Make a Selection from the "Pink clothes" layer, Contract by 2 px, and then Inverse. Now pick a small, white Hard Brush and carefully paint out the outer shoe edges on the "White" channel.


Step 7
Generate a Selection from the "Lettering" layer and Expand by 2 px. Now fill this with black on the "White" channel. Do the same using an Expanded selection from the "Heart" layer. These areas are now spread, to run fractionally behind the black circle.


Step 8
Make a Selection from the merged "Pink graphics" layer, and then add another spot channel. Select PANTONE 238 as you did before and label it "PANTONE 238." The active selection will now appear as black on the new channel—you can check this by disabling the visibility of the "White" channel.


Step 9
Generate a Selection from the "Bullseyes" layer and Fill with white on the "PANTONE 238" channel.


Step 10
Zoom in and use the Magic Wand Tool (with Contiguous Unchecked) to select just the pink areas from the "Bullseyes" layer. You'll need to have the Visibility of the "Bullseyes" layer as well as the composite "CMYK" channel targeted to do this. Now Fill this selection with black on the "PANTONE 238" channel.


Step 11
Fill a Selection from the "Girl Alpha" channel with white on the "PANTONE 238" channel.


Step 12
Now Fill a Selection from the "Pink clothes" layer with black on the "PANTONE 238" channel.


Step 13
Generate a Selection from the "Heart" layer. This area needs spreading behind the black circle, so Expand by 2 px and Fill with black on the "PANTONE 238" channel.


Step 14
Merge the "BLACK GRAPHICS" folder and generate a Selection. Add another Spot Channel, label it "Black," and click the Color Swatch to access the Color Picker. Set the CMYK values to 70c, 70m, 100k. Using a CMYK setting for spot black ink will not affect the ink color—it's only an on-screen representation. As long as your channels are clearly labelled, that's all that matters.
The active selection should now be filled with black on the new channel. Next, Fill the "Black" channel with white using a selection from the "Bullseyes" layer.


Step 15
Now Fill the "Black" channel with white using a selection from the "Girl Alpha" channel. As the black ink overprints print last, there's no need to apply any trapping.


Step 16
Fill a Selection from the "Circle" layer with black on the "Black" channel. Now make a selection from the "Lettering" layer and fill with white. Repeat using a Selection from the "Heart" layer.


Step 17
Generate a Selection from the "Girl Alpha" channel, and then target the "Black" channel. Now use a white Hard Brush and paint within the selection to reveal her left leg.


Step 18
Now use the Magic Wand Tool (with Contiguous Unchecked) to make a Selection of the black areas on the "Girl lineart" layer. Now Fill with black on your "Black" channel.


Step 19
You can check the trapping by Enabling the Visibility of the three spot channels, and then Zooming in to 200%. Now generate Selections from your "White" and "PANTONE 238" channels in turn. The screengrab below shows a selection from the "White" channel—the white lettering and the base white (under the pink heart) have both been spread under the black.


Step 20
All you need to do now is Enable the "CMYK" composite channel and Delete all your layers apart from the background, which you can rename "T-shirt color." Finally, Save, ensuring that you check the Spot Color option. That's it—your PSD file is good to go.


Conclusion
I hope this tutorial has cleared up some common misconceptions a lot of designers have about using spot colors for screen printing, as well as how and when to apply trapping to your artwork. I would like to credit my daughter Chloe for drawing the doodles, as well as a big thanks to Steve at Advertees who always offers great technical support, and for casting his expert eye over my final artwork to ensure it was error-free!
If this has inspired you to make your own T-shirt designs, remember it's good practice to involve your printer at the initial design stage to see what's achievable. Have fun!
Why not see how your T-shirt design will look in real life by using a realistic T-shirt mockup? Download the best free T-shirt mockups here:


The final image is below. Or you can view the large version.
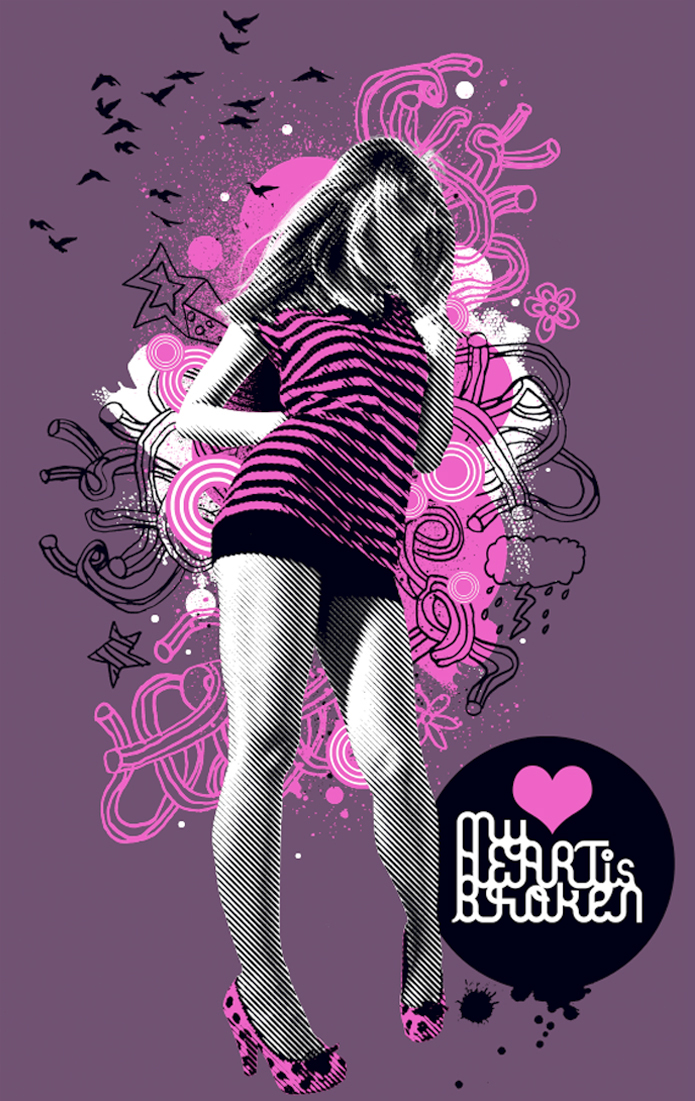


Halftone Effects From GraphicRiver
Want to create a cool halftone effect for your photo? Then download one of the amazing Halftone Photoshop Actions from GraphicRiver to jazz up your photos today. Check out one of our favorites below!
Halftone Photo Effect Photoshop Action
Create an awesome halftone effect in only a few seconds with this awesome Photoshop action. This action is fully editable and allows you to play with additional effects to add dots, lines, or swirls to your photo. Transform your photos with this super fun Photoshop action!


