

Introduction: DIY Cyclone Dust Collector


What i like about cyclone collector system is that you never lose suction, and 97% of dust/debris goes in the bucket so you don't have to clean the shopvac filter every time you empty the bucket. I designed mine with 2 clamps so it's fast and easy to empty the bucket. Also, i added a led light system so you can easily see when the bucket is full. I designed my cart vertically, it take less space in my small woodshop.
I tried to build this dust collector with materials i had on hand at the lowest possible cost. I had to buy the plastic cyclone dust collector, and with my low budget i opted for the china version. You can choose the original Oneida here : https://www.oneida-air.com/ or the china knockoff on Ebay/Ali ( I do not want to start the debate between the original version and the knockoff version, you choose the one you prefer. ? ).
Step 1: MATERIALS :


- - Plywood 5/8 ( i used leftovers )
- - Cyclone dust collector
- - 5 Gallon bucket ( 18.92L )
- - Piano hinge ( Hardware store )
- - 2 small toggle clamp ( Ebay or Ali )
- - 4 casters ( i choosed 2 fixed and 2 swivels )
- - Spray paint ( black and chrome spraypaint leftovers )
Central Vacuum System ( Hardware Store for theses parts ) :
- - 2" vacuum pipe
- - 2" 90° Sweep Elbow (2x)
- - 2" 90° Short Elbow (1x)
- - 2" pipe clamp (3x)
- - 2" Coupling
- - Joint Cement
- - 2" rubber coupling with clamps
Step 2: Sketch Up Model

I've made a "sketch up" model of my project. I'm a beginner with "sketchup" and i forgot to "group" my pieces but still you can explore and see all dimensions in 3d.
Attachments

Step 3: LET'S BUILD IT


Start by assembling all the wood parts. Before installing the middle shelf, i put the foam tube around the bucket, because when the toggle clamps will be in use, you will need to have a tight seal between the 5gal bucket and the top shelf for the system to work.
Step 4: Adding the Cyclone Adapter

Now you will need to make the hole for the cyclonic adapter. You can use an hole-saw or your jigsaw, no need to be perfect here the hole won't be visible.
Step 5: Assembling Vacuum Pipes


Now let's assemble and glue the pipes. Im using central vacuum pipes because of the low price. You can find theses part at your local hardware store.
Step 6: Let's Add Some Colors

I had some spray paint leftovers so i decided to add some colors to my dust collector.
Step 7: Install All Parts


Now let's screw the cyclonic adapter in place, add the toggle clamps and the casters.
Step 8: LED Light System


I'm adding a LED light system so it will be easy to see when the bucket is full of sawdust. These are automotive lights ,they are waterproof so dustproof.
Step 9: LED System Test


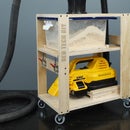
Step 10: Final Result.
Yay!! After so many hours, my cyclone dust collector cart is done! Im so happy with the result, and it works!!! You can see it in action here : DUST COLLECTOR IN ACTION. Dust collectors are so useful for workshops, also you save time because almost all the debris goes in the bucket, so you don't have to empty your shopvac so often.
The good thing is you never lose suction power, because your filter stay clean. The way i builded mine make emptying the bucket so easy. With the led system, you know exactly when you need to empty it.
Thanks for reading my instructable. If you like my project please give a like and share with your friend. Thanks for all your support it's always very appreciated.
Subscribe on : YouTube
Follow on : Instagram
Like on : Facebook


