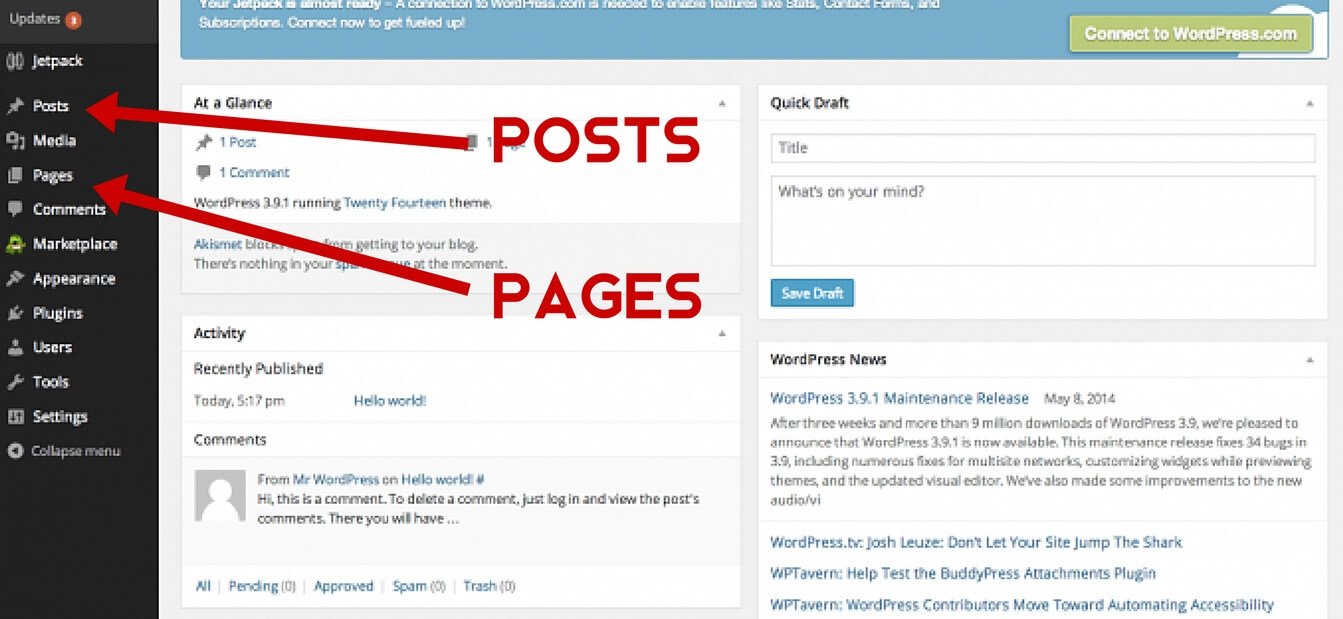
Believe it or not, I created the Money Peach Blog from my laptop at my kitchen table. I literally had no idea what I was doing, and my approach to initially getting started was the Ready, Fire, Aim approach.
It ended up working out pretty well, but there were a lot of bumps in the road and a lot of “oh crap, I shouldn’t have pushed that button….”
Since I went down the DIY road without a guide and have the scars to prove it, I can now show you exactly how to set up your own Blog or Website without the hiccups (ahem…. mistakes) when creating your own.
I don’t want you to make the same silly mistakes I did, therefore if you follow the exact steps that I share with you today, I promise you will be up and running in about 15 mins or less!
**Recommended: Click here to open in a new tab and follow along.
Contents For This Post (Click to Open)
Step 1: Set Up an Account with Bluehost
Bluehost is the server that will host your blog or website.
To make this easy to understand, think of a server as the foundation of your home. It’s the first thing that you must have before you do anything else.
Then, think of your website as the walls and the roof of your home. The website sits on top of the server, just like your home sits on top of the foundation.
Why Bluehost?
There are many other servers out there that work well and I recommend Bluehost because this is how I got started, and I like what I know.
My feeling is if I use it and love it, then this is the one I will recommend to my friends and family.
But here’s also why I love Bluehost:
-
- They’re available if you need help 24/7
- There are NO CONTRACTS and you can cancel at any time
- The Dashboard is extremely simple to understand and use
- They’ve been around forever
- Almost every blogger I know either uses Bluehost or started with Bluehost
*Note* There are other web hosting services out there that are free, but always remember you get what you pay for. Therefore, if you pay nothing…you pretty much get nothing.
If you want to bang your head against the wall and be consistently frustrated, use the free options out there. If you want to enjoy blogging, try out Bluehost.
Click here to open Bluehost in a new tab, and then follow me step-by-step through the entire process for creating your own blog/website with Bluehost. Let’s get started…
It’s simple, straightforward, and I promise you can do this!
Here we go…
Step 1: Select a Plan
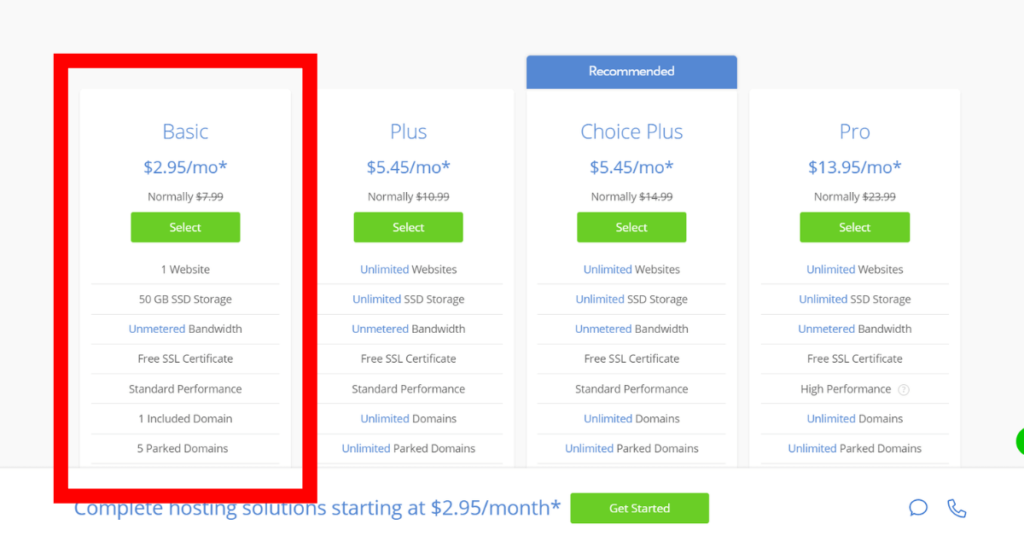
Since you’re just starting out your Blog, you can choose “Basic” and be completely fine.
Step 2: Your Domain Name
There are two different options depending on whether or not your already have your domain name purchased.
Option 1: You Currently Don’t Have a Registered Domain Name
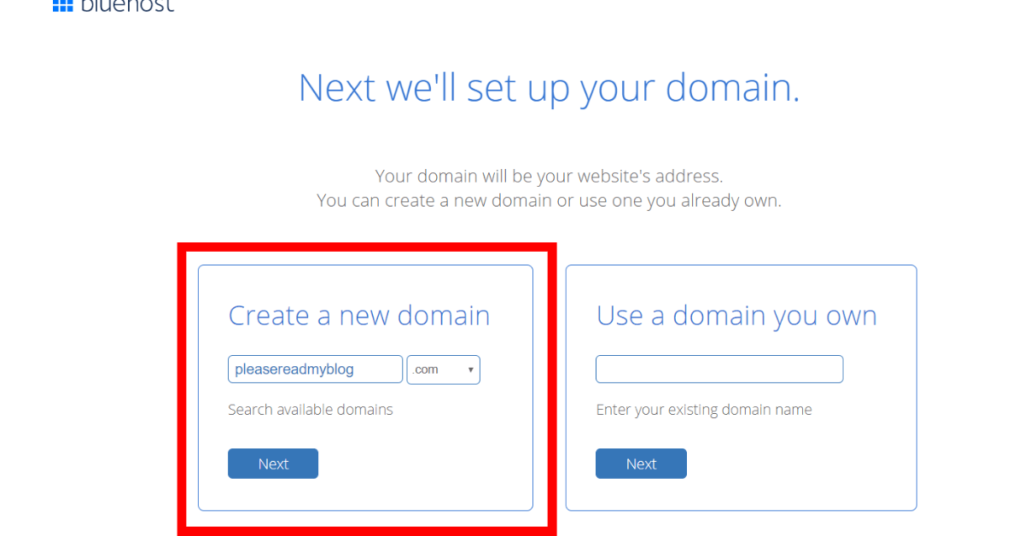
The first thing you need to do is to check the availability of the domain name you want through Bluehost.
I HIGHLY RECOMMEND you purchase a .COM domain. There are tons of other choices out there such as .net, .org, .co, .me, and .us to name a few, but people always remember .com.
You don’t want your future audience to miss out on you because they typed in yourblog.com instead of yourblog.net.
Option 2: You already purchased your domain from somewhere else
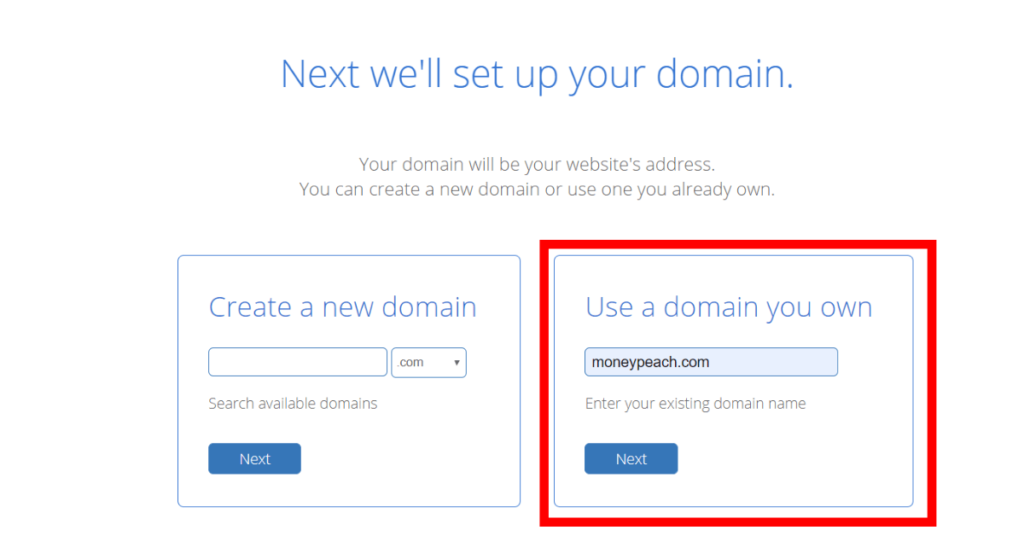
If you have already purchased your domain through sites such as GoDaddy.com, Hostgator.com, or Namecheap.com (there are a ton of places to purchase a domain), then you will need to transfer the domain name to Bluehost.
This is super simple and I don’t want you to get overwhelmed here.
First thing you need to do is to enter some information from the place where you purchased your domain (GoDaddy), so your current domain will be sent over to Bluehost.
This is called setting up your new nameservers.
Here is a link to show you exactly how to do this using GoDaddy, and it’s pretty much the exact same for anywhere else your current domain was purchased from: How to Set Up Name Servers
You will be asked to enter in your custom nameservers provided to you from Bluehost. I have them right here for you:Copy and Paste these into the option for Custom Nameservers
NS1.BLUEHOST.COM
NS2.BLUEHOST.COM
Note** It will take anywhere from 5 minutes to 8 hours for these changes to be reflected globally. However, you can immediately go into Bluehost and start the next steps below.
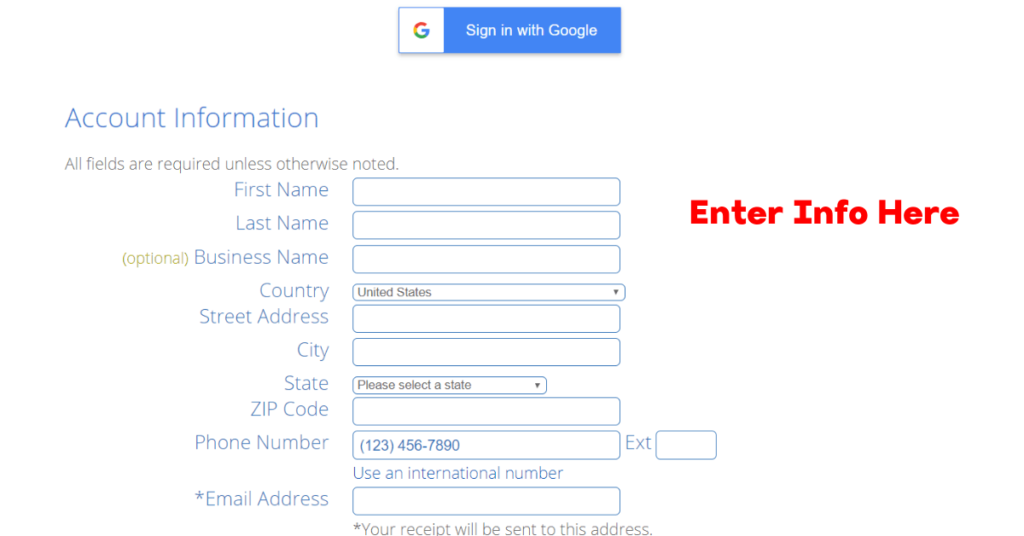
Enter Your Account Information
Step 3: Choosing the Best Package
Basically it is dirt cheap. Usually the cost is $7.99/month, but I have partnered up with Bluehost and they sent me a special link that takes that price down to $4.95/month!
This link was inside the button you clicked above and is also in the button right below:
Here is why I highly recommend 12 months at-a-time:
• Only $2.95/month for 36 months
• Goes to $3.95/month for 24 months
• Then $4.95/month for 12 months
• You can still get a refund at any time (no contracts)
• Full Refund within 30 days and prorated after that
• You get a free Domain Name with a 12 month or greater purchase
• You also have the option of month-to-month, but I will 100% tell you to stay away from this option.
Here is why I tell you to STAY AWAY from month-to-month billing:
• You will pay more than double over time
• If your card expires and you don’t catch it in time, a payment is missed and your website is shut down. All that work…gone
• You will not get a free .com domain
• You can still cancel your subscription anytime when purchasing in bulk and get a refund
What about all these Options?
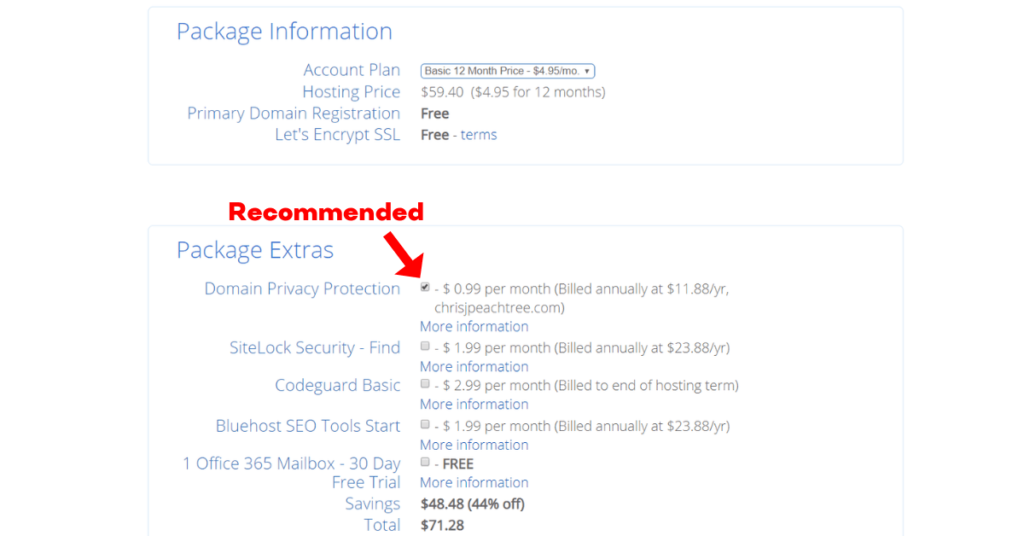
You really don’t need any of them, however there is one I would recommend: Domain Privacy Protection.
The owner of every Domain is available to anyone on the internet. This means marketers will solicit your information and basically annoy the hell out of you because it is easy for them. If you decide to add on the privacy protection, your personal contact information is gone and is replaced with Bluehost’s.
I didn’t do this at first and my inbox was always full of annoying marketers from all over the world begging for me to hire them as my tech person. It’s worth the $1 each month.
SiteLock Security Find: This is great for any online business. This demonstrates to your customers that you are a trustworthy vendor/business by verifying your credentials such as email, phone number, and address.
Codeguard Basic is simply an automatic backup of your site every single day. This is a great feature because it would be pretty horrible if something happened and you lost everything on your blog or website that you have put so much effort into. However, this does cost $2/month and I will share with you a way you can also do this 100% free. Read further down to Must Have Plugins.
Enter Your Payment Info

Welcome to Bluehost!
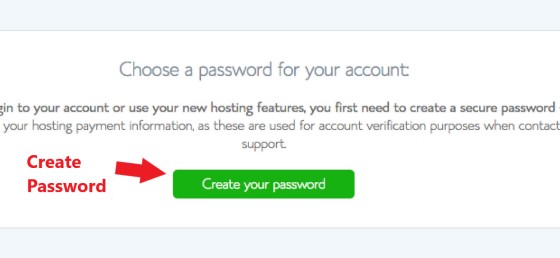
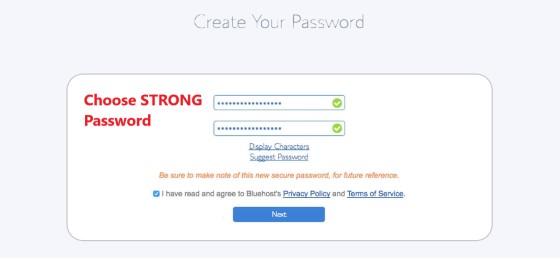
Create Your Password
Login into your Bluehost Account
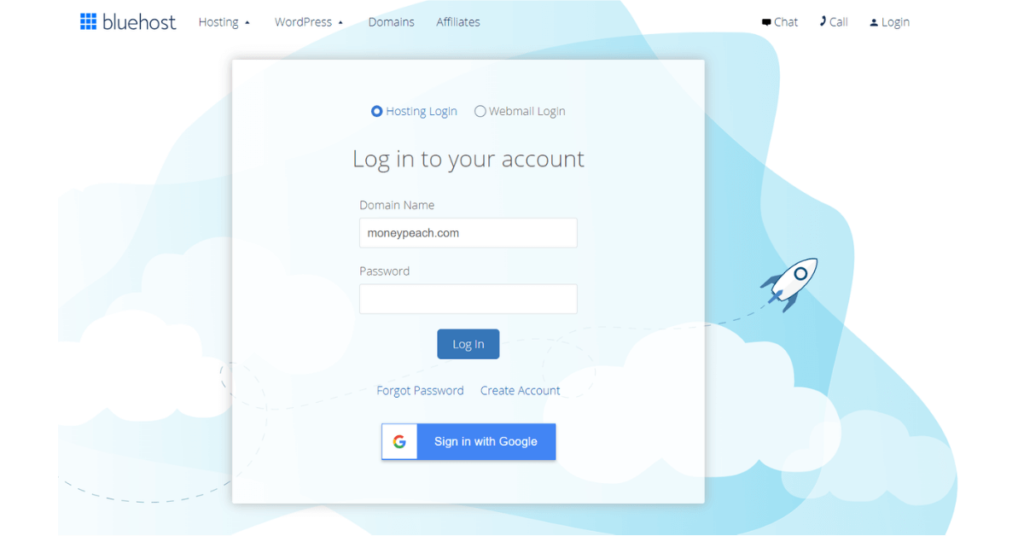
Note: When you get to this point, check your email with your Bluehost Login Credentials inside.
Step 4: Install WordPress
Now that you have a Bluehost account, it’s time to login to Bluehost using the login credentials they emailed you, and then setup your WordPress site. I use Wordpress and so do about 99% of all other bloggers. It has the most options and is the most user-friendly interface I have ever used. And…it’s fun!
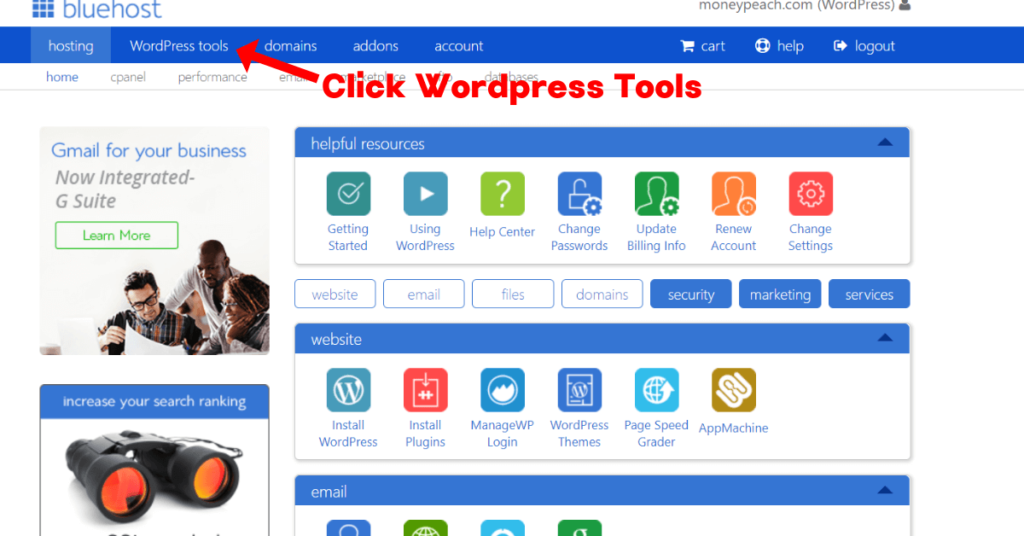
Click “Wordpress Tools” at the top of the screen.
WordPress Starts Here:
Remember above where I told you the server was the foundation of your home. Well, now you can think of WordPress as the house that sits on top of that foundation.
WordPress is how you write blog posts, add a picture, create an about page, add a video, and basically anything you do to your website or blog. It is the control center for your entire site.
Next, click on “Install” and the watch the magic start to happen!
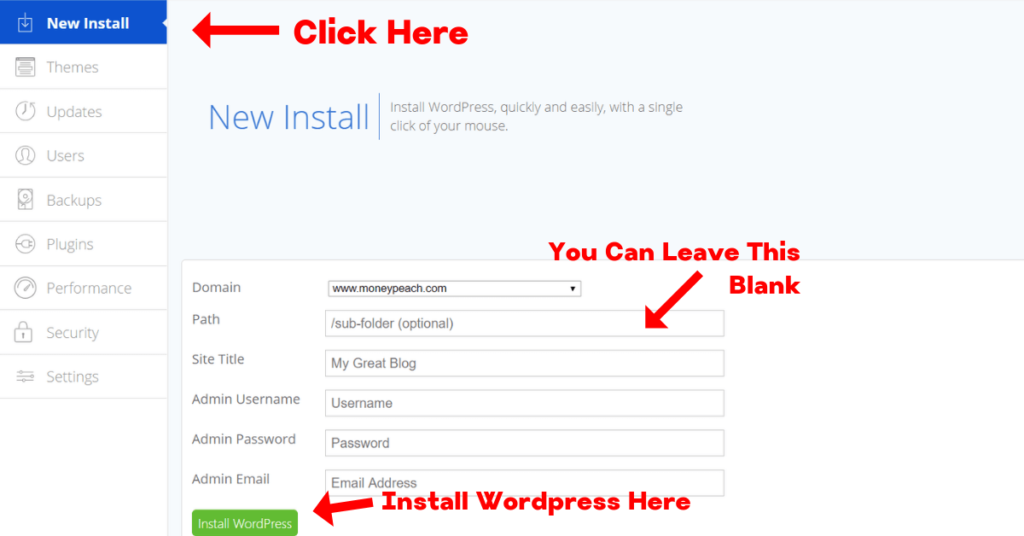
Note: I highly suggest to use something other than your email address for your Admin Username. This is to simply protect you from potential thieves out there who can find your email address and then are one step closer to logging into your website!
Next…


Step 5: Start Your Blog or Website
To login into your WordPress site, simply click on the link in your email you received once your install was completed.
This is the URL to login into your WordPress Site
yourdomain.com/wp-admin
example: moneypeach.com/wp-admin
Login into Your Website/Blog
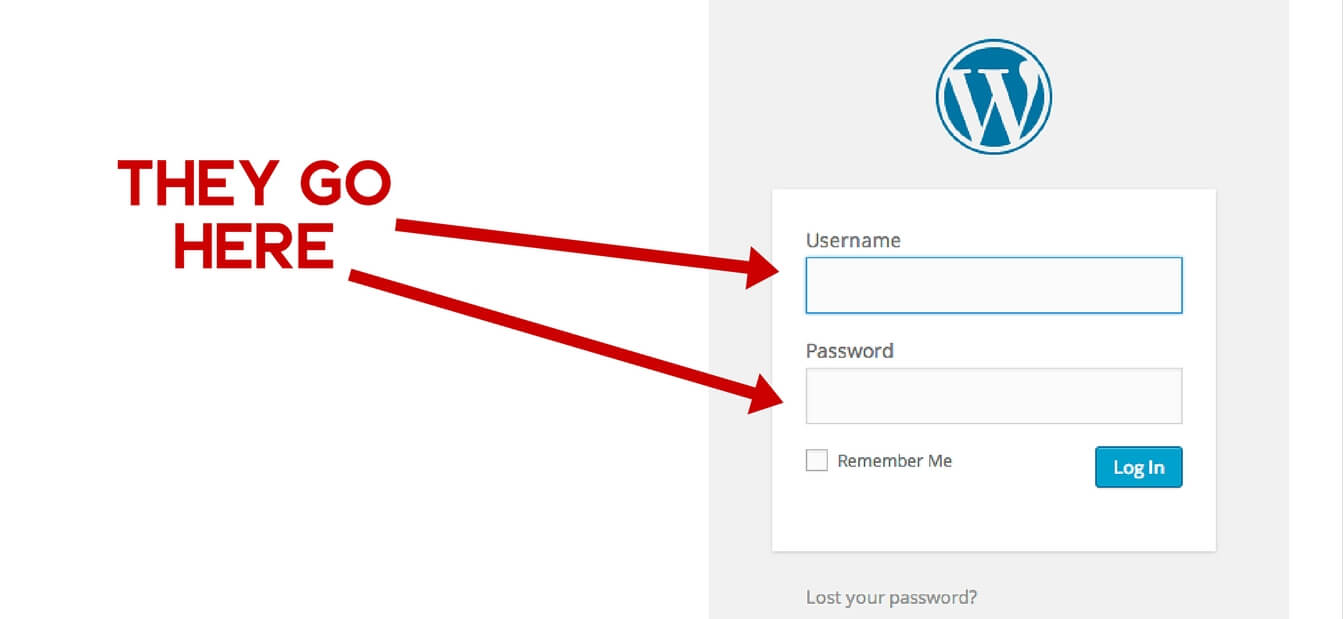
Note: Bluehost will give you a great password that is very tough to remember. I would keep this password and WOULD NOT change your password to something easier to remember. I have over 200 failed login attempts from places all over the world trying to hack into my Dashboard.
Also, your username defaults to your email address by Bluehost and I also suggest you change this prior to installing WordPress to increase security. Once you choose your username, it can never be changed.
Once inside your Dashboard, you can start to customize your blog. However, before go any further, let me talk to you about Plugins.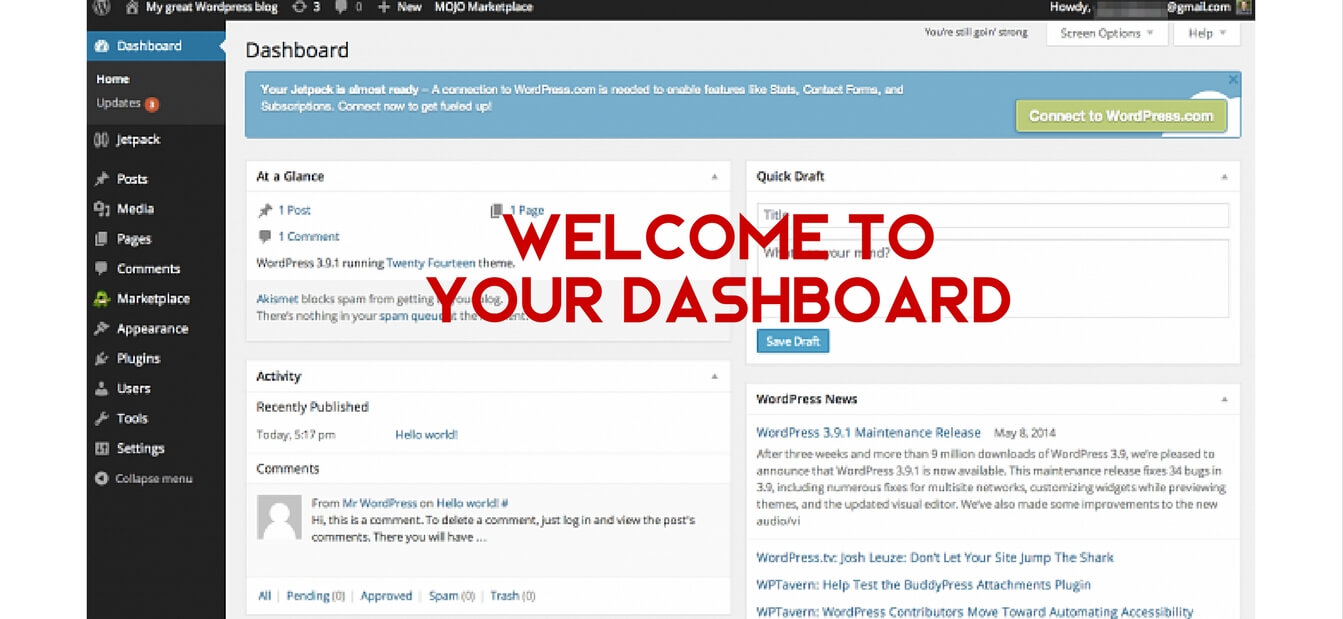
The Other Blogging Stuff
If Bluehost is the foundation and WordPress is the house that sits on the foundation, then think of Plugins as the options you can have to customize your house. The tile, the window coverings, the paint, and all the other options you can think of for your home are essentially the plugins for a website or blog.
There are free plugins and paid for plugins. I currently have both, but since you’re starting off, I recommend you start off with the free ones first.
The MUST-HAVE FREE Plugins to Start
- W3 Total Cache – Caching is a weird word but it essentially makes your site speed much faster for a better user experience
- UpDraft Plus (Backup & Restore) – This plugin will automatically backup your website to Dropbox, Google Drive, Amazon S3, etc. A great safety net if something were to ever happen to your website.
- Wordfence Security – This is a free security plugin to increase security to your blog. Believe it or not, you will have creepers from all over the world trying to break into your account. This plugin has great security features that will stop them from getting in.
- Shareaholic – Have you ever seen the Facebook, Twitter, Pinterest, LinkedIn, etc. buttons on an article you have read on the Internet? Well, this plugin will add those to every post or page you want, and allows your readers to start sharing your content out to the world for you!
- Page Builder – This plugin allows you to do easy drag and drop to build out your page or post for your blog. If you’re not using this, good luck trying to make your blog post look just the way you want it.
- Akismet – You will have those same creepers from all over the world trying to post a comment on your blog to market and annoy the hell out of your readers. This is basically an anti-spam plugin.
- Yoast SEO – This plugin is a great tool for Search Engine Optimization, however I think it is even more useful for helping your with your images. Have you ever shared something on Facebook and automatically had a nice picture, heading, and description pop up on your post? Well, this plugin will allow that to happen.
- Contact Form 7 – Someone is going to want to get a hold of you and you probably don’t want your email address out there for the world to see. This form can go anywhere on your site and will allow someone to get in contact with you. It’s the same form I use here: https://www.moneypeach.com/contact
Your Blog’s Theme
WordPress comes with a bunch of free themes, but you do get what you pay for.
When I first started, I didn’t know any better and I would spend hours upon hours trying to make sure a picture would be on the left side of the page, the title would look a certain way, and the menu would match the design of my site.
Then a friend of mine suggested the drag-n-drop theme by Enfold. This is the only theme I use and the only theme I will ever recommend. It’s extremely simple to use and there is a support team on standby to answer any questions you may have. Unless you’re a whiz-kid behind the laptop, make your life easier with a theme that’s simple. Get Enfold Theme
Post vs Page
Think of a post as a blog post or an article you publish on your site, and think of a page as an About Page, a Contact Page, or a Resources Page.
A post will usually look like this:
https://www.moneypeach.com/how-to-create-a-blog-with-bluehost
A page will have a link similar to this:
https://www.moneypeach.com/about
The Homepage
WordPress automatically makes your homepage a blog roll, which is absolutely awesome.
This is what you want when you’re getting started. A blog roll (not to be confused with a Spicy Tuna Sushi roll) is simply a list of all of the blog posts you have written starting from newest to oldest.
I started with a blog roll as my homepage for the first year I had my blog.
Why?
Because I needed content before I could build out my homepage to point, right?
The Money Peach Blog Roll
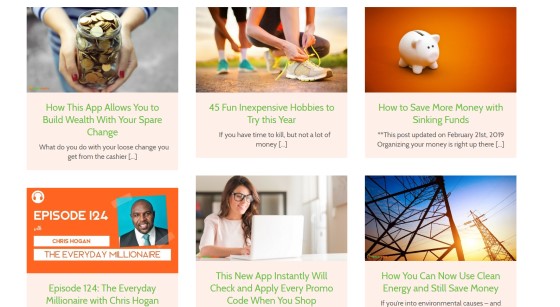
https://www.moneypeach.com/blog
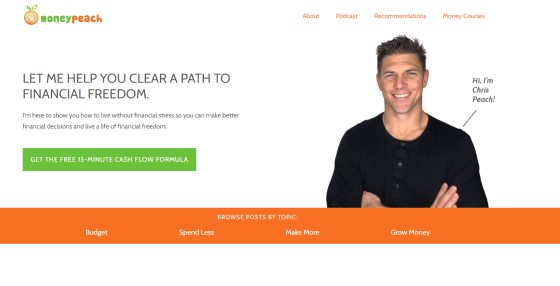
After I had enough content built out, I started to break everything into categories and then transitioned to a static Homepage like you see below:
Money Peach Home Page
The Images
Pictures are literally worth 1,000 words, so make sure your pictures are awesome! You can use these free tools below to create amazing pictures for your own blog:
Note: Be very careful using images you find on the internet. Many of these are owned by someone else and you would technically be stealing from them if the images were copyrighted. Canva has over 1 million pics to search and they are all $1 each. Another great place to safely download amazing images is from Depositphotos.com
A blog post should always have a featured image. I recommend using the same size every single time so your blog looks cleaner. The image size I use for my featured image is: 560 x 315px.
- Facebook and Google+ Images: The pixel size should be 1200 x 628px.
- Twitter Images: The pixel size should be 1024 x 512px. You can actually take your Facebook image and do a little resizing in any program like Paint Windows or Paintbrush for Mac. Easy peasy.
- Pinterest Images: The pixel size should be 735 x 1102px. Yes, Pinterest had to go out and be different.
- Instagram Images: The pixel size should be 1080 x 1080px or 800 x 800px. If you’re smart, you will make sure your Facebook Image can be cropped for an awesome Instagram image. You can use Paint or Paintbrush to do this as well.
*Note: Canva has all of these image sizes as templates to choose from for free and the pixel sizes are also inside the Yoast SEO Plugin.
Please Have an About Page!
Every single time I go to a website or blog that I like, I head directly over to their About Page. Why? Because I want to know a little about this awesome person behind this incredible blog post I just read!
Need an idea for an About Page? Here is mine.
https://www.moneypeach.com/about
Note: You will see it at the very top anywhere you go on Money Peach.
Your Contact Page
What’s the most frustrating thing in the world? Having to search forever and day to find a way to contact someone! This is such an easy step too. Simply add a new page in WordPress, label it “Contact”, and copy and paste the code anywhere in the post from the plugin Contact Form 7 I told you about above.
This is how simple my Contact Page is:
https://www.moneypeach.com/contact
Last, But Not Least
You can have a beautiful website, the best artwork and images, and all those nifty plugins I mentioned above, however it all boils down to one thing: CONTENT.
People want to read, listen, watch, and absorb content that is not just good, but is awesome! I have seen some ah-mazing websites and as soon as I start reading through a blog post….I…..get……distracted…..because….oh look a squirrel!
The point is this: focus on why you wanted to start a blog in the first place. Your content is why your blog visitors will become fans, and why your fans will become customers. Don’t stress too much about the colors, the theme, or any of the “lipstick” of your blog.
When you deliver content that is awesome, your blog will be read, shared, and you will be providing real value. Don’t get lost in the technology portion because you really don’t need to worry about it. I have you covered inside this post
Final Thoughts
Money Peach started off as a great little side hustle and has turned into my full-time business. When I first started my blog, I started with Bluehost and I still use them for some of my smaller sites.
However, as I grew the brand and started seeing a lot more traffic, I did move onto something much more expensive that could handle the traffic to the site. With that said, I still love and recommend Bluehost to anyone who is just starting off with a blog or website. You can always upgrade later!

8 Comments
Thanks, Chris.
Most of this is very straightforward, thanks.
I had a bit of a hiccup with the WordPress admin username and password but seem to have got over that now.
It’s taken me some time but at last I have an about page and a single post which I cannot edit and has repeated the content within it. Frustrated or what?!
Success! (I think)
I have an about page and a post. Phew!
Thanks
A little bit of progress everyday and you’re on your way to a lot of success. Stay consistent and great job Penelope!
Well you have inspired me to start my own blog! I am taking the “risk” of doing a lifestyle blog and doing a bit of everything. I definitely related to your comment at the beginning of not knowing what you were doing! I think it looks good so far! I guess I will find out soon enough!
Check out my progress!
https://www.bizzybeelife.com/
Hi Britt!
I love your progress so far! Great job. I think readers would love to see a picture of you on your About page. This page will probably be one of your most viewed pages, so a picture would be awesome! Also, I recommend using the Contact Form 7 Plugin for your Contact Page. This way people can get into contact with you directly from that page.
Great job so far – I am beyond impressed!
Thank you!! I realized I had my contact page set up wrong, I did not realize I needed to copy and paste the code, still learning! And I agree I need to personalize it more! I do have a question for you though, how do you go about getting the advertisements that you essentially make money off of if you don’t mind me asking?
Thanks!
Britt
This is all great until the hosting company charges you UP FRONT for the money. Dude, I’m working with minimal funds.
Hi Suzi,
The best way to save money is to save up and pay in full. If you are working with limited funds, then I would recommend saving up and getting started when you have the money. The other option is to go with the monthly payment, but you would be actually paying more than if you paid up front. Don’t forget, they still have a money-back guarantee either way. Good luck Suzi! 🙂