

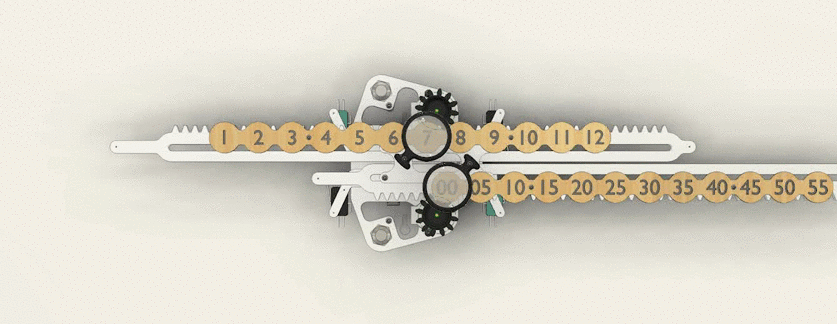
Introduction: Linear Clock (MVMT 113)


No matter what Deepak Chopra tells you, time is linear. Hopefully this clock is a little closer to reality than the circular ones we're all used to. The five minute intervals feel less neurotic than being precise down to the minute, and each number is magnified, reminding you to focus on the present.
I made this using just about every machine at Pier 9 (waterjet, sand blaster, laser cutter, 3D printer, electronics lab, etc.). It's made of 6061 aluminum, steel hardware (screws, nuts, bearings), 3D printed gears, an Arduino Uno, and the hour and minute panels are laser cut / etched plywood.
Of course I know this project isn't accessible to almost everyone who doesn't have the insanely good fortune of having access to a shop like this, but hopefully you'll find it inspiring.
Fusion 360 is free for students and hobbyists, and there's a ton of educational support on it. If you want to learn to 3D model the kind of work I do, I think this is the best choice on the market. Click the links below to sign up:
I also led a series of webinar classes related to 3D modeling projects with moving parts. In these webinars, you will learn Fusion 360 features like advanced mechanical assemblies (meaning two or more joints interacting) and rendering. The last webinar focused on modeling this clock design in Fusion 360. You can watch the entire video here:
If you're interested, check out the other two webinars in this series where you will learn to design a Giant Knob Lamp and a Perpetual Clock with Arduino.
Step 1: 507 Mechanical Movements
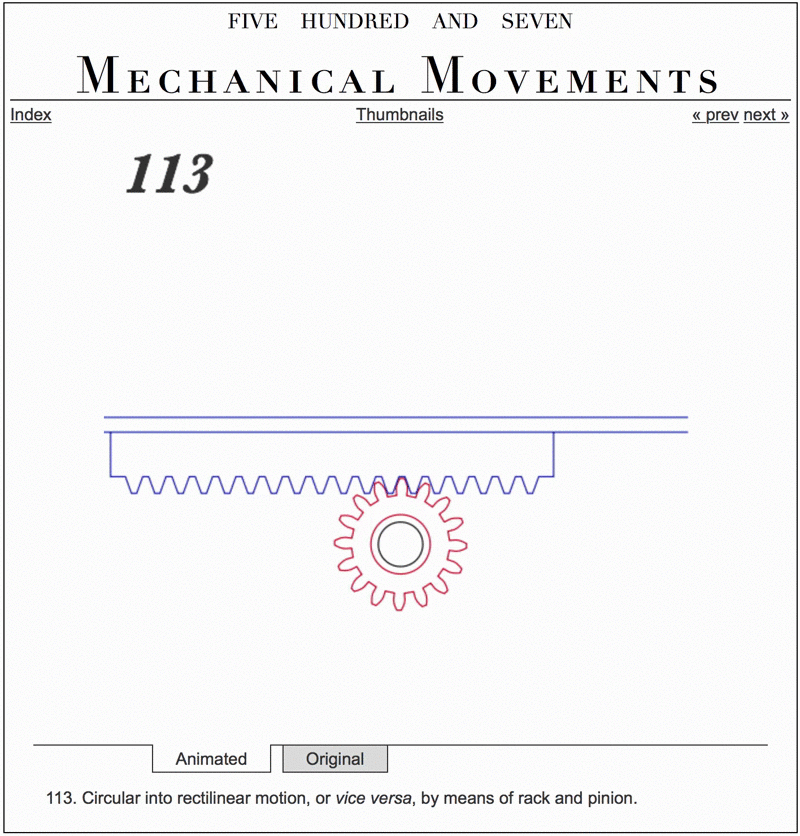
507 Mechanical Movements is an encyclopedia of common mechanisms from the 1860's that serves as a good reference for this kind of thing. This mechanism is bases on Movement 113, "Rack and Pinion".This is going to be a long project, so if you've got a specific mechanism you'd like me to make, feel free to make a request in the comments!
Step 2: Design & 3D Model

The video above is a recording of a webinar I did for the rack and pinion design part of the project.
The hardest part of the design to figure out was the rack and pinion gear assembly. The math for gear design can get pretty complicated (in fact, there are engineers who basically only design gear assemblies for this very reason), but based on a great Youtube tutorial by Rob Duarte, I made my own template that works with the latest version of the Spur Gear add-in for Fusion.
The video above walks you through the process of making the rack and pinion assembly, but if you want a more thorough tutorial, please join me for the Design Now Hour Of Making in Motion webinar on April 5. If you miss the webinar, it'll be recorded and I'll post the video here.

The template (link below) has all of the parameters shown above already entered. I won't get into the math here, but if you follow the instructions, it should work for you.

Use the Spur Gear add-in by going to ADD-INS > Scripts and Add-Ins... > Spur Gear > Run. When you get the window shown above, enter the parameters. Number of Teeth won't let you use a parameter for the value, so just make sure it matches the teethNum value if you change it. You also have to multiply the named parameters by 1 as shown above.
Keep in mind that once the gear is made, you can edit it just like any other object in Fusion.

As shown in the video demo, this is an example of how you'd construct a tooth profile using the parameters.
Here are the links to the template you can use to make your own rack and pinion in Fusion:
Template with parameters:http://a360.co/2oeT5El
After the rack and pinion gear was figured out, I spent a lot of time modeling motors, switches, and other electronic parts, then figuring out all the details. With the motion link described above, I was able to get a good picture of how it would look in motion.
You can access the file through the link below, and play around with it or even try to make your own version out of the file. There was quite a bit of tinkering and alteration after the parts were made, so don't expect to be able to just laser cut all the parts and have a finished product. This project was expensive and took a lot of time! If you're really serious about making it and need some help, just comment below and I'll do my best to get you going.
Finished Clock Design: http://a360.co/2nk51nw
If you aren't already a Fusion 360 user, sign up for my free 3D Printing Class. It's a crash course in Fusion for making, and Lesson 2 has all the info you need to get Fusion for free.
Step 3: UPDATE 12/1/2020

After making the first prototype I started over with some improvements to the design. One of my colleagues from the Electronics team designed a custom circuit to drive the motors, and there are magnetic sensors that help detect position (indexed from magnets press-fit into the rails).
All of the components in the model have part numbers, most are from McMaster Carr or DigiKey. This is a much better design because it avoids the racking issue from the weight of the rail when fully extended, and because the magnet sensor indexing ensures the proper position every time the motors move.
Complete Fusion 360 Assembly: https://a360.co/36ql7oK
Step 4: Hardware
- Panels: 6mm thick 6061 aluminum (presumably plywood would work too)
- Number panel: 3mm plywood
- Arduino Uno: https://www.arduino.cc/en/Main/ArduinoBoardUno
- Adafruit Motor Shield: https://www.adafruit.com/products/1438
- 5V Stepper Motors: https://www.adafruit.com/products/858 ( I would recommend using 12V motors instead of these )
- Limit switches (4): https://www.adafruit.com/products/818
- Momentary switches (2): https://www.adafruit.com/products/558
Step 5: Electronics & Programming


The electronics are all done with an Arduino Uno and an Adafruit Motor Shield.
Here's the basic idea of how I want it to work:
- When the unit is turned on, the steppers run the racks back until the limit switches on the left side are triggered. This sets the position to zero. The steppers then run the racks forward until 1 is centered on the hour panel and 00 is centered on the minute panel.
- Once the hour and minute is centered, the racks move forward in time. A full position move on the bottom at full speed every 5 minutes, and a full position move on the top every hour.
- The momentary switches (pins 6-7) to move the racks forward by one position (about 147 steps), then continue with the clock counting.
- The hour and minute movements have counters that send the bars back to the left limit switches and reset them to zero once hour has gone past 12, and the minutes have gone past 55.
I'm still not clear on what exactly I need to do with the code. I've got it working in theory with the code below that got from Randofo. This code moves the minute bar forward one step every 200 ms (I think) once one of the limit switches is triggered. It works, but I'm pretty quickly out of my depth past the basic work I've done here. This seems like a pretty easy problem for a savvy Arduino user, but I only do a project with one maybe once a year, and every time I do, I've basically forgotten everything I learned in the last project.
<p>/*************************************************************</p>
Motor Shield Stepper Demo
by Randy Sarafan
For more information see:
<a href="https://www.instructables.com/id/Arduino-Motor-Shield-Tutorial/">
https://www.instructables.com/id/Arduino-Motor-Shi...</a>
*************************************************************/
#include <wire.h>
#include <adafruit_motorshield.h>
#include "utility/Adafruit_MS_PWMServoDriver.h"</adafruit_motorshield.h></wire.h>
// Create the motor shield object with the default I2C address
Adafruit_MotorShield AFMS = Adafruit_MotorShield();
// Or, create it with a different I2C address (say for stacking)
// Adafruit_MotorShield AFMS = Adafruit_MotorShield(0x61);
// Connect a stepper motor with 200 steps per revolution (1.8 degree)
// to motor port #2 (M3 and M4)
Adafruit_StepperMotor *myMotor1 = AFMS.getStepper(300, 1);
Adafruit_StepperMotor *myMotor2 = AFMS.getStepper(300, 2);
int delaylegnth = 7;
void setup() {
    //start serial connection
  Serial.begin(9600);
  //configure pin2 as an input and enable the internal pull-up resistor
  pinMode(2, INPUT_PULLUP);
// Serial.begin(9600); // set up Serial library at 9600 bps
Serial.println("Stepper test!");AFMS.begin(); // create with the default frequency 1.6KHz //AFMS.begin(1000); // OR with a different frequency, say 1KHz myMotor1->setSpeed(100); // 10 rpm }
void loop(){

 //read the pushbutton value into a variable
  int sensorVal = digitalRead(2);
  sensorVal == LOW;
  int delayL = 200;

  if (sensorVal == LOW) {

  Serial.println("Minutes ++");
  //myMotor1->step(1640, BACKWARD, DOUBLE);
  for (int i=0; i <= 10; i++){
      myMotor1->step(147, BACKWARD, DOUBLE);
      //analogWrite(PWMpin, i);
      delay(delayL);
   }

  Serial.println("Hours ++");
  myMotor1->step(1615, FORWARD, DOUBLE);
//myMotor2->step(1600, BACKWARD, DOUBLE);
myMotor2->step(220, FORWARD, DOUBLE);
//delay(delayL);
}
else { //Serial.println("Double coil steps");
myMotor1->step(0, FORWARD, DOUBLE);
myMotor1->step(0, BACKWARD, DOUBLE);
}
}Step 6: Assemble the Base

The base is made of two plates with spacers holding them together. The screws fasten to the plate through tapped holes. Part number 6 on this drawing is another 3D printed part- a spacer that's also a cradle for the power terminal for the stepper motors.
Step 7: Add Momentary Switches

The momentary switches, Arduino, and limit switches all fasten to the front plate, so accessing the electronics to make changes is easy- just take the back plate off and you can reach everything.
Step 8: Add Mounting Plate and Limit Switches

The mounting plate holds the limit switches and the bearing assembly for the racks. This part can also stay together when editing the electronics.
Step 9: Add Stepper Motors & Gears

The stepper motors fasten to the panel with M4 screws through threaded holes, and the 3D printed gears are press-fit onto the motor posts. I used a trigger clamp to get them snug and flush.
Step 10: Add Racks

The racks have slots cut into them that bear on the two ball bearings. There's a small gap (.1mm) between the bearings and the slots, which allows the rack to move freely.
The bearings are sandwiched between custom 3D printed spacers to get the exact fit I needed. There's a rack plate on the front that acts as a washer holding the racks in place.
Step 11: Add Hour and Minute Bars

The hour and minute bars fasten to the racks with 12mm spacers creating a gap that allows clearance between the bars and the racks.
Step 12: Add Magnifiers


The magnifiers are cheap pocket magnifying glasses I found on amazon. They're offset from the front of the bars with 25mm spacers.
Step 13: Lessons Learned

I learned a lot about linear motion with this project. The tolerance I used between the bearings and slots on the racks was a bit too much, so if I were to make it again I think I would probably cut it in half. The gap on the sides of the gaps was also a bit too big.
The motors work, but the longer the cantilever gets, the more they have to work. I'd probably go with 12V steppers instead of 5V ones.
The backlash also should have been greater, maybe 0.25mm. The gears were bearing down on the racks too tightly with the first gears I tried.


