

Introduction: Decorative LED Lamp Sound Reactive (Arduino)


Good day, it is my first instructable, and I am not English man ;) please forgive me if I make errors.
The subject I wanted to talk about is a LED lamp than can also be sound reactive.
The story starts with my wife who own this lamp from Ikea since long and I always think, when looking at it, that it could be a good subject to transform it with LED strip.
Then reading some instructables I saw that topic which gave me good inspiration, thanks to Natural Nerd
https://www.instructables.com/id/Music-Reactive-De...
Looking for info to know how it works I also find good animation in
https://learn.sparkfun.com/tutorials/addressable-r...
Thanks also to Michael Bartlett
Let's then start to tune that Ikea lamp, it will be a standard lamp (white) with a potar to be able to adjust brightness, and then it will switch to music reactive lamp with 8 differents animations.
The video does not show well the potar effect, it is nicer in real.
Sorry if I miss some details but I didn't plan to write an instructable before making it.
Edit: I added a new video but my camera (cell phone) is saturated with the light, sorry for that), we can see the start up effect, and the white lamp with brightness setting, and then several music effect
Step 1: Part List
Here the list
- of course the lamp itself
- an arduino NANO (like this one)
- Nano shield (not mandatory but very partical)
- Sound module (be carefull DO NOT TAKE KY-037 or KY-038 with are NOT sensible at all)
- 3m LED strip RGBW (a RGB could be enough but I wanted to play with RGBW) I took warm white, it is ADDRESSABLE strip, each LED can be commanded individually, it is NOT standard RGB strip
- 1 potar (5 potar here)
- Power 5v 20Ah (10or 15 could be enough but I prefered to be large)
- 2 capacitor switch (standard switch could be good too)
- cable
- foot switch
- R/C cable (easy to connect to 3 pin sensor)
Step 2: Prepare the Lamp


The lamp is in kit and must be assemble. As we will not use the lamp and the plastic that locks all tubes together, and as it is quiet not very rigid on the origine I decided to add bolt, so make a hole and secure each tube together. Be careful, one is shorter and is the start from the bottom.
Sorry I didn't get enough picture when I did it.
The lamp is 1m38 tall, I used 2 piece of led strip, that I put on 2 side of the tube.
Be carefull, the strip must be in the right sens, because the cable must be at the bottom, there is an input and an output on such LED strip, the input should be at the bottom. Each LED strip is 77 LED long for me, but will see later that it is too much for arduino NANO.
I try to hot glue the strip to the tube, but when I ordered I took the silicone water proof version, and the hot glue didn't glue it :(
So I used tie-raps instead. Think to attach cable at same time.
Step 3: The Capacitive Switches and the Potar


The 2 capacitives switches are inside the lamp and react relatively well through the plastic of the lamp.
You can put it where you want, I attached them with just a piece of adhesive, at the middle of the lamp's tall.
The top's one is for switching from White to animation.
The bottom"s one is for changing animation's style. There is 8 animations, 7 are music reactive, and the last one is just infinite moving.
For the potar, at the begining, I wanted to use a sliding potar but I didnt know where to put it easily, so finaly I made a hole on the top and put a rotating one.
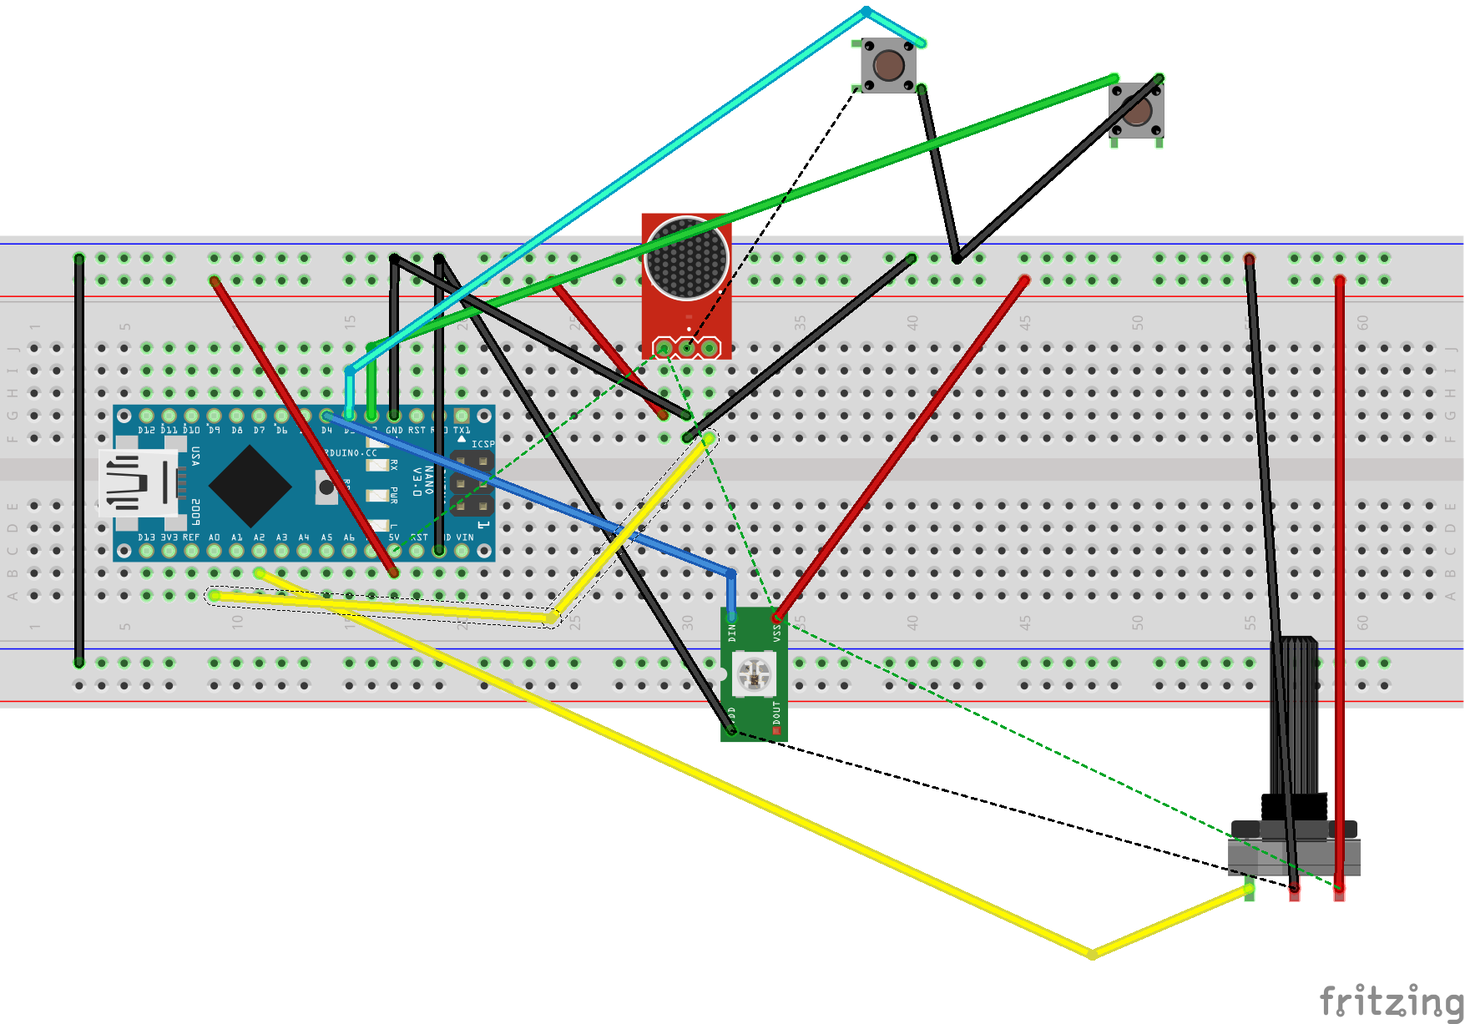
Step 4: Schematic and Programming
Connect everything together
And upload the code
It is just using the Adafruit_NeoPixel library, be sure to have installed it.
In the code you have:
#define NUM_LEDS 74
Even if I used a 77 length led strip, the nano was out of memory and nothing happen until I went down to 74 LED only. May be using a Mega would be better
#define MIC_LOW 0.0
#define MIC_HIGH 737.0
Please check the min / max value you get with your sensor.
When you declare your LED strip, for me it was NEO_RGBW and 800 khz, check the specs of yours.
Adafruit_NeoPixel strip = Adafruit_NeoPixel(NUM_LEDS, LED_PIN, NEO_RGBW + NEO_KHZ800);
When the lamp starts it goes through a rolls up white, red, green and blue, you can remove the starting part if you don't want such start.
Attachments

Step 5: Next Version?
My wife was a little worried when I made surgery on her Lamp, but now she is really loving it.
When you put cable inside, be careful to attach them to avoid inesthetic shadows.
The power box is quite big, and make a shadow at the bottom, beginning the LED strip higher could reduce shadows.
The Button are seen when light is on, it is not esthetic, think to put it on the side of the wall (if lamp is near a wall) and same side as power. but it is good to see where they are, I din't want to make any mark on the lamp.
In last version, when you click on effect button, blue led flashes to indicates you touch the button, and which animation is active but it can be enhanced.
The micro could be more sensible, and I wonder to put 2 micro to have better sensitivity.
More effect could be created, but need to go for a Mega I guess as the memory available on Nano is closed to zero.
A rotary encoder to change effect could also be an alternative. But I like capacitive switch for the time being :)
I attached an USB cable to the top of the lamp to be able to easily program it.
I will add a general switch on the power cord, when I receive it.
Note that If tomorrow you are tired with it, you can get rid of the led and put back the initial lamp, but I really don't imagine why....
Adding remote control is also in the idea list.

Participated in the
LED Contest 2017


