Managing State in Angular 2 Apps with ngrx/store was peer reviewed by Sebastian Seitz, Mark Brown and Vildan Softic. Thanks to all of SitePoint’s peer reviewers for making SitePoint content the best it can be!

The components we build for our web applications often contain state. Connecting components can lead to sharing mutable state: this is difficult to manage and leads to inconsistency. What if we have one place where we mutate the state and let messages do the rest? ngrx/store is an implementation of Redux for Angular, using RxJS, that brings this powerful pattern into the Angular world.
In this article, I will introduce the problem of shared mutable state and show how you can solve this using the ngrx/store library to bring the one-way data flow architecture to your Angular 2 apps. Along the way, we’ll build an example app that allows a user to search for videos using the YouTube API.
Note: You can find the code that accompanies this article in this GitHub repo.
The Problem With Concurrency
Building components which communicate with each other is a typical task involving state. We frequently have to keep up to date with different Angular components interacting with the same state: when more than one component accesses and modifies that state we call it shared mutable state.
To understand why shared mutable state represents a problem, think about a computer which is being used by two different users. One day, the first user updates the operating system to the latest version. The second user turns on the computer one day later and is puzzled since the user interface has changed for no apparent reason. This happened because two users could modify the same object (the computer in this case) without speaking to each other.
Shared Mutable State in Practice
A common example of shared state is the set of properties of an action we are performing. If we are performing a database search, we call that set of feature the current search. From now on, I’ll refer to such a set as the search object.
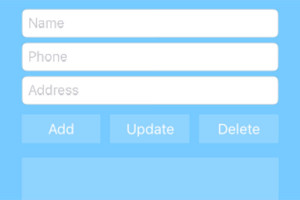
Imagine a page which allows you to search for something by name, and also offers the possibility to restrict the search by geographical location. This page will have at least two different components that can modify the current search properties. Most likely, there would be a service responsible for performing the actual search.
The rules would be:
- if the name field is empty, clear the search results
- if only a name is defined, perform the search by name
- if both name and location are defined, perform the search by name and location
- in order to search by location, both coordinates (lat/long) and a radius must be provided
The Available Approaches
A way to deal with the problem of shared mutable state could be to forward the search object back and forth between components and the service, allowing each to modify it.
This would entail more verbose and complex testing, which is very time-consuming and prone to error: for each test you would need to mock the object, changing just some properties in order to test just specific behaviors. All these tests and mocks also need to be maintained.
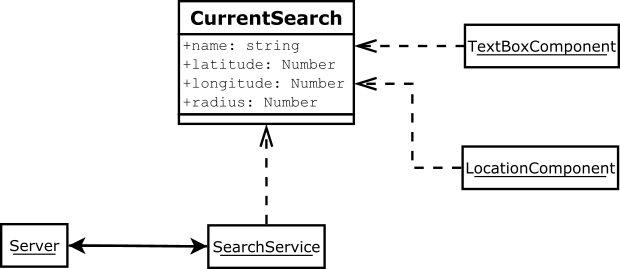
Also, every component interacting with the state will need to host the logic to do that. This compromises reusability of components and violates the DRY principle.
An alternative approach would be to encapsulate the search object into the service and expose a basic API to modify the search values. Nonetheless, the service would be in charge of three different things:
- performing the search
- keeping the state consistent
- applying the parameter rules
Quite far from the Single Responsibility Principle, the service has now become the application itself and can’t easily be reused.
Even splitting up that service into smaller services will still result in a situation where we have different services or components modifying the same data.
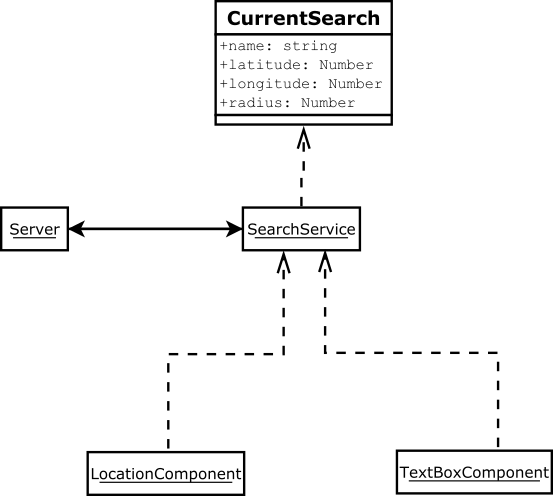
Furthermore, the components are consuming the service, thus they cannot be used without the service.
A different and often-used pattern is to put all the logic into the application layer, but we’d still end up with a great amount of code in charge of guaranteeing the state consistency.
My opinion is that the application layer, which is the real distinctive trait, should only apply the rules. Other tasks, namely message passing, storage, and events, can be handled by the infrastructure.
The Redux Approach
This approach is based on the Flux application architecture model developed by Facebook in the recent years, and on the Elm Architecture.
This pattern is also available to AngularJS developers in several implementations. In this tutorial, we will use ngrx/store since it is part of the ngrx package which is the official Angular 2 wrapper for the Reactive Extensions. Furthermore, it implements the Redux pattern with Observables, thus staying consistent with the Angular 2 architecture.
How does it work?
- components emit actions
- actions are dispatched to a state store
- reducer functions derive the new state based on those actions
- subscribers are notified of the new state
So, we can share responsibilities since ngrx/store is taking care of state consistency while RxJS brings the messages bus.
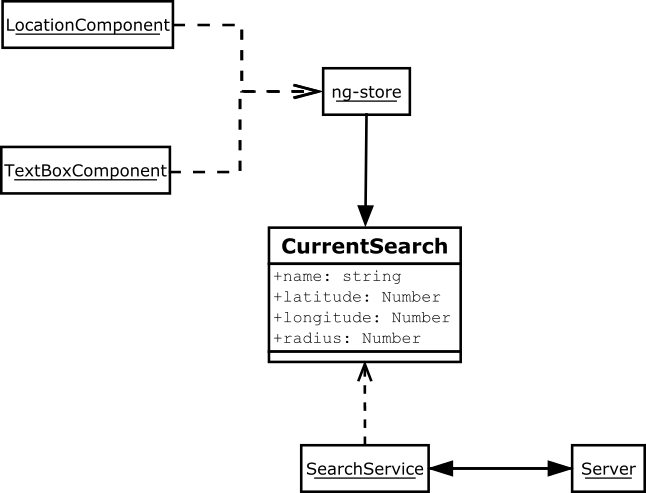
- Our components will not know about services or application logic: they just emit actions.
- Our service has no state: it just performs a search based on a search object coming from outside.
- Our application component just listens to state changes and decides what to do.
- The new entry, the reducer, will actually react to actions, modifying the state if necessary.
- One entry point for mutations.
Example: A YouTube Search Component
We will write a small application to search for videos using the YouTube API. You can see the final demo running below:
Cloning the starter repo
Clone the start-here release of the repository. In the app/ folder, we’ll find the actual application files where we are going to work:
project
├── app
│   ├── app.module.ts
│   ├── app.component.ts
│   └── main.ts
├── index.html
├── LICENSE
├── package.json
├── README.md
├── systemjs.config.js
├── tsconfig.json
└── typings.json
Now, under the app folder, we create two folders named models and components. The first thing we need to define are the models to be used.
Defining the models
Given that a search query is required, we need to decide how to represent it. This will allow searching by name and location.
/** app/models/search-query.model.ts **/
export interface CurrentSearch {
    name: string;
    location?: {
        latitude: number,
        longitude: number
    },
    radius: number
}
Since the location will be an option, it is defined as an optional property of the search object.
A representation of the search result will also be required. This will include the video’s id, title and the thumbnail as this is what will be shown in the UI.
/** app/models/search-result.model.ts*/
export interface SearchResult {
    id: string;
    title: string;
    thumbnailUrl: string;
}
The Search Box component
The first search parameter is “by name”, so a component must be created which will:
- show a text input
- dispatch an action each time the text is modified
Let’s create a new file under app/components with the component’s definition:
/** app/components/search-box.component.ts **/
@Component({
    selector: 'search-box',
    template: `
    <input type="text" class="form-control" placeholder="Search" autofocus>
    `
})
The component also needs to debounce the action for half a second to avoid triggering multiple actions while typing fast:
export class SearchBox implements OnInit {

    static StoreEvents = {
        text: 'SearchBox:TEXT_CHANGED'
    };

    @Input()
    store: Store<any>;

    constructor(private el: ElementRef) {}

    ngOnInit(): void {
        Observable.fromEvent(this.el.nativeElement, 'keyup')
            .map((e: any) => e.target.value)
            .debounceTime(500)
            .subscribe((text: string) =>
                this.store.dispatch({
                    type: SearchBox.StoreEvents.text,
                    payload: {
                        text: text
                    }
                })
            );
    }

}
This can be broken down as follows: to get an Observable from the DOM event, the helper function Observable.fromEvent(HTMLNode, string) is used to transform the typing into a stream of strings, which is then handled with the RxJS toolkit.
Note the definition of store as an input. It represents our dispatcher to deliver the action. The component won’t know about the consumer, the searching process, or the service; it just handles the input string and dispatches it.
Pay attention to how the dispatcher is used: Its signature is dispatch(action: Action): void where Action is an object with a mandatory type field (a string) and an optional payload. Since the action’s type is string, I prefer to define them as constants inside the component with a proper namespace so that any consumer of that action will just import and match against them.
The Proximity Selector component
The second type of search control provided is “by geographical location”, whereby latitude and longitude coordinates are provided. Therefore we need a component which will:
- show a checkbox to turn on localization
- dispatch an action each time the localization is modified
- show a range input for the radius
- dispatch an action each time the radius changes
The logic is still the same: show an input, trigger an action.
/** app/components/proximity-selector.component.ts **/
@Component({
    selector: 'proximity-selector',
    template: `
    <div class="input-group">
        <label for="useLocation">Use current location</label>
        <input type="checkbox"
            [disabled]="disabled"
            (change)="onLocation($event)">
    </div>
    <div class="input-group">
        <label for="locationRadius">Radius</label>
        <input type="range" min="1" max="100" value="50"
            [disabled]="!active"
            (change)="onRadius($event)">
    </div>
    `
})
It is quite similar to the preceding Search Box component. Nonetheless, the template is different, since now two different inputs have to be displayed. Moreover, we want the radius to be disabled if the location is off.
Here’s the implementation:
/** app/components/proximity-selector.component.ts **/
export class ProximitySelector {

    static StoreEvents = {
        position: 'ProximitySelector:POSITION',
        radius: 'ProximitySelector:RADIUS',
        off: 'ProximitySelector:OFF'
    };

    @Input()
    store: Store<any>;

    active = false;

    // put here the event handlers

}
Now, the two event handlers require implementation. First the checkbox will be handled:
/** app/components/proximity-selector.component.ts **/
export class ProximitySelector {
    // ...

    onLocation($event: any) {
        this.active = $event.target.checked;
        if (this.active) {
            navigator.geolocation.getCurrentPosition((position: any) => {
                this.store.dispatch({
                    type: ProximitySelector.StoreEvents.position,
                    payload: {
                        position: {
                            latitude: position.coords.latitude,
                            longitude: position.coords.longitude
                        }
                    }
                });
            });
        } else {
            this.store.dispatch({
                type: ProximitySelector.StoreEvents.off,
                payload: {}
            });
        }
    }
}
The first necessary step is to detect whether the localization is on or off:
- if it’s on, the current position will be dispatched
- if it’s off, the corresponding message will be dispatched
This time, a callback is used, as the data is not like a stream of numbers, but a single event.
Finally, the handler for the radius is added, just dispatching the new value regardless of the location’s status since we have the disabled attribute working for us.
/** app/components/proximity-selector.component.ts **/
export class ProximitySelector {
    // ...

    onRadius($event: any) {
        const radius = parseInt($event.target.value, 10);
        this.store.dispatch({
            type: ProximitySelector.StoreEvents.radius,
            payload: {
                radius: radius
            }
        });
    }
}
The reducer
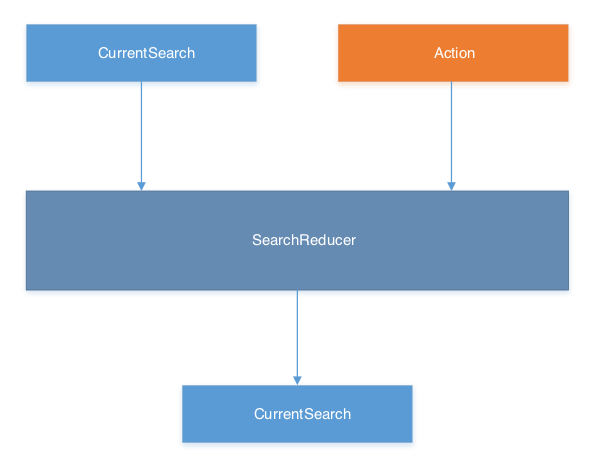
This is, together with the dispatcher, the core of the new system. A reducer is a function which processes an action and the current state to produce a new state.
An important property of reducers is that they are composable, allowing us to split the logic across different functions while keeping the state atomic. Because of that, they need to be pure functions: in other words, they have no side effects.
This gives us another important corollary: testing a pure function is trivial since given the same input will produce the same output.
The reducer we need will process the actions defined in the components, returning a new state for the application. Here’s a graphic explanation:
The reducer should be created in a new file, under app/reducers/:
/** app/components/search.reducer.ts **/
export const SearchReducer: ActionReducer<CurrentSearch> = (state: CurrentSearch, action: Action) => {
    switch (action.type) {

        // put here the next case statements

        // first define the default behavior
        default:
            return state;
    }
};
The first action we must handle is the non-action: if the action doesn’t affect the state, the reducer will return it unmodified. This is very important to avoid breaking the model.
Next, we handle the text change action:
/** app/components/search.reducer.ts **/
    switch (action.type) {
        case SearchBox.StoreEvents.text:
            return Object.assign({}, state, {
                name: action.payload.text
            });
        // ...
   }
If the action is the one exposed by the SearchBox component, we know that the payload contains the new text. So we need to modify just the text field of the state object.
As per best practices, we don’t mutate the state but rather create a new one and return it.
Finally, the actions related to localization are handled:
- for
ProximitySelector.StoreEvents.positionwe need to update the position values - for
ProximitySelector.StoreEvents.radiuswe need to update just the radius value - if the message is
ProximitySelector.StoreEvents.offwe just set both the position and radius tonull
/** app/components/search.reducer.ts **/
    switch (action.type) {
        case ProximitySelector.StoreEvents.position:
            return Object.assign({}, state, {
                location: {
                    latitude: action.payload.position.latitude,
                    longitude: action.payload.position.longitude
                }
            });
        case ProximitySelector.StoreEvents.radius:
            return Object.assign({}, state, {
                radius: action.payload.radius
            });
        case ProximitySelector.StoreEvents.off:
            return Object.assign({}, state, {
                location: null
            });
        // ...
    }
Wiring it all together
At this point, we have two components dispatching actions and a reducer to handle the messages. The next step is to wire up all the elements and test it.
First, let’s import the new components into the application module app/app.module.ts:
/** app/app.module.ts **/
import {ProximitySelector} from "./components/proximity-selector.component";
import {SearchBox} from "./components/search-box.component";
import {SearchReducer} from "./reducers/search.reducer";

// the rest of app component
Next, we modify the module’s metadata to include the SearchBox and the ProximitySelector as directives:
/** app/app.module.ts **/
@NgModule({
    // ... other dependencies
    declarations: [ AppComponent, SearchBox, ProximitySelector ],
    // ...
})
We then need to provide a store which will take care of dispatching actions and run the reducers against state and actions. This can be created using the provideStore function of the StoreModule module. We pass an object with the name of the store and the reducer handling it.
/** app/app.module.ts **/
// before the @Component definition
const storeManager = provideStore({ currentSearch: SearchReducer });
Now, we put the store manager in the providers list:
/** app/app.module.ts **/
@NgModule({
    imports:      [ BrowserModule, HttpModule, StoreModule, storeManager ],
    // ...
})
Lastly, but very importantly, we need to place the components in our template, passing them the store as an input:
/** app/app.component.ts **/
@Component({
    // ...same as before
    template: `
    <h1>{{title}}</h1>
    <div class="row">
        <search-box [store]="store"></search-box>
        <proximity-selector [store]="store"></proximity-selector>
    </div>
    <p>{{ state | json }}</p>
    `
})
The class needs to be updated in order to conform to the new template:
/** app/app.component.ts **/
export class AppComponent implements OnInit {

    private state: CurrentSearch;
    private currentSearch: Observable<CurrentSearch>;

    constructor(
        private store: Store<CurrentSearch>
    ) {
        this.currentSearch = this.store.select<CurrentSearch>('currentSearch');
    }

    ngOnInit() {
        this.currentSearch.subscribe((state: CurrentSearch) => {
            this.state = state;
        });
    }
}
Here, we’ve defined a private property which represents the state to expose (for the UI). The store service gets injected into our constructor and used to get an instance of currentSearch. The OnInit interface is used to get the hook for the init phase, allowing the component to subscribe to the state’s updates using the store’s instance.
What’s Next?
Now a simple service can be implemented which accepts a CurrentSearch and calls the backend API (could be YouTube, for instance) like in the live example. One could change the service, without changing a single line of the components or the application’s implementation.
Furthermore, ngrx is not limited to the store: several tools like effects and selectors are available to cope with more complex scenarios, like handling asynchronous HTTP requests.
Conclusion
In this tutorial, we have seen how to implement a Redux-like flow in Angular 2 using ngrx/store and RxJs.
The bottom line is that since mutations are the root of a lot of issues, putting them in a single, controlled place will help us write more maintainable code. Our components become decoupled from the logic and the details of their behavior are not known by the application.
It’s worth mentioning that we’ve used a different pattern than the one shown in the official ngrx documentation, since the components are dispatching actions directly, without the use of events and an additional layer of smart components. The discussion about the best practices is still evolving.
Have you given ngrx a try yet, or do you prefer Redux? I’d love to hear your thoughts!
Frequently Asked Questions (FAQs) about Managing State in Angular 2 with NgRx
What is the role of NgRx in Angular 2?
NgRx is a framework for building reactive applications in Angular. It provides a unified approach to managing state in Angular applications by bringing the power of Redux, a predictable state container, and RxJS, a library for reactive programming. NgRx helps in managing global and local states in the application, making it easier to track changes and debug the application. It also promotes immutability, isolation of side effects, and the use of actions to express state changes.
How does NgRx Store work in Angular 2?
NgRx Store is a state management solution that implements the Redux pattern using the observables paradigm from RxJS. It maintains a single, immutable data structure, or “store,” that you can access from anywhere in your application. When you want to change something in the state, you dispatch an action. This action describes what you want to do. Then, a reducer function handles this action and returns a new state. The Store provides an observable of the state changes, which you can subscribe to in your components.
How can I implement multiple stores in Angular 2 using NgRx?
In NgRx, you don’t typically create multiple stores. Instead, you create different slices of the same store. Each slice represents a different part of the application’s state. You can manage these slices using different reducer functions. When you dispatch an action, NgRx decides which reducer to call based on the action type. This way, you can manage different parts of the state independently, but still keep everything in a single, unified store.
How can I debug an Angular 2 application using NgRx?
NgRx provides a powerful tool for debugging called NgRx Store Devtools. This tool allows you to track every dispatched action and the resulting state change. You can see the current state, the last action dispatched, and even the state history. You can also “time-travel” by navigating through the state history and see the state of your application at any point in time.
How does NgRx handle side effects in Angular 2?
NgRx handles side effects using a library called NgRx Effects. Side effects are those operations that interact with the outside world, like HTTP requests, timers, web sockets, etc. With NgRx Effects, you can isolate these side effects from your components and handle them in a predictable and consistent way. You define effects as observables of actions, which can listen for specific action types and react accordingly.
How can I test an Angular 2 application using NgRx?
Testing is an integral part of building robust applications. NgRx provides several testing utilities that make it easier to test your state management logic. You can test reducer functions by providing them with a state and an action and asserting the returned state. You can also test effects by mocking actions and asserting the output actions.
How can I use NgRx with Angular 2 forms?
NgRx can be used with Angular 2 forms to manage their state. You can dispatch actions for form changes and handle these actions in a reducer to update the form state. This way, you can keep the form state in sync with the NgRx store and make it easier to handle complex form scenarios.
How can I handle asynchronous operations with NgRx in Angular 2?
Asynchronous operations, like HTTP requests, can be handled in NgRx using effects. You can define an effect that listens for a specific action, performs the asynchronous operation, and then dispatches a new action with the result. This way, you can handle asynchronous operations in a predictable and consistent way.
How can I optimize performance in an Angular 2 application using NgRx?
NgRx provides several tools and techniques to optimize performance in Angular applications. One of them is the use of selectors for efficient state queries. Selectors are pure functions that take the current state and return some part of it. Because they are pure, NgRx can memoize the results, avoiding unnecessary computations.
How can I handle errors in an Angular 2 application using NgRx?
Error handling is a crucial part of any application. In NgRx, you can handle errors using actions and effects. When an error occurs, you can dispatch an action with the error information. Then, you can handle this action in a reducer to update the state or in an effect to perform side effects like showing a notification.
 Pietro Grandi
Just a web developer with strong 3D graphic skills, and four years of experience as 3D artist: my first professional work as a developer involved WebGL. I like studying new technologies and sharing knowledge through my blog. I'm passionate about language learning, be it a human or computer language.