Craft Foam Feather Tutorial
It can be hard to find the perfect feathers for your costume. Easier just to make your own! Foam feathers are cheap, durable, and relatively easy to make. I made these feathers for my kenku costume and here’s how!
Below is a thorough dissection of feather shape to help you if you’re trying to get a highly realistic look.
We can’t talk about feathers without talking about the rest, so first, let’s establish some terms. Here’s a wing as seen from above. The top edge/front edge is called the leading edge.
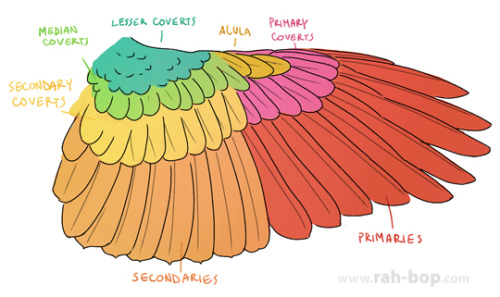
The largest and most visible of these feathers are primaries and the secondaries. They have very specific shapes based on their location and purpose.
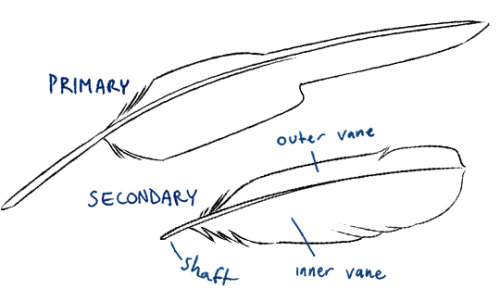
Down the middle of the feather is the shaft aka rachis, and the two weblike parts on either side are called the vanes. The leading edge is called the outer vane and the other is called the inner vane. The vanes are composed of countless small strips called barbs that stick together like fine velcro. The barbs are the things that can be peeled apart and pressed back together to form the surface of the vane. But I’m sure you already knew this, O Best Beloved! I will be referring to all these structures later so I want to make sure it’s clear what I’m talking about.
Wing Shape
Different birds have differently-shaped wings. For cosplay purposes, it is helpful to look at the wings of large birds like eagles, vultures, swans, etc. These are beautiful shapes that lend themselves well to costumes.
I highly recommend surfing around Slater Museum’s Wing and Tail Image Collection, which has photos of upper and lower surfaces of wings of tons of different species. This is an awesome resource!
One important thing to note about wings is feather order. The feathers closest to the body overlap the next closest ones, so the primaries are on the bottom when seen from above.
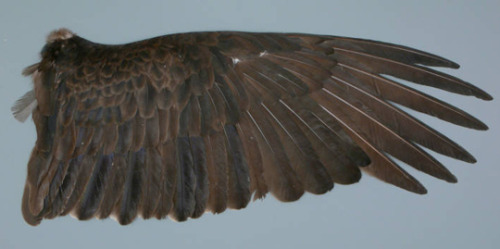
This order is preserved on the underside. Check it out:
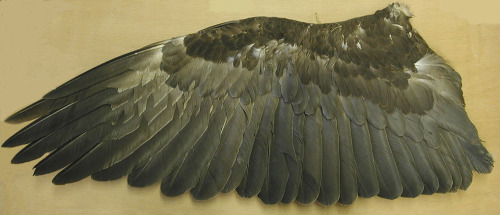
We all know it’s super embarrassing when you wear your feathers on backwards so make sure you pay attention to this.
I made a tutorial about how I made my collection of foam feathers into foam wings and you can read it here!
Feather Shape
As you certainly noticed, feathers are often weirdly-shaped and asymmetrical. Most importantly they don’t look like this leaf-shaped anime feather.

An awesome resource for checking out feather shapes is The Feather Atlas which shows you all the feathers on a wing or tail in order. Are you making some big ol’ eagle wings? You can use the Wing and Tail Collection for the overall shape and the Feather Atlas to get into the minutia.
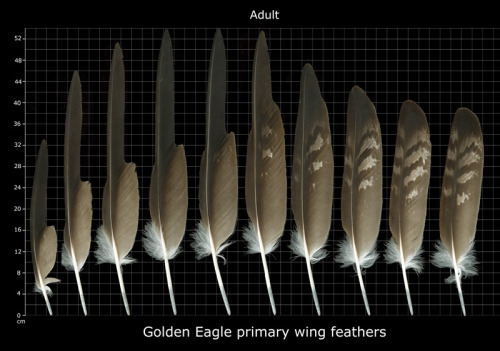
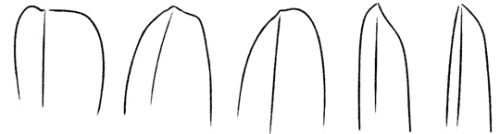
In primaries and secondaries, the shaft gets progressively closer to the leading edge of the feather the farther that feather is from the rest of the body. This is still true of coverts but they are more symmetrical and classically oblong than the larger flight feathers. One very important thing to keep in mind is that the tips come in a big variety of lumps and points, so please pay careful attention to them. Some of them are kind of unexpected.
Feather Edges
So you designed your wing and feather shapes and now you’re cutting out some details around the edges. What do you cut to make it look like a feather? Please don’t cut every barb – you’ll hate your life and it still won’t look right. Instead, fake the shape of vanes by emulating the way they split and bunch up. Here are some exciting shapes to try!
Due to the curvature of the feather, the outer vane (left side in this pic) will generally have more shapes where the barbs split apart. The inner vane will have more bunching and softer shapes (G and H in particular.) Not always! But very often.
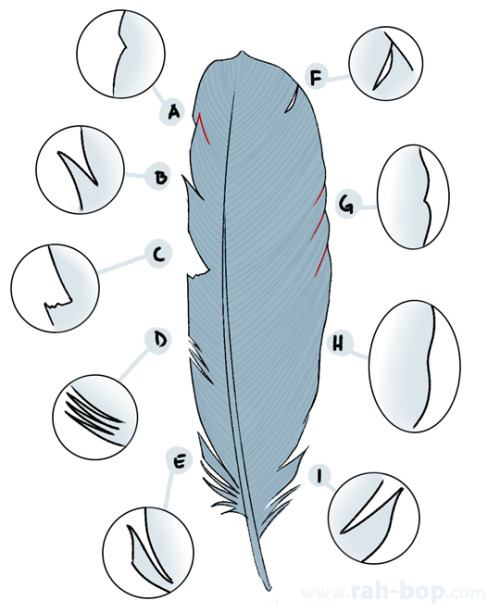
A. Two points on top, a curve on the bottom. Draw/incise the red part on with your sculpture tool.
B. The bottom part curves away from the point. Cut a VU
C. This is a part where the feather was damaged and the loose barbs ends fell off.
D. Cut a series of lines and separate them with your fingers.These especially look good at the base of the feather to emulate the soft barbs there.
E. Kind of like B except with another cut behind it.
F. Cut a little loop out and it will look like the barb split and folded back on itself.
G. Cut one or many notches. Draw the red parts to make it look like wrinkles.
H. A big, gentle divot over a large area.
I. like E except a gentle shape at the bottom.
The tip has its own collection of shapes you can cut:

The bottom example is a bunch of these used together.
The more details you cut around the edges of the feather the more tattered and old it will look. Don’t go overboard if you want your feathers to look healthy and pristine. Experiment with the look you want!
Feather Texture
Here are some things to keep in mind as you score the foam with your sculpting tool.
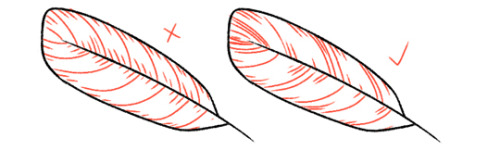
First, the barbs come away from the shaft at an angle and curve toward the tip.

Second, avoid uniformity at all costs. Don’t draw every barb or it will look silly. Instead, draw them here and there to give the impression of light playing on the vanes. Even then, draw them unevenly. Also, try to line them up so that they touch some of the notches and edge details you cut. It looks nice!
That’s it! No sweat!
If you are wondering about making foam feathers into foam wings, check out my foam wing tutorial.
Good luck!
Was this tutorial helpful to you? If you use my techniques or tutorials to complete your own costumes, especially if you are doing so on commission, please consider buying me a coffee through ko-fi or paypal! I also have a Patreon where I post more costume WIPs and tutorials. Thanks for looking!
 aonik liked this
  voiceofthetunnels liked this
 noxthechaos reblogged this from rah-bop
 tildondobbinsbitsandbobbins liked this
 bardtank liked this
mcgigolo liked this
geodehooligans liked this
 catuslotsu liked this
 girlwithredhairs liked this
 peroxideprincess liked this
  dolldaydreams reblogged this from rah-bop
  pyratutorials reblogged this from rah-bop
 dr-lynne liked this
derpyfins liked this
diesaur liked this
 drawing-n-tips reblogged this from rah-bop
 thesneklordwithwings liked this
sagely-cashews liked this
 kaytomyheart liked this
 ironicsuperstition liked this
hidemyerror reblogged this from rah-bop
 cecil-is-an-eldrich-deity liked this
 bow-ties-and-daydreams liked this
pippin-and-trouble reblogged this from rah-bop
everordinary liked this
nessahallow liked this
 internet-or-sleep reblogged this from rah-bop
 - internet-or-sleep liked this
fandomsfrillsandfuckingtea liked this
kermitsbicycle liked this
 stupidbluejay liked this
 nonotablechange liked this
 pixiedixiedo liked this
 maecatt liked this
 fandomfriend liked this
  koios liked this
 beetle-ze-bub liked this
staticcryptid liked this
two-leaf-clover liked this
lifeaccordingtolouie-blog liked this
candylionisweird liked this
larkiethings liked this
rah-bop posted this
- Show more notes