

Introduction: Marvin the Martian - Costume


I fully intended to make a costume with "normal" mobility and field of vision this year ... it just wasn't meant to be.
Truth be told, I was working on an EVA foam based cyborg/armor costume. I started earlier than previous years and was making great progress, but it just wasn't exciting. It wasn't a known character, so come Trick or Treat night, none of the kids (nor adults) would be excited and/or amazed. That's when inspiration hit me like a two ton heavy thing (Queensryche reference) ... another character from my childhood who shared my not so lovable disposition (it's becoming a trend .. Animal, Bender, Oscar) - Marvin The Martian!!
Another full body costume which incorporates a head I can barely see out of and feet that make walking damn near impossible (I can either shuffle or trip)- what's not to love about this build!
A quick note about foam costuming:
Until now, I've never worked with EVA foam. All of my knowledge comes from two sources via Youtube.
Ted Smith from Evil Ted's Channel and Bill Doran from Punished Props
My top three tips:
1. Keep your razor sharp. Invest in a sharpener, you'll thank me.
2. Make your cuts in one pass if at all possible. Multiple passes results in stepped and/or unclean edges.
3. Don't rush glue ups. Wet contact cement results in a gooey mess and weaker joints - trust me.
Step 1: The Head


Plan A was to fabricate all of the main costume parts (excluding the lycra suit and gloves) using EVA foam, but I was having difficulties with the head.
Issue 1: The domes lacked appropriate curvature as any seam created an angular ridge. I could've spent several hours sanding them into a better shape, but I'd never get it perfect.
Issue 2: The dome bottoms weren't consistently flat, so trying to glue them together in order to make a sphere would've caused further distortion and most likely ended up looking like a lumpy egg.
Issue 3: The foam is rather flexible and I could tell it wouldn't be strong enough for the helmet plume. I'd end up with a dented head and a sagging plume ... no one wants that.
Plan B was to use the 14" acrylic globe I had stored in the attic from when I made my Animal costume. I had ordered two in case I ruined the first attempt and was saving it for the next appropriate costume. These globes are used on decorative lamp posts, so the hole isn't large enough for a human head. However, that problem can be resolved with the Dremel and a cut off wheel. I just laid down some tape, drew my offset, and carefully made the cut. Make sure to sand the edge down a bit because the cut plastic is a bit sharp.
Note: I acquired the dome template from Evil Ted's website - it's free.
Step 2: The Helmet - Basic Construction

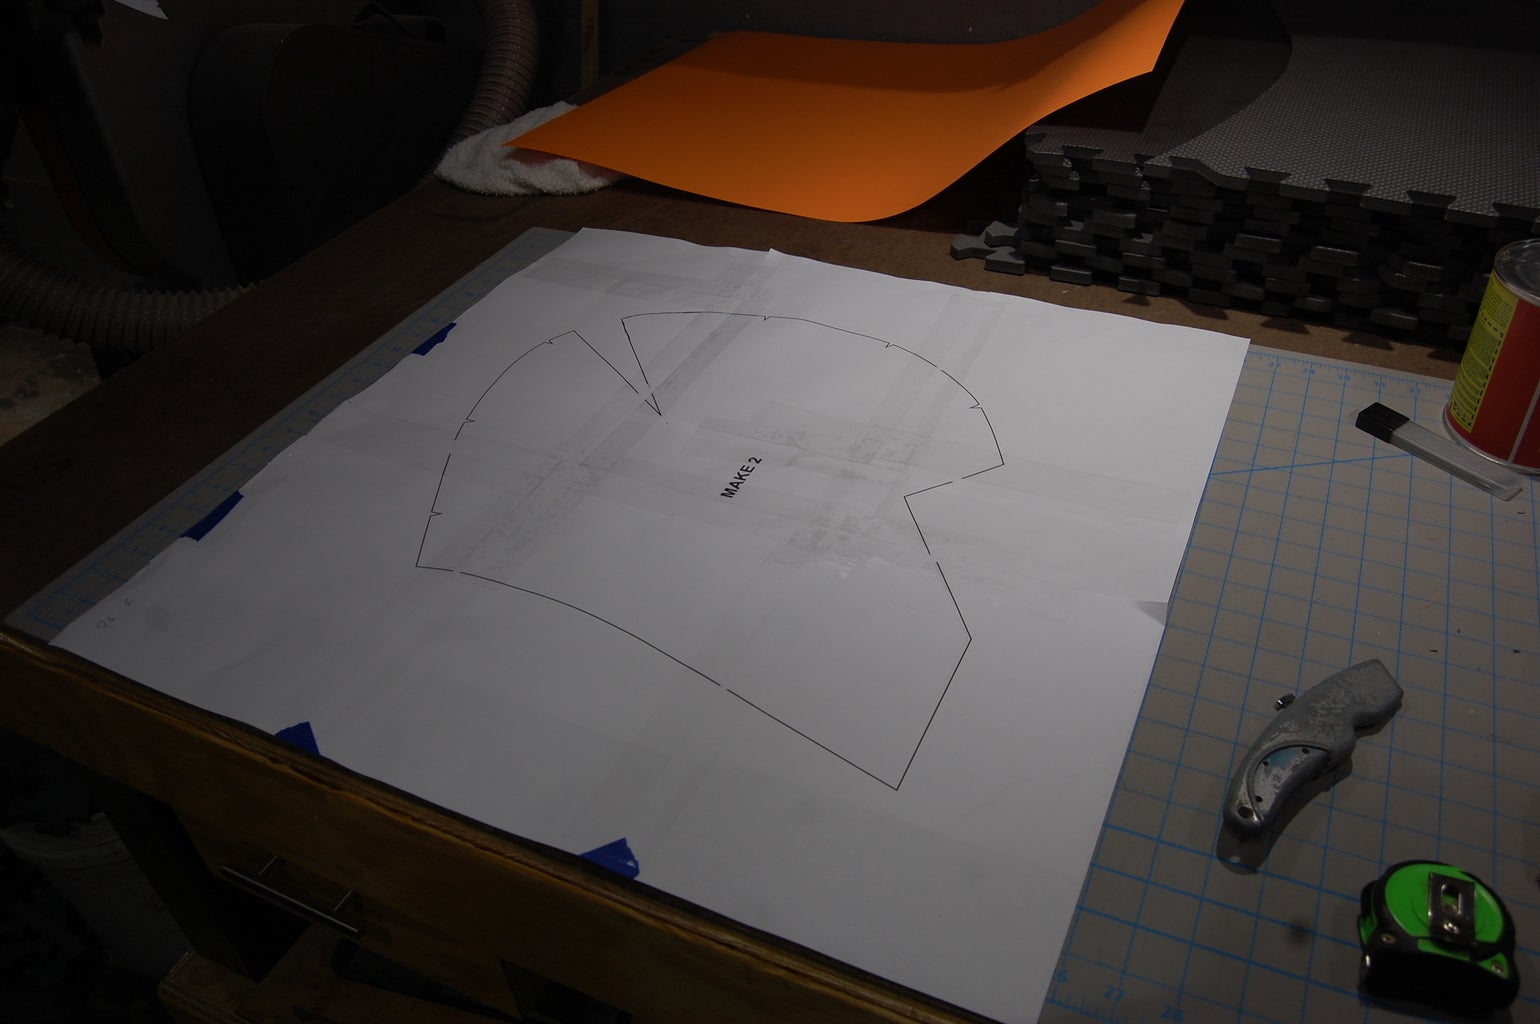


The helmet template is also courtesy of Evil Ted for the low price of $5. I made one helmet based on his plan as practice, so I just scaled it up to 200%, so that it fit over a 14" globe. The most difficult part of the process was taping the multiple pages together with minimal distortion/error ... you can see I used my sliding glass door to assist with this process.
Once I had the paper template assembled, I took it to the shop, where I cut it out and traced it onto poster board. The poster board makes for a more rigid and durable template. I figure if I'm putting all this time to templates, I might as well make versions which can be saved for future use. You'll notice that I modified the template to add material to the front of the helmet, which is necessary since Marvin has the Roman style flairs in the front.
The templates are pinned to the foam mats so that they don't slide around while being traced. I had better luck with a pen than with a sharpie, but don't apply too much pressure or it'll leave grooves in the foam. Once traced, the template is removed and the shape cut out using a sharp razor. I used a straight edge on any straight cuts and free-handed all the curves.
Prior to glue up, I added some curvature to the parts by warming them up with a heat gun and bending/shaping them with my hands. I'm not sure this was completely necessary, but Ted and Bill do it and they know better than I at this point in time.
In order to stick the pieces together, I used Barge cement. You could use regular contact cement, but my local hardware store only had small bottles, so I purchased this larger container via Amazon. I've seen people use hot glue, but in my opinion, Barge gives better results.
Step 3: The Helmet - Marvin Modifications


With the basic helmet assembled, it was time to modify it into the style of Marvin. I agonized over the process ... second guessing, over-thinking, multiple versions of layout lines scribbled on the foam. It was a perfect storm of my OCD, perfectionism, and fear of a catastrophic cut.
Once I finally made a decision, I cut out the front of the mask and to my surprise ... it looked pretty good. I also did some shaping of the bottom edge, but failed to take any pictures. I assure you, it was thrilling.
The back, bottom edge of Marvin's helmet flairs out a bit. I tried to achieve this shape with a heat gun and bending, but to no avail. The working method was to cut a V shaped groove into the foam and then use Barge to glue it into my desired shape.
The last and most painful modification, was the visor. I wanted to take a large piece of foam, bend it over the helmet, draw my shape, and cut it out - that failed. My next idea was to use a strip of foam to capture measurements and then transfer that onto the larger foam.
Since I had laid out the visor pivot points on the helmet already, that was a good starting point. I stuck nails through those points, attached one side of the foam strip to a nail, formed it around the front of the helmet, and then onto the second nail. That foam strip now acted as a "story stick" and I transferred the information onto the larger piece of foam.
The next problem was figuring out the shape of the back edge. After wasting more time over-thinking the issues, I decided to wing it. I drew half of the arch onto the form, made some edits, and then made a few cuts with test fits in between. Once I was happy with how it looked on the helmet, I folded the foam over onto itself and mirrored the arch onto the remaining half. Lastly, I used the heat gun and my hands to start forming the compound curvatures into the visor (left to right and front to back)
To glue the visor in place, I started with the two pivot points and I once again used the nails to help with alignment. During layout, the foam had matched the helmet curvature perfectly and I had planned on being able to adhere it across the entire front edge. However, this was no longer the case. It probably has something to do with the compound curves, but there was no going back now. I decided to add more Barge on each side and then just leave the middle section be, which worked out nicely. The gap isn't obscene and actually gives the illusion that the visor is a movable piece.
Step 4: The Plume


Buying a deck brush for the plume would've been quick and easy, but I wanted the plume to have a slight curve and preferred the idea of making it from foam.
Brush
I cut 8 pieces of foam to 3 1/2" x 10" and then laminated them into a block using Barge. On one side of the block, I found/marked the center point and then drew my desired brush shape. That shape was cut out using the bandsaw and then the oscillating belt sander was used to remove the blade chatter marks, as well as taper the long sides a bit. To give the look of bristles, I cut out a few larger slivers of foam and then made shallow slices with a razor. A little heat from a heat gun makes all these cuts open up a bit.
For the wooden block part of the brush, I just cut a rectangle of foam, making sure to leave a small overhang. This piece was glued to the bottom of the brush part.
Post And Attachment To The Head
For the post I used 1/2" PVC and I decided to connect it to the acrylic head using a bolt and T-nut. I decided on a bolt for two reasons ... I didn't feel Barge or epoxy would hold long term and having the plume detachable would be beneficial for transport, as well as storage.
Initially, I tried to epoxy a T-nut into one end of the PVC pipe, but it broke loose while I was sanding the metal flange down to match the outer diameter of the pipe. Plan B was to jam a section of 1/2" dowel into the pipe and then drill down the center if it to accept the T-nut, which worked. I used epoxy to glue the parts in place and once cured, successfully sanded the flange flush with the pipe.
Once I decided on the location of post to globe attachment, I cut a circle out of the foam using a sharpened 3/4" copper pipe (perfect match for the outside diameter of the PVC pipe). I just tapered/sharpen the outside edge of the pipe using the oscillating belt sander and then holes can be made in foam with moderate pressure and a twisting motion. I used the same method to make a hole in the bottom center of the foam brush, but since I was having a difficult time removing the "plug,' I used a forstner bit on the drill press to excise the waste material. The hole location in the foam helmet was transferred to the acrylic globe and a unibit was used to drill out a 5/16" hole for a hex bolt.
Step 5: The Shoes


I wasn't exactly sure how to go about making the shoes, so I started by tracing my shoe onto cardboard and then drawing the outline of Marvin's shoe around it. You can see I made several arcs before deciding on a length that worked with the scale of the head and helmet. after determining the size, I decided to build a temporary shoe form, from which I could then make a pattern.
Making The Templates
I used cardboard to create a wall around the heel of my shoe, which was at my desired finished height. I then used strips of foam scrap, packing tape, and hot glue to fabricate the shape of Marvin's shoe. Once I had my shape, I covered the entire form with a layer of aluminum foil followed by duct tape.
Marvin's shoes have a black pinstripe running down each side and I figured that would be a great place to hide a seam, so I decided to split the pattern into three sections .. two sides and a middle. These lines are drawn onto the duct tape and are then used to cut the template into separate pieces once it's removed from the form.
Note: I failed to make alignment marks along these lines before making my cuts. It wasn't a huge deal since this isn't a complex shape to glue up, but they would be helpful.
The duct tape sections were flattened out ... you can see I had to add a dart (cut, slit, etc) to the middle section in order to get it to lay flat. The duct tape shapes are then traced onto poster board, creating the permanent templates.
Assembly
The templates get pinned to the foam, traced, and cut out with a razor ... just as was done with the helmet. The dart in the middle section is glued first, then the left and right sides to the middle section. You can see that I turned this assembly inside out while the Barge cured a bit ... this creates enough pressure to keep the seams tight and gap free [Picture 14].
I was having difficulty with alignment and assembly of the shoe body to the sole, so I decided to make an "inner sole." I figured not only would it resolve those issues, but it would also create more surface area for glue, and therefore more strength. To make the inner sole, I cut 1/2" off the perimeter of the original cardboard sole template ... used that to make a hardboard template .. then used that to cut out the foam. These two layers were pinned and clamped together - then laminated with Barge in two phases.
Barge was spread onto the mating parts of the shoe body and sole, left to dry 5-10 mins, and then assembly started at the toe. I worked my way down each side, but quickly noticed that the fit wasn't working out - I had excess length on the shoe tops than on the sole. I'm sure it has to do with foam thickness, perimeter calculations, foam distortion, math, etc ... but it was too late at this point. My solution was the cut open the back seam, continue gluing the shoe top to the sole, overlap and remove the excess material at the back, and then re-glue the back seam. It worked so well that you can't even tell there was an issue.
Decorative Lines And Ovals
Marvin's shoes have a few lines across the top. I drew these on, scored them with a razor, and used the heat gun to open them up a bit. This created shallow/narrow grooves, which I could easily locate and accent with black paint during the finishing process.
Marvin's shoes also have ovals on each side towards the heel. I used a center line and a few washers to rough out a shape on poster board, which I then finessed by hand before cutting it out. This was traced onto 1/8" craft foam and cut out for a total of 4 ovals, which were then attached to the shoes with Barge.
Shoe Inside A Shoe
While trying to come up with some sort of strapping/buckle/harness system to hold these massive shoes onto my small human feet, it occurred to me that I was overthinking the problem. The easy solution was to buy a cheap pair of shoes ($9) with a relatively flat bottom and glue them into the foam shoes. I figured if Barge didn't hold, I'd move onto epoxy ... Barge held without issues.
Step 6: The Skirt


Since my waist isn't a perfect circle (not yet anyway) and I wanted it easily removable (as opposed to trying to climb into it), I decided to use an adjustable belt approach. I could then glue the "fins" to the top of this, which would give them stability against gravity, as well as conceal the belt.
The Belt
For the buckle, I used a plastic side-release clasp and nylon strapping. These are available at the big box store, but I happen to have a bag full of them, which are already assembled/stitched, thanks to the marketing department and a re-branding initiative at the office job.
The nylon strapping is 1" wide, so I cut 1 1/2" foam strips and used a sanding drum on the Dremel to carve out out a pocket. This recesses the nylon flush with the foam and keeps it from abrading the lycra body suit. I cut the nylon strapping to my desired length (giving myself a few inches of slack for tightening/loosening) and glued it in place with Barge.
A second layer of foam was laminated to the outside of this belt in order to provide more gluing area for the fins, add more rigidity, and conceal the plastic clasp.
Note: The foam floor mats are only 24" wide, so I had to splice the strips together in order to make this belt. I staggered the seams.
The Fins
For the fins, I started by drawing several concentric circles onto contractors paper, so that I could decide on an overall diameter. The centermost hole is for my waist and is 12" in diameter. I ultimately chose 28" for the outside diameter, which isn't perfectly to scale, but I wanted to fit through doors and I was at the edge of the paper.
The number of fins on Marvin's skirt varies among illustrations, but seven seemed to reoccur the most. I started by dividing the circle in to six sections and then moving lines around to get seven sections of varied size. These sections were then cut out and traced onto poster board in order to ... you guessed it ... make more templates. As before, the templates were pinned to the foam, traced, and cut out with a sharp razor. Lastly, they were fused to the top of the belt using using Barge.
Step 7: The Disintegration Pistol


Marvin likes destruction, so obviously he needs his disintegration pistol. As luck would have it, he has had several different pistols, so I chose the version I liked and fabricated one section at a time.
Grip And Body Bottom
I used a Nerf gun as reference to sketch a grip and bottom section of the gun body. This sketch of course became a poster board template, which was traced onto foam (twice) and cut out with a razor. Once laminated, this became the core of the pistol. It had more flexibility than expected, so I inserted a 1/8" steel rod up through the bottom of the grip and into the body at an angle.
Note: After assembly, I felt the grip was too narrow, so I added a layer of 1/8" craft foam to each side.
Barrel and Body Sides/Body Top
The barrel is just a 12 1/2" length of 1/2" PVC, which sits on top of the pistol core.
The left and right body sides are 3 1/2" x 5 7/8" sections of foam. You can see that these panels align with the front and bottom of the core, stopping before the grip, and extending 1/2" above the top edge of the barrel. That's enough overlap to add a strip of foam to the top, which boxes in the barrel.
Barrel Rings
The pistol version I used for reference had two rings on the barrel. You'll find illustrations and props using three rings or one long ring, but I went with two. I used a 2" fender washer as traced circles onto foam. The center holes were punched out using the sharpened 3/4" copper pipe. The outside was trimmed close to the line and then sanded to the line using the oscillating belt sander.
Note: A single later of foam looked wimpy, so I laminated two layers together for each ring.
Note 2: Save the punched out foam centers.
Note 3: I made several of these foam rings at this time because two will be used for the flag pole and one is used for the bottom of the plume.
Power Setting Knob
Marvin's pistol has a power setting knob, which from pictures I found, has two settings: Stun and Earth Shattering Ka-Boom. For this part, I laminated two 1/2" x 1/2" squares of foam to make a cube, cut the back face at an angle, and then glued one of the punched out foam centers to the angled face.
Sight
The sight is just another punched out foam center on a length of 1/8" steel rod, which gets secured into a hole the top of the barrel. The rod ended up wobbling around a lot inside of the hollow pipe, so I pushed another foam center down into the pipe and used it as an anchoring point.
Trigger And Trigger Guard
The trigger was made from a 1" wide strip of foam. One edge was shaped to match the contour of the grip and then I cut it to a visually pleasing length.
The trigger guard was made from the same 1" strip. It was cut to the necessary length (determined by eye) and notch was cut on the inside so force the starting point of the bend.
All of the pistol parts were locked together with Barge.
Step 8: The Flag and Flagpole


The Martian flag is cut from a gifted white T-shirts. I don't wear white T-shirts since I would ruin them in T-minus 2 seconds, but a neighbor donated a stack to the shop since he knew I'd use them for finishing woodworking projects. Little did he know ... I'd turn his shirt into a declaration of war!
Anyway, I cut the largest section I could from a T-shirt, which ended up being 18" x 26". Some scrap cardboard was used to make 10" diameter circular spray paint mask. I used red, black, and white spray paint to make what kind of looks like "The Red Planet" .. Mars.
The flagpole is a 82" length of 1/2" PVC with a PVC cap glued on the bottom. The top end has two of the foam donuts from when I was fabricating the pistol and is then capped with a 3" styrofoam ball. I used the drill press and a Forstner bit to drill a hole into the styrofoam ball and more epoxy to fuse it all together.
Left to it's own devices, the flag would just hang limp and fail to display Martian ownership ... I couldn't have that. As luck would have it, I had a 25" length of 1/2" Pex tubing. Towards the top of the flagpole, I drilled a hole to receive the Pex and locked in it place from the other side with a small machine screw. Lastly, the top of the flag was wrapped around the length of Pex and locked in place with hot glue. To keep the bottom in place, I screwed a small eye screw into the pole and glued a corresponding washer to the bottom corner of the flag using epoxy.
The flag pole was finished with plastic primer and then several coats of gray spray paint.
Step 9: Paint Preparation


I tired hand sanding with 150 grit paper, as well as a sanding block ... neither produced favorable results in my opinion. I had way more success with a sanding drum on a Dremel, but it takes a bit of practice and a steady hand ... in the blink of an eye, it will run away and chew craters in your hard work. Once I perfected my technique, any high spots along seams were leveled and all edges were lightly rounded over, in hopes of better paint adhesion.
Gaps and other imperfections in the foam were filled with Kwik Seal caulking. Just to be sure to smooth out your patches (I used a water dipped finger) because this stuff can't be successfully sanded.
The acrylic globe received a few coats of Valspar plastic primer before multiple coats of flat black spray paint. I easily applied 6-7 light coats because I was fearful or drips and runs, but it all worked out.
All of the foam parts received two thorough applications of Plasti Dip, which took two entire cans.
Step 10: The Eyes


The eyes can make or break a character costume ... if you don't believe me, just google "-your favorite character- costume" and have a look. I usually end up making several different sizes/versions before getting them right. For Animal and Oscar that meant cutting up several styrofoam balls ... Marvin was a cheaper endeavor since I was using 1/8" craft foam.
Similar to the shoe ovals, I used washers and freehand sketching to draw rough forms, but this time I used graph paper to help with sizing. Once I had a pleasing arc, I would fold the paper into quarters and make the cut. Just like cutting out snowflakes ... why make four non-matching cuts when I can cut them all at once?! This graph paper template was traced onto the craft foam (twice), cut out, and held up to the face to see if they work proportionately. I did this three times, but it really didn't take too long.
The overall eye shape was dialed in, but they still needed pupils, which meant more graph paper and washers. Once I had the winning pupil shape and location within the eye, I taped the two eyes together so I could make the cut once and end up with a matching pair. I failed to cut a perfect oval with the razor, so I used a sanding drum on the Dremel to rectify that situation.
In order to align the eyes on the face, I applied a few strips of painters take to the globe, so that I could draw centered vertical and horizontal reference lines. I first determined the left to right spacing by holding the eyes to head and changing the size of the center gap until things looked right. Too close and Marvin looks cross eyed ... too far apart and he looks cockeyed. Next I moved the eyes up and down until they looked right. That was just a matter of having the pupil end up around the vertical center, while having the top of the eyes disappear under the helmet visor.
With all my marks in place, I just held each eye in place and used a few dabs of hot glue to hold the top in place. This held the eyes securely enough for me to remove the painters tape and then carefully secure the rest of the eye with hot glue.
The last step was to cut holes in the globe so that I could actually see once it was on my head. I used a unibit in a handheld drill to create a 1/2" hole. I then used the sanding drum to enlarge that hole to match the contours of the pupils.
Step 11: Paint


The weather in MA was turning cold and windy ... neither of those are good things for spray painting. Unless absolutely necessary, I avoid spraying paint in my basement (the Plasti Dip was necessary .. stupid wind).
Plan B was Americana acrylic paint from Michaels ... not a sponsor [Call Me! (phone call emoji)]. I
Shoes: White
Took 4 coats of white.
Pinstripes took 2 coats of black .. then I had to come back and touch up with white thanks to tape bleed.
2 coats of red around the edge of the soles.
2 coats of black for the ovals.
Plume: Two shades of yellow
Took 3 coats of light yellow .. 2 coats of the darker yellow for the "block" and "handle/post."
Black was brushed into recesses and wiped off from high spots immediately.
Helmet & Skirt: Festive Green
Applied 2 coats ... could still use 3rd.
Disintegration Pistol: Two shades of gray with black accents (trigger + power setting knob)
Took 3 coats of light gray.
1 top coat of darker gray for accenting.
1 coat of black for accenting.
Step 12: Shorts and Hands


Shorts
Unless I wanted to achieve Level 3 status, a lycra bodysuit and Martian skirt wasn't going to stand up in court. My solution was to purchase a pair of red sweatpants and cut them into shorts. I made a mark around 2" below the crotch seam, cut the legs off, folded the material towards the inside, and sewed a "short shorts" hem. On their own, they look like totally creeper gym teacher shorts, but they aren't that bad when worn with the costume.
Hands
Using my hand pattern from Oscar and traced it four times onto a white T-shirt. After cutting them all out, I pinned them together and then sewed all of the edges ... poorly.
For the cuff thing at the base of the gloves, I used 5/8" caulk saver foam (what a horrible product name). Two lengths of foam were cut and the ends hot glued together to transform them into rings - just size them by eye and make sure your hand can fit through. With the gloves still inside out, the bottom fabric was wrapped up and over the foam, pinned in place, and hot glued instead of sewn. I honestly had/still have no idea how to make this happen with the sewing machine.
I wore these T-shirt hands over cheap gloves to pad them out ... also kept my hands warm during Trick r Treat hours.
Step 13: Assembly of the Head/Helmet


Part of my brain said I need to make the helmet removable from the head. I know what you're thinking ... here he goes again ... over-complicating the simple details, but hear me out.
1. I wanted (needed) to paint the inner surface of the helmet green. I had no idea how much would actually be visible AND you knew I'd get green paint all over Marvin's head.
2. Trying to glue the helmet to the head after paint seemed like a recipe for disaster - glue everywhere and messed up paint.
Hopefully, we agree this had to be done. And if not .. I did it anyway.
Helmet attachment
I decided on a somewhat concealed location on each side of the helmet and applied a square of velco (both parts connected). Once I fiddled with the helmet and got it aligned with the head, I removed the adhesive backing and pressed the helmet against the head - perfect alignment - done.
Helmet Padding
I used scrap EVA form for the majority of the head padding with the final layer being a more porous packing foam, which has more give and contours to my head.
Pictures 4 & 5 give you an idea of how the plume post secures to the acrylic glove.
I waited until final assembly to cut the plume post to length because I wanted to see it on the full costume before making that decision. Once I had the desired length, I glued the plume on with Barge.
Step 14: Glamour Shots


There we go! Marvin in the Martian flesh! Most of the young kids were hesitant to approach, but a few offered "knee level fives." A few older kids, but mostly adults, asked if they could take pictures. It's Halloween and I'm wearing a ridiculous bodysuit ... of course we can take pictures.
Purchased Materials
Face open lycra bodysuit = $33
Red sweatpants = $6
Shoes = $9
1/2” EVA foam floor mats = $16
1/8” crafting foam = $2
Poster board = $ 4
1/2” PVC pipe = $5
Plastidip = $12 (two cans at $6 each)
Velcro = $3
Acrylic latex paint (black, white, green, red, yellow) = $23
Helmet Template = $5
Total = $118
Materials I had
14” acrylic globe (cost $23)
White T-shirts = $0
Styrofoam ball = $0
Plastic buckle = $0
Dowels =$0
Pex = $0
Plastic primer spray = $0
Black spray paint = $0
Red spray paint = $0
Purchased Tools & Supplies
Barge cement= $20
Razor = $1.50
Sharpener = $14
KwikSeal caulking = $4
Total = $39.50
Step 15: The Videos

Runner Up in the
Hats and Headpieces Challenge

Runner Up in the
Glue Challenge 2016

Third Prize in the
Halloween Costume Contest 2016


