
You did it. You stepped up and bought a real camera. Not just some accessory lenses for your phone—a real, honest to goodness camera with a detachable lens and manual control. Now it’s time to learn how to use the thing. We spoke to adventure photographer Krystle Wright to help you make art out of the confusing world of ISOs, apertures, and histograms.
#1. Know the Lingo
Shutter Speed: This number, given in fractions of a second for normal exposures, represents the amount of time light is exposed to the camera’s sensor or film.
Aperture: The size of the hole that lets light into the camera. The smaller the number, the larger the hole and the more light hitting the sensor or film per second. Smaller numbers also indicate a smaller depth of field.
Depth of Field: This is roughly the distance in front of the lens that can be in sharp focus. Large apertures (small numbers like f/1.8-3.5) give a narrow band of sharpness, which is why a portrait may show eyes in perfect focus while the tip of the subjects’ nose is blurry. For landscapes, use a smaller aperture (larger numbers like f/11-16) to capture the entire scene.
ISO: The degree of sensitivity of a given film stock. The smaller the number, the less sensitive the film or digital setting, which means you’ll need more light to get a good shot. In dark conditions, bump up the ISO to bring in more light without slowing the shutter speed.
Histogram: A chart of the tone values of each pixel. From pure black on the left edge to pure white on the right, this shows the exposure in a mathematical chart. RGB histograms show this information for each color channel: red, green, and blue.
#2. Don’t Trust the LCD
The LCD screen on the back of your camera distorts color and brightness. It will trick you. Instead, use the histogram. If the chart seems bunched and “clipped” on either the right or left edge of the chart, highlights or shadows are likely too dark or too light, causing an area of the image to be pure black or pure white. No amount of editing can bring detail out of a blown-out highlight or shadow.
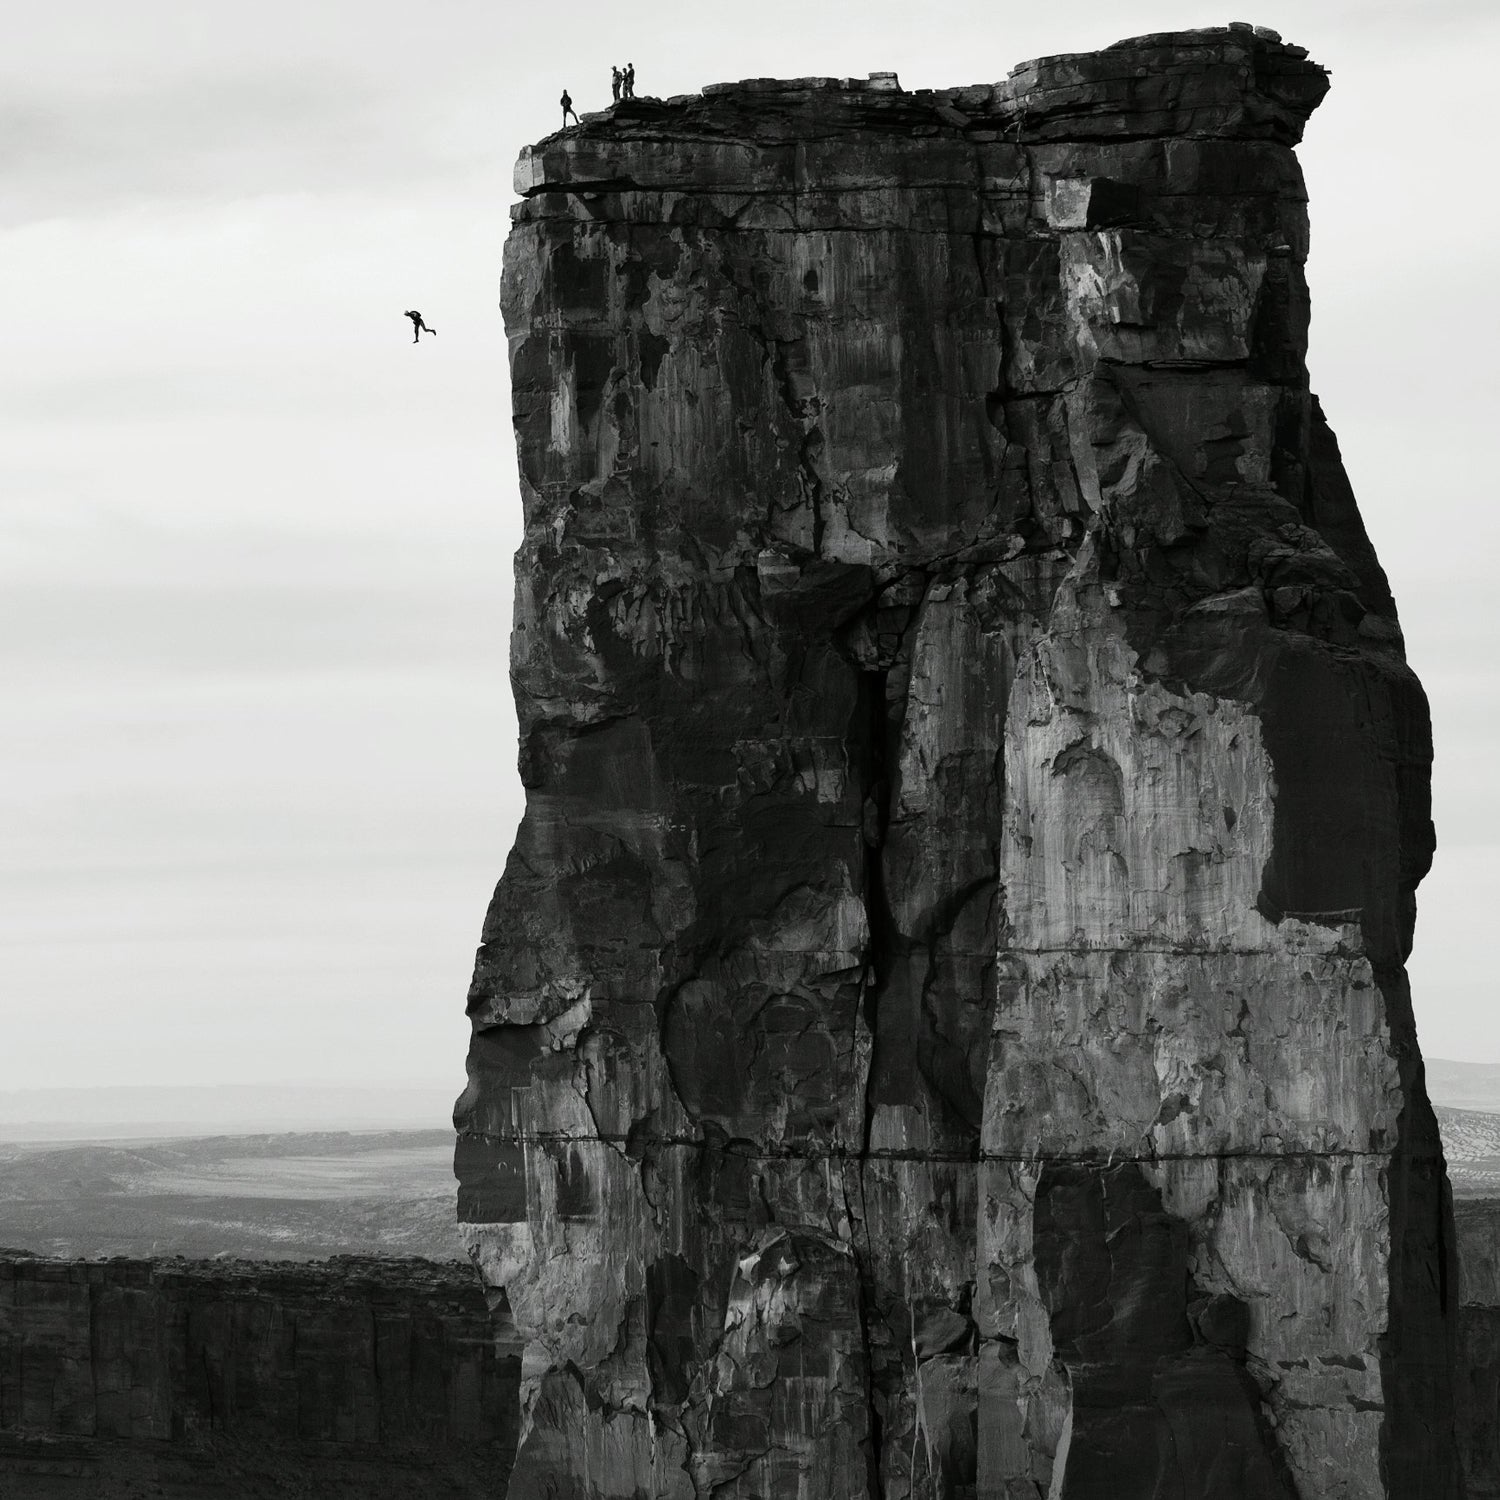
#3. Step Back to Include Context
When capturing action, it’s common to want to zoom in tight. But you need to step back to capture the whole scene. In adventure photography, the landscape often forms an important part of the story. My style frequently focuses on the balance of the athlete and the environment, and I favor the wider angle over tightly zoomed-in images.
#4. Use Your Camera’s ISO to Avoid Tripods
A lot of people ask me about tripods, but 99.9 percent of the time I won’t use one. I find them restrictive and prefer the spontaneity of movement you get without one. A DSLR has the advantage of allowing adjustment of ISO sensitivity for each image; with film, you’re stuck with one speed for an entire roll. If the situation is dark—for example, after a sunset—you can raise the ISO to brighten the scene without changing your aperture or shutter speed. For daylight settings, 100 to 400 is a good range, while 800 to 1,600 is best for low light. Be careful about going too far—ugly noise can become visible beyond 2,000.
#5. Shoot in RAW
RAW gives you lots of editing wiggle room. A JPEG is a compressed file, which limits your ability to tweak the image in production. A RAW file records all the information from a scene, so it gives a lot more freedom to edit and a much higher quality for printing. You can generally select this file format in the “quality” dialog in the menu or on the fly with a button on the body of some of the more professional DSLRs.
#6. Use Your Shutter Wisely
When capturing high-speed action, it’s crucial to have the correct shutter speed. Shooting at 1/1000 second or faster is ideal, though as slow as 1/500 can work in darker situations. Adjusting the ISO to maintain a fast shutter speed is another option that will bring in more light.
To create a more dramatic image, slow the shutter speed to around 1/10 second or even slower. This will show movement in the shot, adding texture and making it more dynamic. Find one object in the image to focus on and track the subject as it moves—the eye wants to rest on something that is sharp and recognizable.
#7. Make Lots of Mistakes
The only way to improve is to shoot as much as you can. Make as many mistakes as possible, and over time you will learn your style and how you want to capture the world. No matter how much you read or what others say, it’s important to be outside shooting as often as possible.
#8. Learn the Rules So You Can Break Them
Photography is all about breaking the rules. No matter what advice is given, I’ve always taken it with a grain of salt. Art is subjective, and the only limitations are what you set yourself. For example, the rule of thirds? That doesn’t mean you have to place subjects exactly a third from the edge of every frame. Sometimes the symmetry of a center-weighted composition can be equally appealing.
#9. Know When to Put the Camera Down
I’ve found moments where it’s been far more valuable to put the camera down and simply record the image in my mind. I remember working in Antarctica at 11 p.m. when a group of whales were feeding at the water’s surface, perhaps 200 meters away. I knew the limitations of my camera, and it was impossible to translate that moment into a still image. It was a moment to watch with the far superior night vision of my own eyes rather than document it.