

Introduction: Twitter Enabled Automatic Dice Roller


The aim of this project is to create an automatic dice roller controlled via Twitter. It uses a Raspberry PI v3 interfaced with a modified dice roller via a relay hat. The code is written in Python, using Open CV and Twython.
Step 1: Materials Needed


The hardware needed for this project is:
- Raspberry PI 3 + PI Camera
- 115 degrees FOV lens and lens adapter for the PI Camera
- Raspberry PI case with Go Pro mount
- Relay HAT
- Camera tripod + GO Pro mount adapter
- USB power supply
- 3 VDC power supply
- USB light
- 3 standard dice with black dots (the ones supplied with the dice roller are quite ugly)
- a battery operated dice roller
Furthermore you'll need a monitor, keyboard and mouse just during the setup phase, in order to align and focus the camera.
I got all my hardware on Amazon, but I think it's easily available on eBay as well...
The software needed for this project is:
- Python 2.7.12
- OpenCV 3.1.0
- Twython 3.4.0
Step 2: Dice Roller Modification


The dice roller need to be modified in order to be powered with a 3 VDC supply and controlled with the relay HAT:
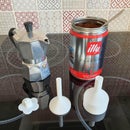
- Remove dome and the dome cover
- choose a paper cup of a suiting size, and cut it in order to get a tube. fit the cup on the dice roller. In this way you can take a clean picture of the dice from above
- Remove batteries
- Remove the bottom plate to access the battery and push button terminals
- Solder a couple of wires in parallel with the battery leads and a couple of wires in parallel with the push button
- Route the wires out of the container and reassemble the bottom plate
Job done!
note:
- I used a USB connector but the motor is a 3 VDC one. Indeed I'm using a 3 VDC power supply with a USB adaptor.
Step 3: Picamera Modification


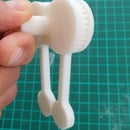
The PI Camera is a fixed focus device, while we need to adjust the focus to our needs. So we can upgrade the camera with a standard M12 2.8mm 115º fixed IRIS lens for security CCTV cameras and a lens Holder with 21mm hole spacing. Proceed as follows:
- use pliers to remove the original lens
- modify the lens holder in order to fit the camera connector (see picture)
- screw in the lens
- modify the camera case (if needed) in order to fit the lens holder
Job done!
Step 4: Relay HAT Connection


Mount the relay HAT on the back of the case using biadhesive tape. Connect terminals as shown.
Step 5: Final Assembly


Let's assembly the system:
- Attach the raspberry to the tripod as shown
- Position the led light and the dice roller
- Connect raspberry to USB power
- Connect led light to USB power
- Connect dice roller to to 3 VDC power
- Connect dice roller push button wires to relay HAT
At the beginning you'll need to connect monitor, keyboard and mouse as well (not shown), in order to align the camera properly
- Adjust position and focus in order to get an image of the dice similar to the one shown
Step 6: Getting Twitter API Keys
To use this device via twitter you'll need a twitter account and access tokens. I'm not writing down a tutorial for this part, but you can check this instructable:
https://www.instructables.com/id/Raspberry-Pi-Twitterbot/
...it's explained pretty well! :)
Step 7: Coding


So you finally got everything ready... what else? You need the code! Just replace the twitter authorization data in it with your own and everything should work. the code is widely commented, so if you want to change something just go trough it...
You'll probably want to change the "userCommand" to suit your twitter account. For me the commands were:
@hombremagnetico roll the dice!
The RasPI will activate the relay shield starting the dice roller for 1 second, then it will switch the relay off. It will then wait for two seconds for the dice to stop, and then it will take a picture, process it and update the stats (file and graph). The processed picture will be tweeted back to the user.
@hombremagnetico stats please!
to get a graph with the updated statistics. The updated stats graph will be tweeted back to the user.
Have fun!
Attachments


First Prize in the
IoT Builders Contest


