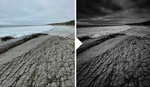
Some days, the light just doesn't cooperate to give you that beautiful blue sky in the background of an image. But your subject may be so compelling, you know you have to fix that sky to make elevate your image from mundane to impressive. You could always replace the sky in Photoshop, but there may just be an even easier way to do it using the Black and White Filter.
How will the Black and White Filter make your colors pop? Colin Smith from photoshopCAFE explains in this one-minute video that a black and white layer in luminosity mode will give you incredible control over the colors in your image.
Simply adjusting the color sliders (red, green, blue, cyan, yellow, and magenta) allows you to deepen the blue sky, or set off the red in an image.


In addition to subtle tweaks that make your colors pop just a bit, you can also get creative and completely change the look of your image by making drastic changes to the sliders. And since it takes less than a minute to make the changes, you can tweak many images quickly, making it an invaluable addition to your workflow.


Great post. I have been doing similar changes in Lightroom but it is great to know how to do this in Photoshop!
Great trick, but even more impressive is that it was in 60 seconds which was about 23 minutes shorter than the typical video which would have said the same thing. Well done!
I agree. It's a real breath of fresh air after too many of these :
(All shouted at camera as if everybody is watching together in a live theatre at once....)
I'm gunna share this mind blowing tip with you, it's so awesome, it'll blow your mind, it's the best ever, you're gonna love it! And it only takes 30 seconds to learn!
For those who don't know me, I'm Simon, and I aim to have a gazillion subscribers by June, so smash those like and subscribe buttons if you're new to my channel, and be sure to tick that little bell icon so my videos pop up into your feed. <Cue 20 second funky after-effects intro>
This episode is part sponsored by Squarespace, who make it soooo easy to make your own website. In fact, it's so easy that I made my website in 3 seconds flat. It takes me twice that time to say hello! Check out Squarespace today, and use my coupon code to get 15% off your first purchase with them. And use their 30 day no obligation free trial period to use all of their features, to really check it out.
Oh and when you're going anywhere, be sure to book with Seatgeek. Seatgeek can get you tickets you couldn't imagine possible for normal people to get at huge events, and at great prices too. Click on this icon here to check them out, and I'll have a link in the description below. Seatgeek are also a sponsor of this show . Thanks to all the great folks over at Seatgeek for their wonderful support.
So, without further ado, back to that tutorial. Let's get right into it. You're really gonna love it, it's so simple but it'll just transform your workflow. You'll wonder how you ever got by without this simple tip. It's so awesome guys, I'm so looking forward to showing it to you. I'm sooo excited!
<shows screen capture> I'm just gonna go ahead and open Lightroom. Here's the icon on my computer's desktop, just go ahead on click on that. This is a Mac, but it's just the same on PC, just go ahead and click on the Lightroom icon. Oh, maybe you click twice on the icon on a PC? And is it left click or right click on a PC....you might need to Google that.
Oop, my computer just hung on me temporarily - that never happens usually! Maybe it has something to do with the free screen capture software I'm using? Hmmm, I'll make sure I leave that 10 second pause in my video, because it really was an important part of me recording this.
Anyhow, after you've opened Lightroom, which I have now after that minor technical difficulty, sorry about that. This tip is so awesome and only takes 30 seconds to show you, let's dive right back in.
Aaaargh!
This is outstanding. :)
I do make a conscious effort to only post videos are worth the time they take to view. If there's 2 minutes of content in an 11-minute video, I generally pass. Glad you liked!
Great tip!
What a wonderful time saving tip. Both presentation and process.
That is a very handy tip, I use that to good effect. It can also be interesting to adjust the b&w layer in normal blend mode, to generate what looks good in b&w, then change the layer to lumosity and see how the colour is affected. Can stimulate creativity in surprising directions.