


We may receive a commission when you use our affiliate links. However, this does not impact our recommendations.
Editor’s note: With the holidays upon us, I’m looking through vintage issues of the magazines and books we own for fun handmade gifts – things that you can build in not too much shop time, but that will help to create a lifetime of memories for the recipients. I’ll post (at least) two every week between now and the new year. This is Holiday Project Post number two – for the “Pint-sized Pickup,” click here.
— Megan Fitzpatrick
 Learn to make through-mortises using a template and a router as you construct this simple and sturdy shelf.
by Rick Peters
from the December 2001 issue of Popular Woodworking Magazine
Like most woodworkers, I try not to reinvent the wheel every time I build a project. Instead, I search through my library and back issues of woodworking magazines to see if I can find what I’m looking for. I usually don’t find exactly what I want – but if it’s close, it’s easy to modify a dimension or decorative feature. So I was quite surprised when I started looking around for a Craftsman-style wall shelf, and came up empty. Further digging revealed that the Craftsman folks of yesteryear didn’t use them. Not because they didn’t have knickknacks, but because they relied on built-in shelving units and large sideboards or buffets to store and display their cherished collectibles.
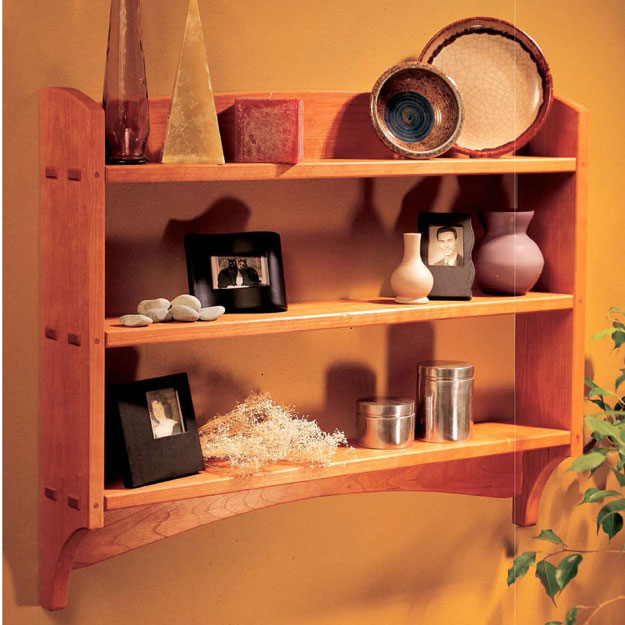
Undaunted, I dusted off my drafting table and put pencil to paper. Designing a wall shelf like this was fairly straight-forward as I had a rough idea of the dimensions I needed and I knew I wanted three shelves approximately 30″ long. As I worked, I incorporated three classic craftsman-style details into the wall shelf: shallow, graceful curves, the corbel (the distinctive curved shape at the bottom of the sides), and the honesty of through-mortise-and-tenon joints. Although quartersawn oak is a trademark of Craftsman-style furniture, I chose cherry instead for two reasons. First, quartersawn oak is highly figured and I wanted the items displayed to catch the eye rather than the shelf itself. Second, since I was looking for a formal, dignified look, I chose cherry – a wood I’ve always felt adds a touch of elegance to any piece.
Once I was comfortable with the design and had worked out the majority of the details, I made a quick mock-up to get a better feel of how the curves would work together and to better visualize the finished piece.
Construction
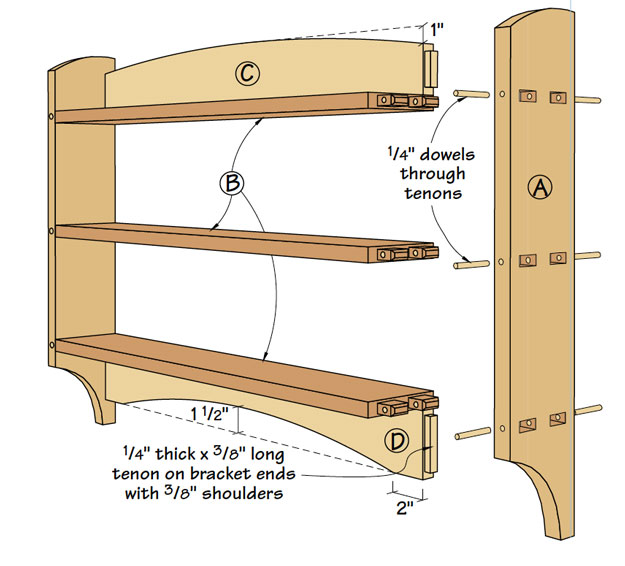
To build the Craftsman-style wall shelf, start by cutting the parts to size. See the cutting list and illustrations. There are only seven parts to the shelf: two identical sides, three identical shelves and a top and bottom bracket. The sides and shelves are 7⁄8″-thick and the brackets are 3⁄4″. As you cut the parts to size, set some of the thicknessed scraps aside for test cuts later.
Mortises
The biggest challenge to building the wall shelf is cutting the mortises in the sides for the shelf tenons. Because these are through-tenons and will be highly visible, I decided it would be best to build a simple router jig for added accuracy. The jig is just a piece of 1⁄4″-thick hardboard with cleats screwed around the edges to hold a side piece in perfect position. Pairs of slots for the mortises in the hardboard are sized to accept a 5⁄8″ OD, 17⁄32″ ID template guide bushing for the router. This bushing can be used with a 1⁄2″-diameter straight bit or spiral-end mill bit. I drilled the holes in the hardboard with a 5⁄8″ brad-point bit and removed the waste between the holes with a sharp chisel.
Cleats screwed around the perimeter of the mortising jig capture a side piece for routing the mortises.
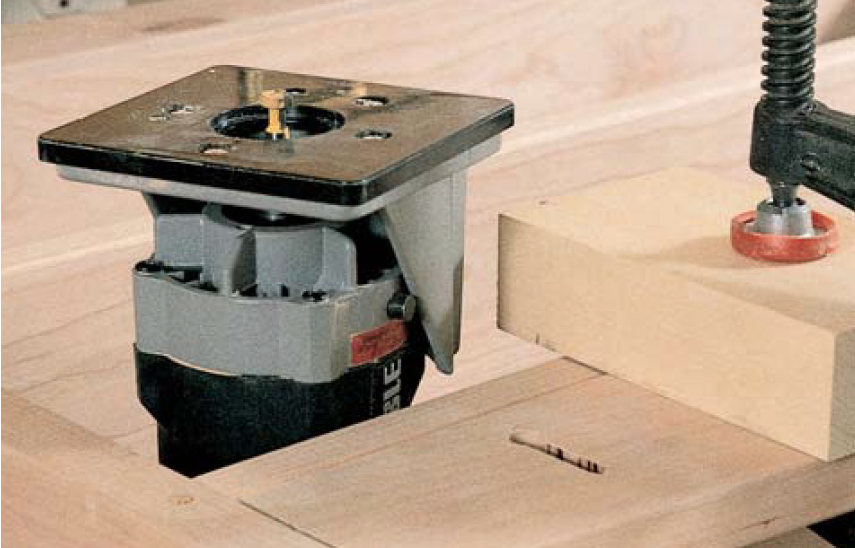
To use the router jig, fit it over a side and slide a scrap of plywood underneath since you’ll be routing all the way through the side. Using a plunge router, take a series of light cuts, blowing out the chips from the mortise after every pass. Continue until you’ve cut all the way through. Then move onto the next mortise.
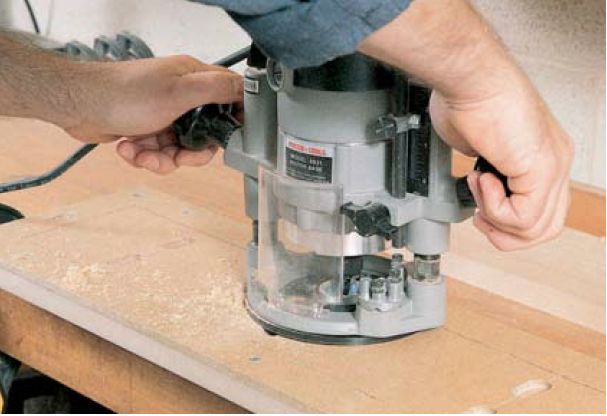
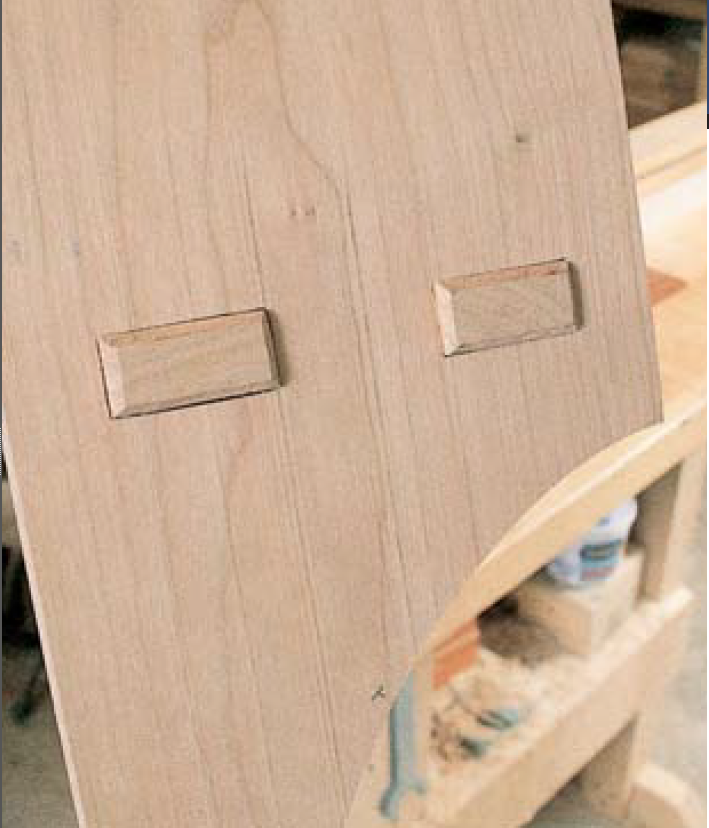
A plunge router plus a mortising jig equals precision mortises –something that’s paramount when the mortises are through and the tenons are exposed.
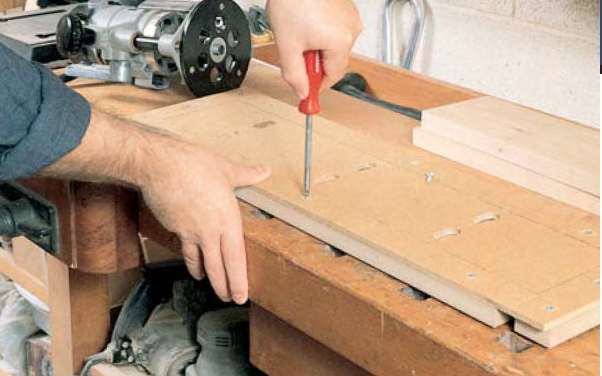
All that’s left is to square up the round corners of each through-mortise with a chisel. Although you can do this with a conventional beveled-edge chisel, a corner chisel will make quick work of the job. Since I lean heavily towards the Craftsman style, it was easy to justify the modest cost of this fine tool. To ensure the corner cuts are perfectly vertical, clamp a guide block flush with the edge of the mortise and press the corner chisel firmly against it as you strike the chisel with a hammer.

To guarantee the mortise corners end up perfectly vertical, clamp a scrap of wood flush with the edge of the mortise to guide the chisel.
There are a couple more mortises to cut on each side piece – these accept the tenons on the ends of the top and bottom brackets. Since these aren’t through-mortises, you needn’t use a jig. Instead, lay them out directly on the sides making sure to book-match them as shown. To cut these mortises, I used a 1⁄4″ mortising bit in the drill press and clamped a fence on the back edge for accuracy.
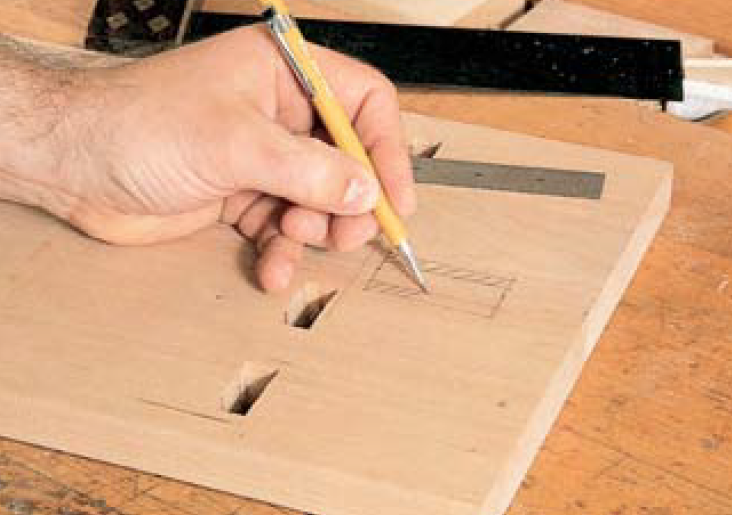
Book match the two sides and lay out the mortises for the brackets directly on each side piece.
Side Shapes
With the mortises complete, use the drawing on the last page to make a pattern of the sides out of 1⁄4″ hardboard. Carefully cut this out with a jigsaw or band saw and sand the edges smooth. Then place the pattern on each side piece and trace around it with a pencil. Now you can cut the sides to shape and sand the edges smooth.
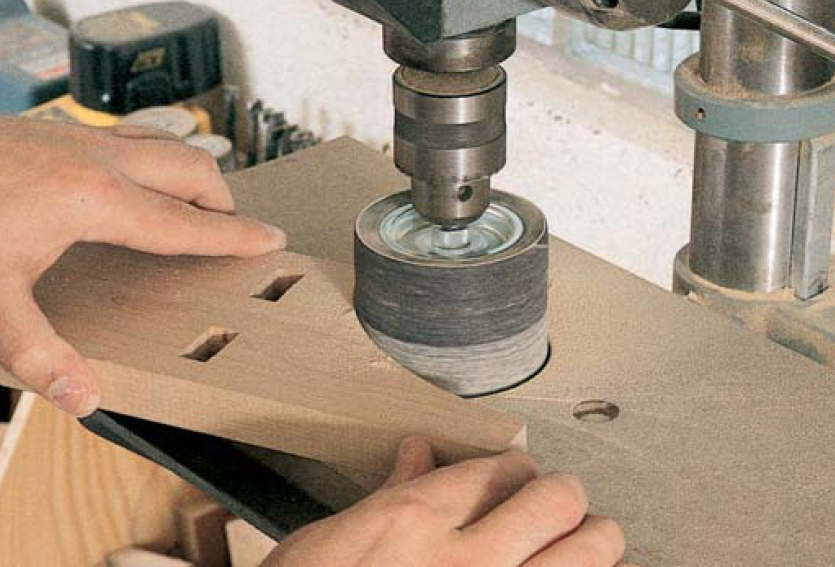
A drum sander fitted in the drill press will make quick work of smoothing the corbel on the bottom and the gentle curve on top of each side piece.
Shelf Tenons
Now that the sides are complete, you can turn your attention to the shelves. Basically all there is to do here is to cut the tenons on the ends to fit the mortises in the sides.
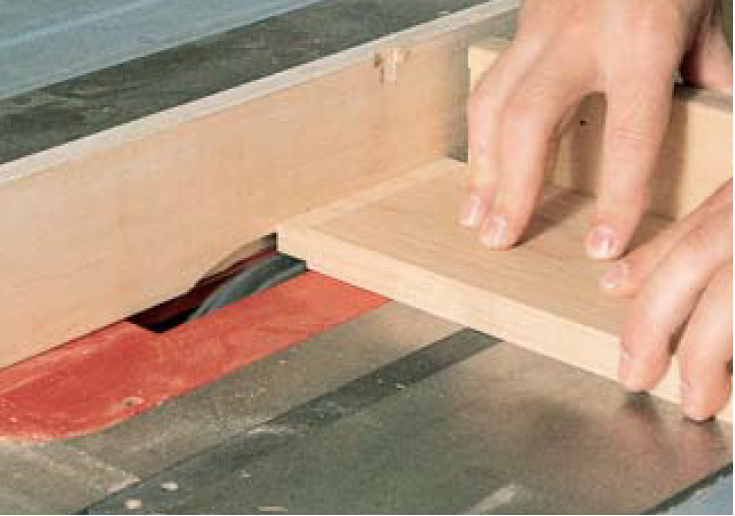
The shoulders for tenons on the shelves areeasily cut on the table saw fitted with a dado blade.
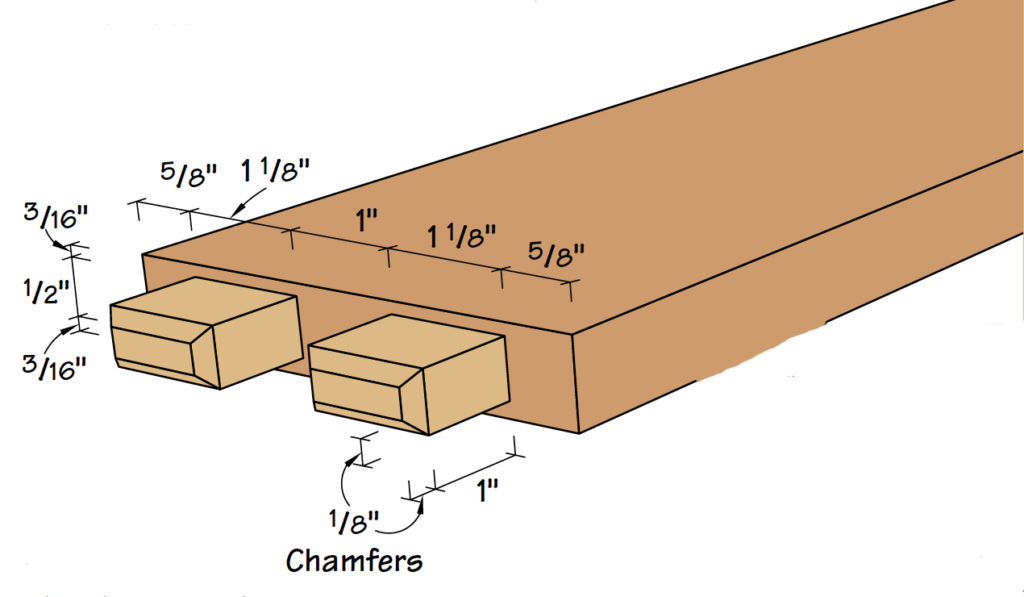
Since the sides are 7⁄8″ thick, I made the tenons 1″ long so they’d protrude through the 7⁄8″-thick sides by 1⁄8″. I cut the twin tenons in two steps. First, with a dado blade in the table saw set for a shallow cut, cut an equal amount off each face to create the shoulders leaving a 1⁄2″-thick tenon (here’s where those scrap pieces come in handy). Then with each shelf on end and a tall support piece attached to the miter gauge, make the end and middle shoulder cuts to form the twin tenons. Here again, use the scrap pieces and sneak up on the perfect fit.
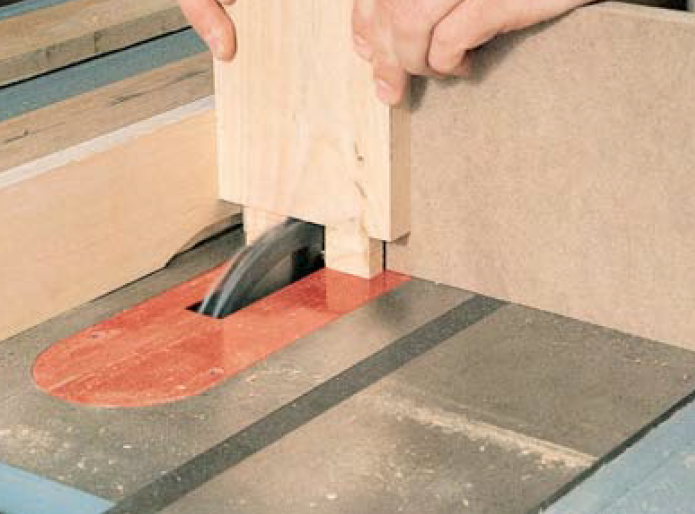
Clamping a tall support fence to your miter gauge will make cutting the twin tenons a safe and easy operation.
Take your time and test the fit often – what you’re looking for is a friction-fit – if you even think about reaching for a hammer to persuade the joint to go together, it’s too tight. Stop and take a little more off. (A finely tuned shoulder plane is excellent for this.) Finally, to soften the ends of the tenons and help them slide more easily into the mortises, I chamfered the ends with a block plane.
A friction fit of the tenons in the mortises is what you’re looking for.You should feel just a slight resistance as you slide the pieces together.
Brackets
The last two pieces of the wall shelf to make are the top and bottom brackets.Each has a graceful curve and tenons cut on the ends to fit into the matching mortises cut in the sides. Once you’ve cut the tenons, lay out the curves by bending a thin strip of wood into a graceful curve and having a helper trace the outline on each bracket. The old boatmaker’s adage “if it looks fair, it is fair” certainly applies here. After you’ve laid out the curves, cut out the shapes and sand the edges smooth.

The graceful curves on the top and bottom brackets can be laid out with the aid of a helper by tracing along a bent strip of thin wood.
Assembly
Before assembling the Craftsman-style wall shelf, there are a couple things to do.First, soften the edges by rout-ing or planing an 1⁄8″ chamfer on all edges except for the top edges of the bottom bracket, the bottom edges of the top bracket, and the back edges of the shelves. Next, sand all the pieces now – this is a habit that’s worth developing – you’ll save yourself a lot of frustration in the long run trying to sand inaccessible spots.
To assemble the wall shelf, first make a dry run. Assemble all the pieces and clamp the shelf together without glue to make sure there won’t be any unwanted surprises. Then carefully disassemble the shelf and apply a small amount of white glue (I don’t use yellow glue here, it sets up too quickly) to the tenons on the shelves and the tenons on the top and bottom bracket. Also, apply a thin bead of glue to the bottom edge of the top bracket and the top edge of the bottom bracket.
Working quickly, slide the shelves and top and bottom brackets into one side piece.Then position the remaining side piece and apply clamps from side to side. You’ll also want to clamp the top and bottom brackets along their lengths to their respective shelves. After the glue dries, remove the clamps and pin the shelves to the sides with short lengths of dowel for added strength.
I drilled 2″-deep holes from both the front and back of each side piece to allow the dowel to pass completely through each tenon to lock it securely in place. A dollop of glue on each end and a few raps of a hammer is all it takes. (Pare off any protruding dowel with a sharp chisel.)
Finally, I routed a pair of keyhole slots in the back to hang the shelf and applied two coats of satin polyurethane.
A keyhole bit fitted in a hand-held router and run along a guide block is an easy way to attach the shelf to a wall.
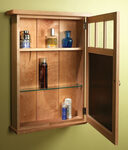
Mounted on the wall, this Craftsman-style shelf will grace any home and will proudly display your favorite collection of pottery, knick-knacks – even antique tools.
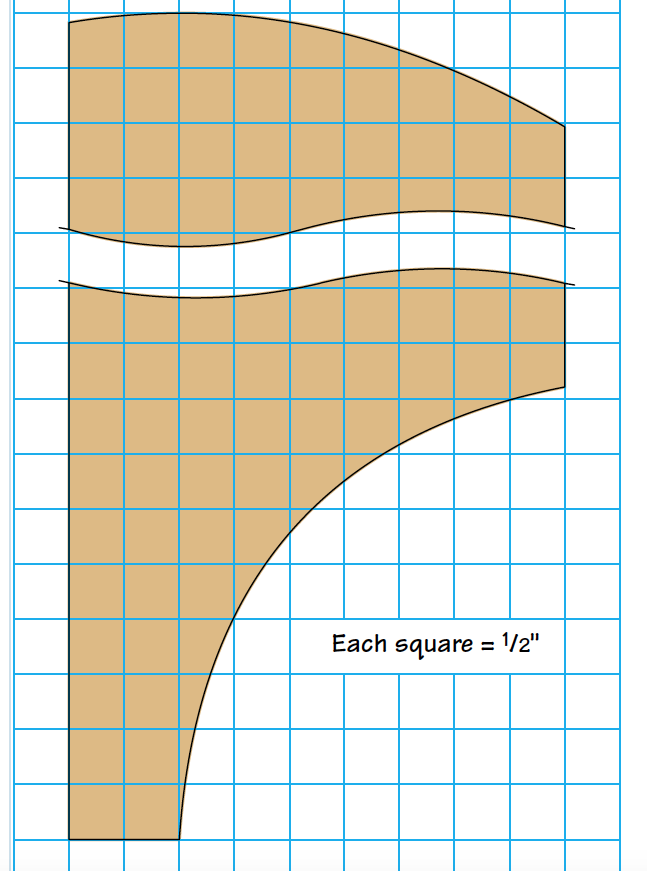
Pattern for the sides.


If you like building this style of furniture, be sure to check out “Popular Woodworking’s Arts & Crafts Furniture Projects,” with 42 outstanding designs.
Here are some supplies and tools we find essential in our everyday work around the shop. We may receive a commission from sales referred by our links; however, we have carefully selected these products for their usefulness and quality.


This is a good one! Thanks for putting it up.