Overview of What We’re Building
This is what our app is going to look like: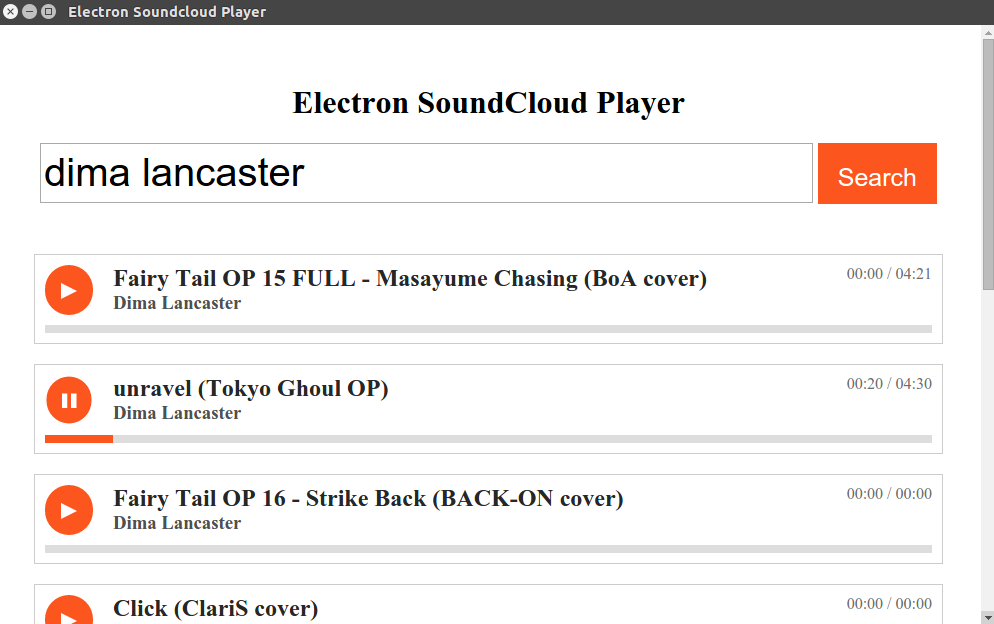 We will use React to create the UI, the SoundCloud API to get the tracks, and Electron to allow the app to run in a browser-like environment. As you can see, it will have a search field for searching for the music to be played and the results will be the audio players for each of the results. Pretty much like what you see on the SoundCloud website.
If you want to follow along make sure you have a SoundCloud account and a SoundCloud app. Take note of the API key because we will use it later.
We will use React to create the UI, the SoundCloud API to get the tracks, and Electron to allow the app to run in a browser-like environment. As you can see, it will have a search field for searching for the music to be played and the results will be the audio players for each of the results. Pretty much like what you see on the SoundCloud website.
If you want to follow along make sure you have a SoundCloud account and a SoundCloud app. Take note of the API key because we will use it later.
Adding Electron and Other Dependencies
Start by cloning the Electron Quick Start repo on Github into a folder titledsoundcloud-player:
git clone https://github.com/atom/electron-quick-start soundcloud-player
package.json file and add the following dev dependencies:
"devDependencies": {
  "electron-prebuilt": "^1.2.0",
  "babel-preset-es2015": "^6.9.0",
  "babel-preset-react": "^6.5.0",
  "babelify": "^7.3.0",
  "browserify": "^13.0.1"
}
- electron-prebuilt —installs Electron prebuilt binaries for command-line use.
- babel-preset-es2015—used for transforming ES6 code to ES5 code (which can run in any modern browser).
- babel-preset-react—used for transforming JSX code to JavaScript.
- babelify—the Babel transformer for Browserify.
- browserify—builds a bundle you can serve up to the browser in a single
<script>tag.
dependencies:
"dependencies": {
  "node-soundcloud": "0.0.5",
  "react": "^0.14.8",
  "react-dom": "^0.14.8",
  "react-loading": "0.0.9",
  "react-soundplayer": "^0.3.6"
}
- node-soundcloud—allows us to make calls to the SoundCloud API.
- react—the React library. Allows us to create UI components.
- react-dom—allows us to render React components into the DOM.
- react-loading—used as a loading indicator for the app.
- react-soundplayer—a React component that allows us to easily create custom audio players for SoundCloud.
dependencies and devDependencies, execute npm install to install all of them.
Finally, add the scripts for compiling and starting the app. This will allow you to run npm run compile to compile the app and npm start to run it.
"scripts": {
  "compile": "browserify -t [ babelify --presets [ react es2015 ] ] src/app.js -o js/app.js",
  "start": "electron main.js"
}
{
  "name": "electron-soundcloud-player",
  "version": "1.0.0",
  "description": "Plays music from SoundCloud",
  "main": "main.js",
  "scripts": {
    "start": "electron main.js",
    "compile": "browserify -t [ babelify --presets [ react es2015 ] ] src/app.js -o js/app.js"
  },
  "author": "Wern Ancheta",
  ...
}
package.json file should now look like this.
Project Structure
This is how we are intending to structure our project:.
├── css
│ └── style.css
├── index.html
├── js
├── main.js
├── package.json
├── README.md
└── src
├── app.js
└── components
├── ProgressSoundPlayer.js
└── Track.js
mkdir -p css js src/components
touch css/style.css src/app.js src/components/ProgressSoundPlayer.js src/components/Track.js
js directory will hold the compiled JavaScript for our app, the css directory our app’s styles and the src directory the app’s components.
Of the files we pulled in from the Electron Quick Start repo, we can remove the following:
rm renderer.js LICENSE.md
main.js and ìndex.html. Of these two files, it is main.js which is responsible for creating a new browser window in which the app will run. However, we need to make a couple of changes to it. Firstly adjust the width on line 13:
mainWindow = new BrowserWindow({width: 1000, height: 600})
mainWindow.webContents.openDevTools()
main.js creates the new browser window, it will load index.html (we’ll look at this file later on in the tutorial). From here, the app will run in the same way as it would in a browser window.
Building the App
The Track Component
Next let’s create theTrack component for the audio player (in src/components/Track.js).
First we require React and a few components provided by React SoundPlayer:
import React, {Component} from 'react';
import { PlayButton, Progress, Timer } from 'react-soundplayer/components';
Component class from React. As the name suggests, Component is used for creating new components.
Then we create a new component named Track and give it a render method. Note that we’re exporting this class so it can be imported into another file later on.
export default class Track extends Component {
  render() {
    ...
  }
}
render method we extract the information about the current audio track from the props it received and then assign them to their own variables using destructuring assignment. This way we can use track instead of this.props.track.
const { track, soundCloudAudio, playing, seeking, currentTime, duration } = this.props;
const currentProgress = currentTime / duration * 100 || 0;
return (
  <div className="player">
    <PlayButton
      className="orange-button"
      soundCloudAudio={soundCloudAudio}
      playing={playing}
      seeking={seeking} />
    <Timer
      duration={duration}
      className="timer"
      soundCloudAudio={soundCloudAudio}
      currentTime={currentTime} />
    <div className="track-info">
      <h2 className="track-title">{track && track.title}</h2>
      <h3 className="track-user">{track && track.user && track.user.username}</h3>
    </div>
    <Progress
      className="progress-container"
      innerClassName="progress"
      soundCloudAudio={soundCloudAudio}
      value={currentProgress} />
  </div>
);
The ProgressSoundPlayer Component
Let’s move on to the ProgressSoundPlayer component (src/components/ProgressSoundPlayer.js). This will serve as the wrapper for theTrack component created above.
Aside from React and the Track component, we also need to import the SoundPlayerContainer. The SoundPlayerContainer is a higher level container that propagates its children with the props they will need to build the audio player.
import React, {Component, PropTypes} from 'react';
import { SoundPlayerContainer } from 'react-soundplayer/addons';
import Track from './Track';
ProgressSoundPlayer component. All this does is render the SoundPlayerContainer which wraps the Track component. Note that we do not need to pass anything to the Track component since SoundPlayerContainer automatically does this for us behind the scenes. We do however, need to pass the resolveUrl and clientId as props for the SoundPlayerContainer.
export default class ProgressSoundPlayer extends Component {
  render() {
    const {resolveUrl, clientId} = this.props;
    return (
      <SoundPlayerContainer resolveUrl={resolveUrl} clientId={clientId}>
        <Track />
      </SoundPlayerContainer>
    );
  }
}
resolveUrl and clientId to be passed in when this component is rendered.
ProgressSoundPlayer.propTypes = {
  resolveUrl: PropTypes.string.isRequired,
  clientId: PropTypes.string.isRequired
};
propTypes is a good practice to get into. This will trigger warnings in the dev tools console if the props that the component requires don’t get passed to it. Note that we didn’t have to do this earlier in the Track component since the SoundPlayerContainer is responsible for passing in all of the necessary props.
Here’s what the complete component looks like.
Main Component
The main file is src/app.js. This is responsible for rendering the full UI of the app—that is the search field, and the audio players. Breaking the code down, we first import all the libraries that we need. Each of these were mentioned earlier in the dependencies section (except for theProgressSoundPlayer which we created).
import React, {Component} from 'react';
import ReactDOM from 'react-dom';
import ProgressSoundPlayer from './components/ProgressSoundPlayer';
import SC from 'node-soundcloud';
import Loading from 'react-loading';
var client_id = 'YOUR SOUNDCLOUD APP ID';
SC.init({
  id: client_id
});
Main component:
class Main extends Component {
    ...
}
constructor method we then call super() to call the constructor of the Component class and any initialization code that the Component class has.
constructor(props){
  super();
}
queryis the default search query.hasResultsis used for tracking whether the component currently has any results from the API or not.searchResultsstores the current search results.isLoadingis used for tracking whether the app is currently fetching results from the API or not. When this is set totrue, the spinner becomes visible to indicate that there’s something going on.
this.state = {
  query: '',
  hasResults: false,
  searchResults: [],
  isLoading: false
};
handleTextChange method. This is used for updating the value of query in the state and also calls the search method if the Enter key is pressed. This method gets called when the onKeyUp event gets fired on the search field.
handleTextChange(event){
  this.setState({
    query: event.target.value
  });
  if(event.key === 'Enter'){
    this.search.call(this);
  }
}
search method, which sends the query to the SoundCloud API and processes the response. First it sets the isLoading state to true so that the spinner becomes visible. Then it makes a GET request to the tracks endpoint of the SoundCloud API. This endpoint accepts the query as its required parameter, but we also pass in an additional embeddable_by parameter to specify that we only want to fetch tracks that are embeddable by everyone. Once we get a response back, we check if there are any errors and if there aren’t, we update the state with the search results. At this point the component should now re-render to show the search results.
search(){
  this.setState({
    isLoading: true
  });

  SC.get('/tracks', {
    q: this.state.query,
    embeddable_by: 'all'
  }, (err, tracks) => {
    if(!err){
      this.setState({
        hasResults: true,
        searchResults: tracks,
        isLoading: false
      });
    }
  });
}
render method renders the UI of the component. This contains a search field for entering the song name or artist and a button for submitting the search. It also contains a couple of conditional statements for rendering the Loading component (which only becomes visible when isLoading has a truthy value) and the search results (which are only displayed when hasResults is truthy but isLoading is falsy).
render(){
  return (
    <div>
      <h1>Electron SoundCloud Player</h1>
      <input type="search"
             onKeyUp={this.handleTextChange.bind(this)}
             className="search-field"
             placeholder="Enter song name or artist..." />
      <button className="search-button"
              onClick={this.search.bind(this)}>Search</button>
      <div className="center">
        {this.state.isLoading && <Loading type="bars" color="#FFB935" />}
      </div>
      {this.state.hasResults && !this.state.isLoading ?
       this.renderSearchResults.call(this) :
       this.renderNoSearchResults.call(this)}
    </div>
  );
}
bind() for the handleTextChange method and call() for the renderSearchResults and renderNoSearchResults methods. This is because methods in React aren’t automatically bound when using the ES6 class syntax. Alternatively, you can use something like decko to auto-bind specific methods to the class. For example:
import { bind } from 'decko';

// ...

@bind
handleTextChange(event){
  this.setState({
    query: event.target.value
  });
  if(event.key == 'Enter'){
    this.search();
  }
}
renderNoSearchResults(){
  return (
    <div id="no-results"></div>
  );
}
map method in the searchResults to loop through all the results and execute the renderPlayer function for each iteration.
renderSearchResults(){
  return (
    <div id="search-results">
      {this.state.searchResults.map(this.renderPlayer.bind(this))}
    </div>
  );
}
renderPlayer function accepts the individual track object as its argument. We use it as a source for the key and resolveUrl props. If you’ve worked with React in the past, you already know that when using the map method to render a list, we always have to pass a unique key or else React will complain. The other two props: clientId and resolveUrl are required by the ProgressSoundPlayer component. The clientId is the SoundCloud API key which you defined earlier and the resolveUrl is the unique URL that refers to that specific audio track. It’s the same URL that you get when you visit the page for a specific audio track on SoundCloud.
renderPlayer(track){
  return (
    <ProgressSoundPlayer
      key={track.id}
      clientId={client_id}
      resolveUrl={track.permalink_url} />
  );
}
var main = document.getElementById('main');
ReactDOM.render(<Main />, main);
Styling the App
The styles for the app reside in css/style.css. The stylesheet contains style declarations for each of the components (play button, search button, progress bar, and other elements that we’ve used).Index File
As mentioned earlier, when Electron’smain.js file creates the new browser window, it will load index.html. There’s nothing fancy here, just your standard HTML file with a style sheet and a JavaScript file.
<!DOCTYPE html>
<html lang="en">
  <head>
    <meta charset="UTF-8">
    <title>Electron Soundcloud Player</title>
    <link rel="stylesheet" href="css/style.css">
  </head>
  <body>
    <div id="main"></div>
    <script src="js/app.js"></script>
  </body>
</html>
Compiling the App
Inside the Electron environment you can actually require stuff just as you would in a standard Node.js app. This means that you can actually use something like:import fs from 'fs';
const buffer = fs.readFileSync(`${__dirname}/index.html`);
console.log(buffer.toString());
npm run compile
Running and Packaging the App
You can run the app by executingnpm start in the root of your project. But that wouldn’t be any fun at all. You might as well just run the app in the browser and call it a day. Instead, what we’ll do is to package the app into a single folder. That folder will contain all the files necessary for the app to run. You can then create an archive from that folder to distribute your app.
To package the app we need to install electron-packager:
npm install electron-packager -g
electron-packager ./soundcloud-player SoundCloudPlayer --version=1.2.4 --platform=linux --out=/home/jim/Desktop --arch=all --ignore="(node_modules|src)"
./soundcloud-player—your project directory.SoundCloudPlayer—your app name.--version=1.2.0—the version of Electron that you want to use. It’s at version 1.2.0 at the time of writing of this article, so if you’re reading this at a later time, you can probably use the latest version as long as there are no breaking changes in the API.--platform=linux—the platform where you want to deploy to. In this case I used Linux since I’m on Ubuntu. If you want to package for all major platforms (Windows, OSX, Linux) though, you can use the--alloption instead.--out=/home/wern/Desktop—the output directory. This is where the package will get created.--arch=all—the processor architecture. We’ve specifiedallwhich means it will build for both 32-bit and 64-bit operating systems.--ignore="(node_modules|src)"—since the app is going to get packaged with Electron and Chrome, the size is going to be pretty big. The only thing that we could do to prevent it from further inflating is to exclude all the files that we do not need. Since we’re already compiling into a single JavaScript file, we no longer need anything inside thenode_modulesand thesrcdirectory.
Where to Go From Here
In this tutorial we’ve built a pretty simple Electron app. It works but we can still improve on it. Here are some suggestions for improvements that could be made:- Paginate the search results.
- Add a function to automatically stop a playing track once the user searches.
- Remove the button and call search directly from the
handleTextChangemethod. - Package the app to an asar archive to avoid exposing your source code to everyone.
- If you’re serious about distributing your app to the whole world. You can create an installer for all major platforms (Windows, OSX, and Linux). There’s a project called electron-builder which allows you to do so.
- NW.js—previously known as node-webkit. Allows you to call node modules directly from the DOM. If you’re looking for Electron alternatives, you might want to check this out.
- Create Cross-Platform Desktop Node Apps with Electron—a recent SitePoint tutorial.
- Electron Video Tutorials
- Electron Official Docs
Conclusion
In this tutorial we’ve learned how to create a sleek and stylish cross-platform application using Electron. What’s better is that we’ve done this by leveraging our existing web dev skills. We’ve also seen how easy it is to package and distribute this app as an OS-specific bundle. I’d love to hear about the applications you build with Electron in the comments below.Frequently Asked Questions on Building a Music Streaming App
What are the key features to consider when building a music streaming app?
When building a music streaming app, there are several key features to consider. First, the app should have a user-friendly interface that allows users to easily navigate and find their favorite songs or artists. Second, the app should offer a wide range of music genres to cater to different tastes. Third, the app should have a search function that allows users to quickly find songs, albums, or artists. Fourth, the app should allow users to create and manage their own playlists. Lastly, the app should have a social sharing feature that allows users to share their favorite songs or playlists with their friends.
How can I ensure high-quality audio streaming in my app?
Ensuring high-quality audio streaming in your app involves several factors. First, you need to choose a reliable streaming protocol that can deliver high-quality audio without buffering or lagging. Second, you need to optimize your app for different network conditions to ensure smooth streaming even in low-bandwidth situations. Third, you need to use high-quality audio files and codecs to ensure the best audio experience for your users.
How can I monetize my music streaming app?
There are several ways to monetize a music streaming app. One common method is through subscription-based models where users pay a monthly fee for unlimited access to music. Another method is through advertising where you display ads in your app and earn revenue from ad impressions or clicks. You can also offer in-app purchases for premium features or content.
How can I ensure the security of my music streaming app?
Ensuring the security of your music streaming app involves several steps. First, you need to implement secure coding practices to prevent common security vulnerabilities. Second, you need to use secure protocols for data transmission to prevent data interception. Third, you need to implement user authentication and authorization to prevent unauthorized access to user data.
How can I make my music streaming app stand out from the competition?
Making your music streaming app stand out from the competition involves offering unique features or services that others don’t. This could be a unique music discovery feature, exclusive content, superior audio quality, or a unique user interface. You also need to continuously improve and update your app based on user feedback and market trends.
What are the challenges in building a music streaming app?
Building a music streaming app comes with several challenges. These include ensuring high-quality audio streaming, dealing with copyright issues, securing user data, and providing a user-friendly interface. Additionally, you need to deal with competition from established players in the market.
How can I attract users to my music streaming app?
Attracting users to your music streaming app involves a combination of effective marketing strategies and offering a great user experience. This could involve social media marketing, influencer marketing, SEO, and other digital marketing strategies. Additionally, offering a user-friendly interface, high-quality audio, and unique features can help attract and retain users.
How can I handle copyright issues in my music streaming app?
Handling copyright issues in your music streaming app involves obtaining the necessary licenses from music rights holders. This typically involves negotiating with record labels and music publishers to obtain the rights to stream their music on your app. You also need to ensure that you comply with copyright laws and regulations in the countries where your app is available.
How can I improve the user experience in my music streaming app?
Improving the user experience in your music streaming app involves several factors. First, the app should have a user-friendly interface that is easy to navigate. Second, the app should offer personalized recommendations based on the user’s music preferences. Third, the app should offer features like offline listening, high-quality audio, and social sharing to enhance the user experience.
How can I maintain and update my music streaming app?
Maintaining and updating your music streaming app involves regularly checking for bugs and fixing them, updating the app with new features based on user feedback, and ensuring that the app is compatible with the latest operating systems and devices. You also need to monitor user behavior and app performance to identify areas for improvement.
 Wern Ancheta
Wern is a web developer from the Philippines. He loves building things for the web and sharing the things he has learned by writing in his blog. When he's not coding or learning something new, he enjoys watching anime and playing video games.