For a freelancer, nothing is more important than time. Tracking invoices or doing paperwork can quickly become tedious and occupy a large portion of that. In March, I showed you FusionInvoice, a tool to keep track of your clients and invoices. Although it’s a nice and easy to use tool, its open-source version has since been discontinued and in part taken over by InvoicePlane. In this post, however, I’d like to introduce you to InvoiceNinja.
Introducing InvoiceNinja
InvoiceNinja is an open-source self-hosted and cloud hosted invoicing platform.
True to its motto, InvoiceNinja’s interface is simple and intuitive making creating invoices a breeze. Tasks like managing clients, issuing a new invoice or adding a payment are just simple actions that even an inexperienced user will feel comfortable doing. Its simplistic dashboard greets the user displaying relevant information about the invoices created and their status. The live preview of the invoice will help you to easily review it before sending it to your clients.
Through integration with PayPal, Google Wallet and 21 other payment processors, InvoiceNinja makes it very easy for your clients to reimburse you for your work directly through the application.
Getting down on the technical level, InvoiceNinja has, at its core, the latest version of the Laravel framework while its UI is built on the Twitter Bootstrap library. This integration makes it easy to update the self-hosted version’s theme exactly to your requirements as well as having a responsive layout and being mobile friendly out-of-the-box.
Knockout.js, a Javascript MVVM library, connects the rich UI to the business logic – and with the help of the jsPDF Javascript library you can easily export the invoice directly as a PDF file or send it via email to your customers with just a few clicks of the mouse.
Installation steps
Installation to a local environment is very simple when using Laravel’s Homestead pre-packaged Vagrant box. Homestead runs on any Windows, Mac, or Linux host system and includes the Nginx web server, PHP 5.5 and the MySQL 5.5 database server already installed and configured.
Bruno Škvorc makes a great job explaining how to get Homestead up and running in just 5 simple steps. You can check out his article if you are unfamilliar to Homestead as we won’t go in to much detail here. Just make sure you follow his steps but skip the 5th step and do not boot the VM before we customize it for our application.
Now if you followed Bruno’s instructions and you have downloaded the Homestead VM on your machine customizing it for our InvoiceNinja installation it is a simple 4 line change.
Open the Homestead.yaml file in your preferred editor and change the next few lines according to your installation paths:
folders:
  - map: /path/to/your_installation
    to: /home/vagrant/invoice-ninja
and
sites:
  - map: invoice.ninja.dev
    to: /home/vagrant/invoice-ninja/public
The folders/map: /path/to/your_installation refers to the path you set on your host machine. This is where the files will ultimately be downloaded although to the VM they will appear as being installed inside of the Vagrant box.
Those are all the modifications we need. Now just boot your VM using the vagrant up command and let it finish installing.
When the installation of the VM is done, and it should not take more than just a few minutes, we will start downloading InvoiceNinja along with all its dependecies from Github.
To start downloading the application, just SSH into the Homestead VM using the vagrant ssh command. After you are logged in run the next command at the prompt:
$ cd ~/invoice-ninja
This will change the working directory to the folder we previously set to host our application inside the VM.
To begin downloading InvoiceNinja to our local environmnent run the next command:
$ git clone https://github.com/hillelcoren/invoice-ninja.git .
Note: Make sure you include the dot at the end of the clone command otherwise Git will create a subfolder which will break the path we set earlier for our Nginx sites config.
In order to keep up-to-date any third-party dependencies used by the project, the development team is using Composer. (If you are not familiar with Composer, Sitepoint has a very good article written by Alexander Cogneau that will quickly get you up to speed with using Composer).
Now let’s install the rest of the libraries by running the next command:
$ composer install
Note: Github is limited to 60 request per hour for unauthenticated users. Because of this limitation you will have to log in with your Github account when asked to be able to install the rest of the components. If you don’t have a Github account, create one.
After we finished downloading all the dependencies, let’s prepare the database by running the next command:
$ mysql -u root -psecret
The Homestead box comes with MySQL pre-installed and configured. The default configuration created a user called “homestead” with the password “secret”. This user will have most of the administrative rights but in our case we will need the “root” user in order to create and assign to our database the “ninja” user which is configured by default in the InvoiceNinja application. By adding the ninja user we will avoid changing the default configuration of our application, but you are free to skip the last 2 commands in this step if you feel comfortable quickly changing the database connection settings in InvoiceNinja’s config files.
Once you have successfully logged in to the MySQL prompt run the next series of commands:
mysql > CREATE DATABASE `ninja` DEFAULT CHARACTER SET utf8 COLLATE utf8_general_ci;
mysql > CREATE USER 'ninja'@'localhost' IDENTIFIED BY 'ninja';
mysql > GRANT ALL PRIVILEGES ON `ninja`.* TO 'ninja'@'localhost';
mysql > FLUSH PRIVILEGES;
That’s it. We created the database and configured the “ninja” user with all the required access to the database.
Once we’ve finished with the setup let’s seed the database by running the next command:
$ php artisan migrate --seed
Create our first invoice
Now that we successfully installed InvoiceNinja on our system let’s create our first invoice made to ACME Inc.
After you log in, if you choose to create a company profile, you are welcomed by the well designed dashboard.
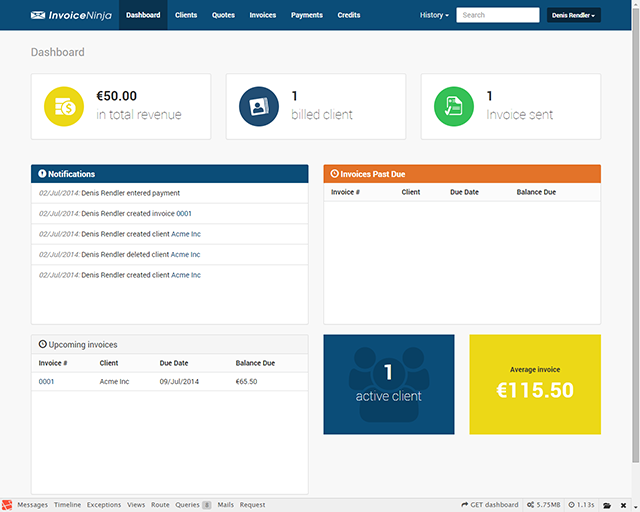
As you may notice, the design is simple yet elegant and provides the user with all the necessary information upfront. This design becomes quite handy on mobile devices which lack in page real-estate that desktops have in abundance.
InvoiceNinja is able to maintain client lists, invoice and item tax rates, services and products all of which you can easily link to a new invoice.
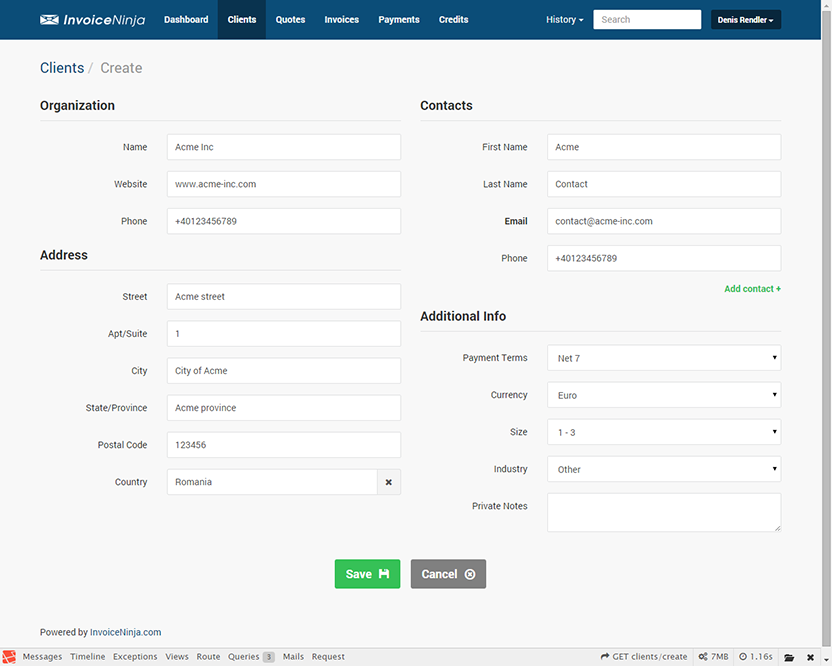
To add a client you can either add him while creating your invoice or by selecting the Clients > New Client command from the main menu at the top of the page.
Now let’s create a new client called ACME Inc. and fill in the details as shown in the screenshot below.
Once you filled all the fields and saved the client proceed to Invoices > New Invoice to create our first invoice as displayed in the next screenshot.
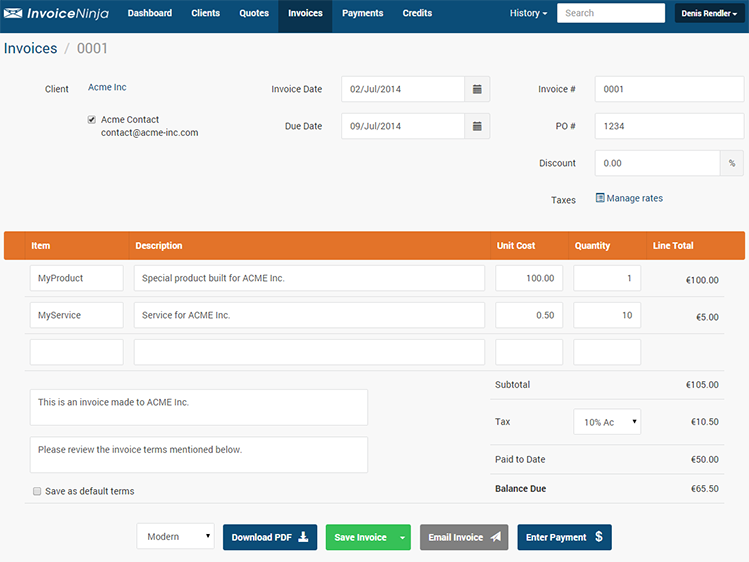
Tax rates can be easily managed while creating the invoice by selecting Manage rates and adding the tax rate details.
With InvoiceNinja you can also add a percentage discount applicable directly to the invoice.
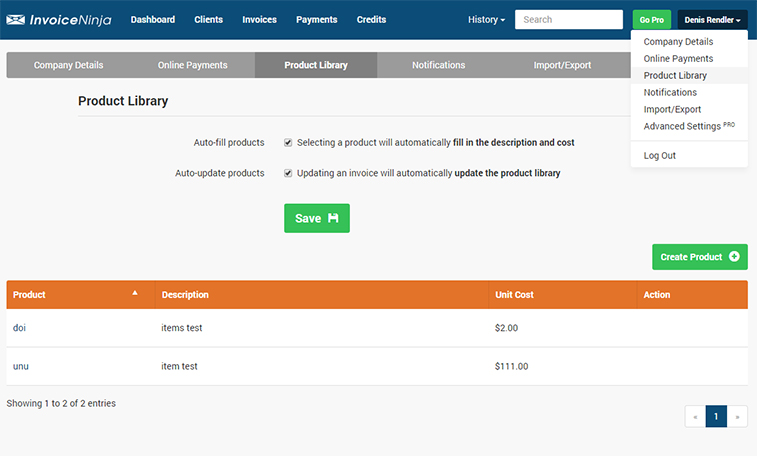
Products and services can be managed by selecting the Product Library from the upper right menu displayed when you click your user name.
Simple, right?
Conclusion
With the client’s data and products already saved, creating a new invoice is just a matter of a adding the quantity for each product or service and choose the method of delivery – either as PDF or e-mail a link to the invoice.
There is however a downside to all of this simplicity and speed. There are only 4 templates for the invoice and the only customization you can do without diving into the code is change the primary and secondary colors. The currency is saved on a per client basis which means that you will not have the option to use a different currency for a certain invoice to the same client. Other options like managing tax rates are accessible only when you create an invoice or quote. You will also not have the option to apply a fixed discount.
One of the biggest problems I noticed is that if you delete a client, all invoices associated to that client will also be deleted but the application doesn’t warn you about this.
In future posts, we’ll see how we can fix some of these issues and make the application suit our needs. Have you given it a go? Done any extensions? Let us know!
Frequently Asked Questions (FAQs) about InvoiceNinja
What makes InvoiceNinja different from other invoicing platforms?
InvoiceNinja stands out from other invoicing platforms due to its open-source nature. This means that users have the freedom to modify and customize the software to suit their specific needs. It also offers a self-hosted solution, which provides users with full control over their data and privacy. Additionally, InvoiceNinja supports a wide range of payment gateways, making it easier for businesses to accept payments from customers worldwide.
How secure is InvoiceNinja?
InvoiceNinja prioritizes user security. It uses secure encryption to protect sensitive data and complies with PCI DSS standards. Furthermore, the self-hosted solution allows users to maintain complete control over their data, adding an extra layer of security.
Can I customize my invoices with InvoiceNinja?
Yes, InvoiceNinja offers a high level of customization for invoices. Users can add their logo, choose from various invoice designs, and even create their own design using the platform’s built-in design tools. This allows businesses to maintain their brand identity across all their invoices.
Does InvoiceNinja support recurring billing?
Yes, InvoiceNinja supports recurring billing, making it easier for businesses to manage subscriptions and other recurring payments. Users can set up automatic billing cycles, send reminders for upcoming payments, and even automate late payment fees.
Can I use InvoiceNinja on my mobile device?
Yes, InvoiceNinja offers mobile apps for both iOS and Android devices. This allows users to manage their invoices, track time, and accept payments on the go.
What payment gateways does InvoiceNinja support?
InvoiceNinja supports a wide range of payment gateways, including PayPal, Stripe, and Authorize.net. This makes it easier for businesses to accept payments from customers worldwide.
Can I track time with InvoiceNinja?
Yes, InvoiceNinja includes a time tracking feature. This allows users to accurately track the time spent on projects and bill clients accordingly.
Does InvoiceNinja offer customer support?
Yes, InvoiceNinja offers customer support via email and a community forum. Users can also access a range of resources on the platform’s website, including tutorials and FAQs.
Can I manage expenses with InvoiceNinja?
Yes, InvoiceNinja includes an expense tracking feature. This allows users to record and categorize expenses, making it easier to manage business finances.
Is there a free version of InvoiceNinja?
Yes, InvoiceNinja offers a free version of its software. This version includes basic invoicing features and supports up to 100 clients. For more advanced features, users can upgrade to one of the platform’s paid plans.
 Denis Rendler
Denis is a Zend certified PHP Developer from Romania. He loves programming and playing with new technologies. In his spare time he likes to share his knowledge with other IT lovers and less tech-savvy people.