New JEDEC DDR5 Memory Specification: Up To 8800 MT/s, Anti-Rowhammer Features

Rapid row activations (yellow rows) may change the values of bits stored in victim row (purple row).
Row hammer” by DsimicOwn work. Licensed under CC BY-SA 4.0 via Wikimedia Commons.

As DDR SDRAM increases in density and speed, so too do new challenges and opportunities appear. In the recent DDR5 update by JEDEC – as reported by Anandtech – we see not only a big speed increase from the previous maximum of 6800 Mbps to 8800 Mbps, but also the deprecation of Partial Array Self Refresh (PASR) due to security concerns, and the introduction of Per-Row Activation Counting (PRAC), which should help with row hammer-related (security) implications.

Increasing transfer speeds is primarily a matter of timings within the limits set by the overall design of DDR5, while the changes to features like PASR and PRAC are more fundamental. PASR is mostly a power-saving feature, but can apparently be abused for nefarious means, which is why it’s now gone. As for PRAC, this directly addresses the issue of row hammer attacks. Back in the 2014-era of DDR3, row hammer was mostly regarded as a way to corrupt data in RAM, but later it was found to be also a way to compromise security and effect exploits like privilege escalation.

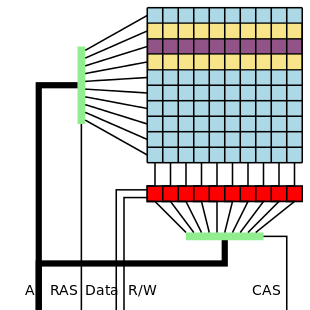
The way PRAC seeks to prevent this is by keeping track of how often a row is being accessed, with a certain limit after which neighboring memory cells get a chance to recover from the bleed-over that is at the core of row hammer attacks. All of which means that theoretically new DDR5 RAM and memory controllers should be even faster and more secure, which is good news all around.

End-Of-Life For Z80 CPU And Peripherals Announced

In a Product Change Notification (PCN) published on April 15, Zilog (now owned by Littelfuse) announced the End of Life for a range of Z80 products, specifically virtually all of the Z84C00 range. This also includes the peripherals, such as the Z84C10 range of MPUs. These are currently already marked as EoL on stores like Mouser, with Littelfuse noting that the last orders with them can be placed until June 14th of 2024. After that you’ll have to try your luck with shady EBay sellers and a lucky box of old-new-stock found in the back of a warehouse.

What this effectively means is that after just under 48 years since its launch in 1976, the Zilog Z80 will no longer be available for sale as discrete components, which is likely to primarily impact hobbyists and people who are trying to keep retro systems going. This does not mean that it’s the end of the road for Z80, however, as the eZ80 will be produced for the foreseeable future.

These new chips will of course not come in easy to drop in DIPs, making the challenge of breadboarding your own Z80-based microcomputer that much tougher. Yet one thing that definitely won’t happen is any of us witnessing the end of the era of the Z80, 6502 and 8051 architectures.

Thanks to [Techokami] for the tip.

Logic analyzer capture, showing the rails constantly oscillating at a high rate

When Your Level Shifter Is Too Smart To Function

By now, 3.3V has become a comfortable and common logic level for basically anything you might be hacking. However, sometimes, you still need to interface your GPIOs with devices that are 5 V, 1.8 V, or something even less common like 2.5 V. At this point, you might stumble upon autosensing level shifters, like the TXB010x series Texas Instruments produces, and decide that they’re perfect — no need to worry about pin direction or bother with pullups. Just wire up your GPIOs and the two voltage rails you’re good to go. [Joshua0] warns us, however, that not everything is hunky dory in the automagic shifting world.

During board bring-up and multimeter probing, he found that the 1.8 V-shifted RESET signal went down to 1.0V — and its 3.3 V counterpart stayed at 2.6V. Was it a current fight between GPIOs? A faulty connection? Voltage rail instability? It got more confusing as the debugging session uncovered the shifting operating normally as soon as the test points involved were probed with the multimeter in a certain order. After re-reading the datasheet and spotting a note about reflection sensitivity, [Joshua0] realized he should try and probe the signals with a high-speed logic analyzer instead.

Continue reading “When Your Level Shifter Is Too Smart To Function”

Delays And Timers In LTSpice (no 555)

If you need a precise time, you could use a microcontroller. Of course, then all your friends will say “Could have done that with a 555!” But the 555 isn’t magic — it uses a capacitor and a comparator in different configurations to work. Want to understand what’s going on inside? [Mano Arrostita] has a video about simulating delay and timer circuits in LTSpice.

The video isn’t specifically about the 555, but it does show how the basic circuits inside a timer chip work. The idea is simple: a capacitor will charge through a resistor with an exponential curve. If you prefer, you can charge with a constant current source and get a nice linear charge.

You can watch the voltage as the capacitor charges and when it reaches a certain point, you know a certain amount of time has passed. The discharge works the same way, of course.

We like examining circuits for learning with a simulator, either LTSpice or something like Falstad. It is easier than breadboarding and encourages making changes that would be more difficult on a real breadboard. If you want a refresher on LTSpice or current sources, you can kill two birds with one stone.

Continue reading “Delays And Timers In LTSpice (no 555)”

Crank-Powered Train Uses No Batteries Or Plugs

The prolific [Peter Waldraff] is at back it with another gorgeous micro train layout. This time, there are no plugs and no batteries. And although it’s crank-powered, it can run on its own with the flip of a switch. How? With a supercapacitor, of course.

The crank handle is connected a 50 RPM motor that acts as a generator, producing the voltage necessary to both power the train and charge up the supercapacitor. As you’ll see in the video below, [Peter] only has to move the train back and forth about two or three times before he’s able to flip the switch and watch it run between the gem mine and the cliff by itself.

The supercapacitor also lights up the gem mine to show off the toiling dwarfs, and there’s a couple of reed switches at either end of the track and a relay that handles the auto-reverse capability. Be sure to stick around to the second half of the video where [Peter] shows how he built this entire thing — the box, the layout, and the circuit.

Want to see more of [Peter]’s trains and other work? Here you go.

Continue reading “Crank-Powered Train Uses No Batteries Or Plugs”

Do You Trust Your Cheap Fuses?

When a fuse is fitted in a power rail, it gives the peace of mind that the circuit is protected. But in the case of some cheap unbranded fuses of the type that come in kits from the usual online suppliers that trust can be illusory, as they fail to meet the required specification.

[Andreas Spiess] has used just these fuses for protection for years as no doubt have many of you, so it was something of a shock for him to discover that sometimes they don’t make the grade. He’s taken a look at the issue for himself, and come up with an accessible way to test your fuses if you have any of those cheap ones.

It’s an interesting journey into the way fuses work, as we’re reminded that the value written on the fuse isn’t the current at which it blows but the maximum it’s intended to take. The specification for fuses should have a graph showing how quickly one should blow at what currents above that level, and the worry was that this time would be simply too long for the cheap ones.

In the video below the break, he looks at the various set-ups required to test a fuse, and instead of a bank of large power supplies, he came up with a circuit involving an 18650 cell and three one ohm resistors in parallel. The resulting 1/3 ohm resistor should pass in the region of 10 A when connected across the 18650, so with a 5 A fuse in that circuit and a storage ‘scope he’s able to quickly test a few candidates. He found that the cheap fuses he had were slower to blow than a Bosch part but weren’t as worrisome as he’d at first thought. If you have any of these parts, maybe you should take a look at them too?

Continue reading “Do You Trust Your Cheap Fuses?”

Emergency DIP Pin Repair For Anyone

Who has not at some point in their lives experienced the horror of a pin on a DIP package breaking off? It’s generally game over, but what if you don’t have another chip handy to substitute? It’s time to carefully grind away some of the epoxy and solder on a new pin, as [Zafer Yildiz] has done in the video below the break.

The technique relies on the pins continuing horizontally inside the package , such that they provide a flat surface. He’s grinding with the disk on a rotary tool, we have to say we’d use one of the more delicate grinding heads for something more akin to a miniature die grinder.

Once the flat metal surface is exposed, the chip is placed in a socket, and a new pin is cut from the leg of a TO-220 power device. This is carefully bent over, inserted in the socket, and soldered into place. The whole socket and chip arrangement is then used in place of the chip, making for something a little bulky but one infinitely preferable to having to junk the device.

There are many useful skills to be learned when it comes to reworking, and we’ve covered a few in our time. Most recently we saw a guide to lifting SMD pins.

Continue reading “Emergency DIP Pin Repair For Anyone”