
A common problem faced by orthodontists and restorative dentists is how to handle post orthodontic patients with congenitally missing lateral incisors. Most of these patients are under 20 years old with long-term solutions that are less than conservative for patients of that age. Fixed prosthodontic solutions for the case described in this article might include: 1) A pair of conventional three-unit bridges that involve preparation of two central incisors and canines for full coverage; 2) Placement and restoration of implants in the lateral incisor positions, which may also require grafting to augment the alveolar bone and soft tissues in the facial direction. (Note: the patients’ age may preclude this option until later in life); 3) Single tooth “Maryland Bridges” or ceramic pontics with wings bonded to the adjacent teeth. In the author’s experience, particularly on the maxillary arch, these options are “temporary” at best with metal frameworks being potentially “unaesthetic” interproximally, or with ceramic wings that can fracture easily under the forces of occlusion. Often, these patients wear removable “flipper” or “thermoplastic” type prostheses for many years, which are problematic and unaesthetic at best and not very good solutions for a young patient in their late teens.
Lite cured composite with fiber reinforcement offer these patients a better intermediate or long-term solution for this restorative dilemma in one visit with no laboratory cost. There is a unique fiber reinforcement material on the market that is made up of a bundle of fibers surrounded by a matrix of polymethyl methacrylate (PMMA) and Bis-GMA, which allows it to bond directly to composite or acrylic restorative materials, unlike other fiber reinforcement materials currently available. Using this type of fiber material, either as an intracoronal or extracoronal splint (retainer), a direct composite pontic can be sculpted directly to it, closing the space. Not only can a beautifully aesthetic restoration be made with little or no preparation (depending on the occlusal relationship of the patient) but also this type of restoration is economical to place and is easily repaired should it fracture at any time under functional stress. “Maryland bridge” types of ceramic restorations do not offer either of these advantages.
Placement Of The Fiber Reinforcement
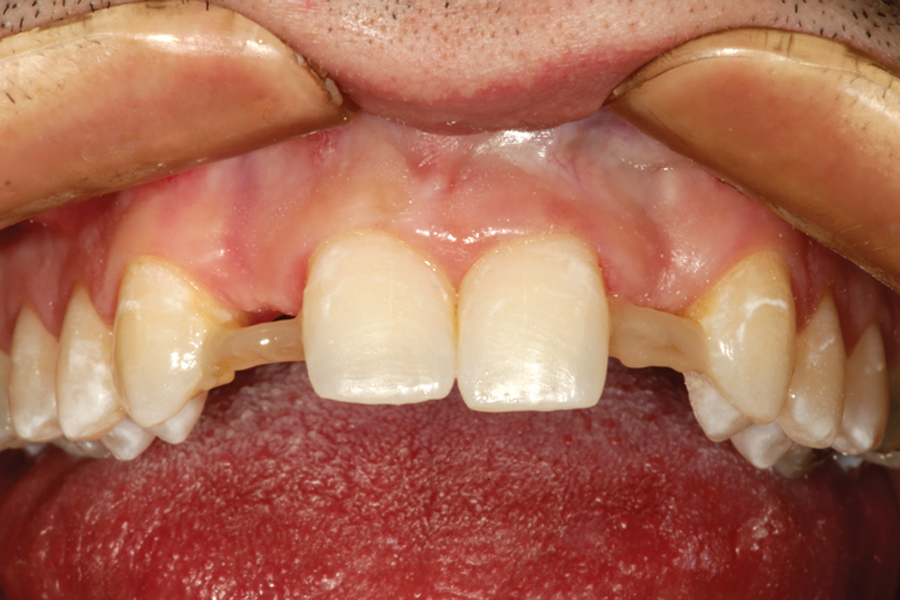
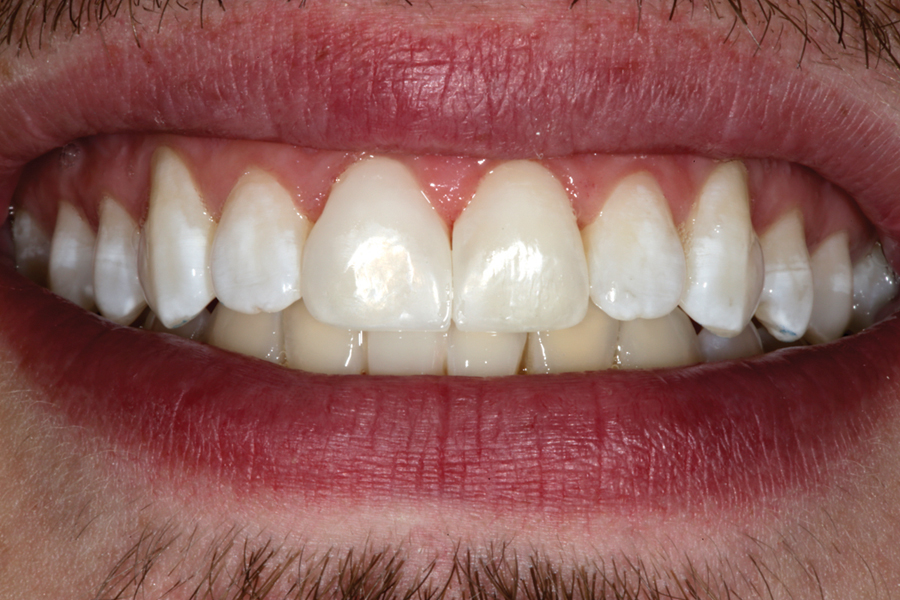
Figure 1 shows a preoperative full smile view of a post orthodontic case where missing lateral incisors have been temporarily replaced by placing composite in the final Invisalign aligner. After removal of the plastic orthodontic aligner, the anatomy of the edentulous spaces is clearly seen (Fig. 2). If implants are to be considered as a potential long-term solution, bone and soft tissue grafting would most likely be needed to allow positioning of the implants facial and incisal enough to create aesthetic harmony. Without grafting, the lateral incisor implant restorations would most likely be to long cervico-incisally and need to be cantilevered facially to make up for the palatal positioning of the implant body. Putting an adolescent patient in a “temporary removable flipper” until old enough for the placement of implants would only lead to the possibility of further bone and soft tissue loss that would need to be replaced by grafting at a later time. Use of a “Maryland type” bridge, or “porcelain winged pontic” would incur more expense to the patient and doctor for a “long-term temporary that, if it broke, would necessitate further lab costs and multiple appointments usually at the doctor’s expense! Any appliance that will be palatally bonded to the adjacent maxillary teeth will require minimal preparation into these surfaces to accommodate the occlusion, including the aforementioned indirect options. Therefore, for these reasons, a direct composite replacement is not only a conservative, lower cost treatment option but more importantly, is a repairable, maintainable option to carry the patient into later years where grafting and implant placement may be more feasible for them.
FIGURE 1. A preoperative full smile view of a post orthodontic case where missing lateral incisors have been temporarily replaced by placing composite in the final orthodontic aligner.

FIGURE 2. A preoperative full smile view showing missing maxillary incisors after removal of the “provisional” aligner.

Since the mandibular incisal edges articulate in the middle of the palatal concavity of the maxillary central incisors in centric occlusion/maximum intercuspation for the patient in Figure 3, shallow preparations were made into the enamel using a #6 round diamond bur to embed the fiber reinforcement into the palatal aspects of the teeth on each side of the lateral incisor spaces. This partial imbedding of the fiber will also increase the surface area contact of the fiber and enhance retention. A piece of dental floss is used to measure the arch length from the distal portions of each “slot” to determine the length of fiber that will be used. Selective etching of the enamel around the preparations is done for 15 seconds Etch (Fig. 4), then thoroughly rinsed and dried. A bonding agent is brushed into the preparations (Fig. 5), air thinned, then lite cured. Next, placement of “heavy bodied” flowable resin is done over the prepared areas and not cured (Fig. 6). The fiber is pushed into the uncured flowable resin using a plastic instrument and a “Stick Stepper” to hold the fiber in place while individually light curing the fiber to each of the abutment teeth (Fig.7). Once the fiber is attached, the remainder of the fiber is covered with flowable resin, including the portion of the fiber that extends across the edentulous space(s), light cured, and the excess trimmed with a carbide composite finishing bur (Figs. 8 & 9). Unlike traditional fiber reinforcements, one made up of microfiber bundles surrounded in a matrix of polymethylmethacrylate (PMMA) and Bis-GMA resin is especially suited for this technique. The composite restorative materials will chemically bond to the fibers becoming one with the fiber.
FIGURE 3. A piece of dental floss is used to measure the arch length from the distal portions of each “slot” to determine the length of fiber reinforcement that will be used.
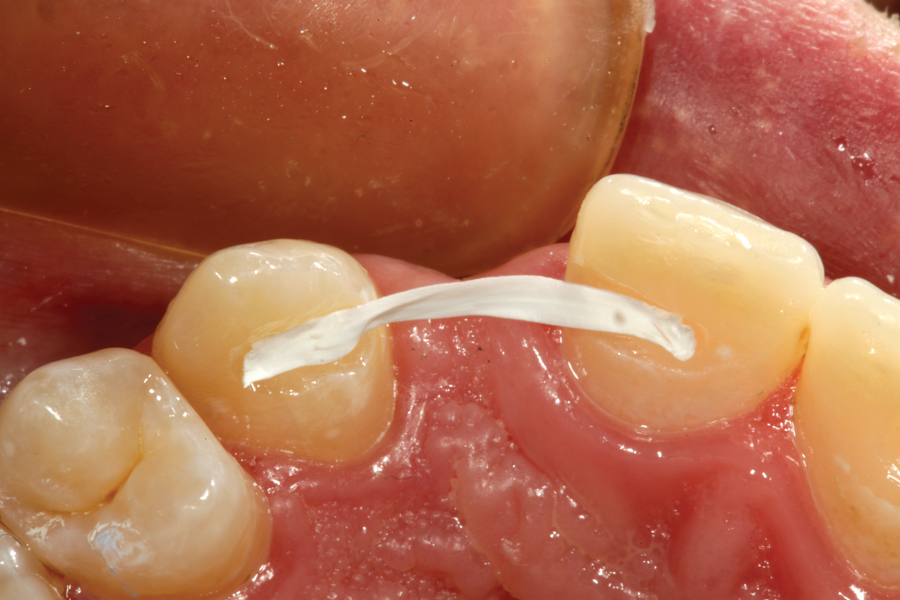
FIGURE 4. Selecting etching of the enamel around the preparations is done for 15 seconds, then thoroughly rinsed and dried.

FIGURE 5. Bonding agent is brushed into the preparations, air thinned, then lite cured.

FIGURE 6. The fiber is pushed into the uncured flowable resin and held in place using a plastic instrument and a “Stick Stepper”.
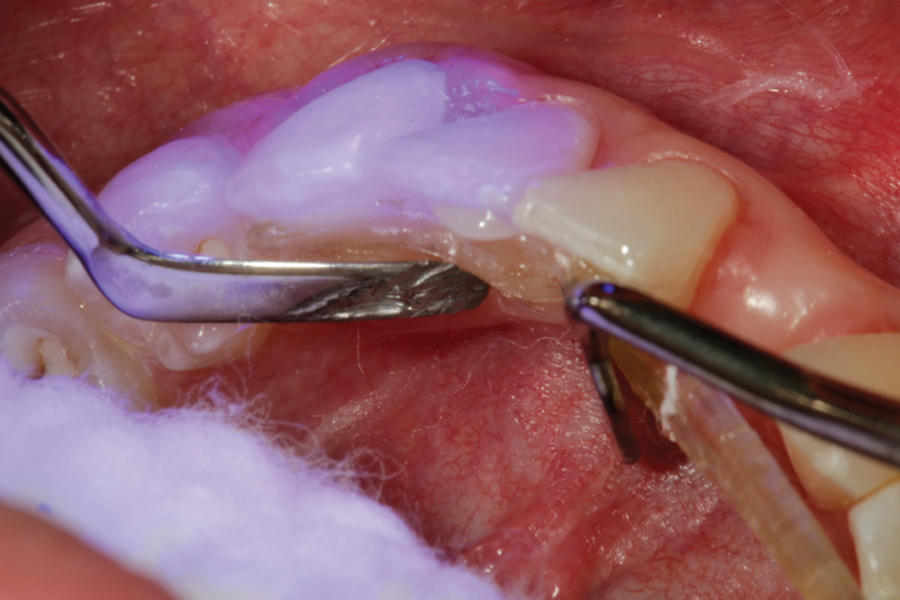
FIGURE 7. Flowable resin is shown being applied to cover the remaining fiber material after curing it to the lingual prepared surfaces.
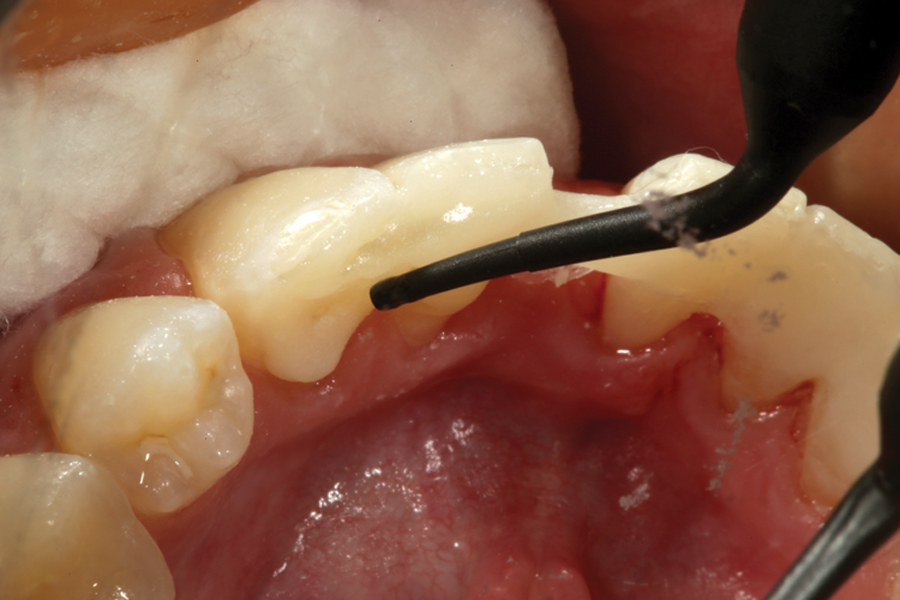
FIGURE 8. A flame shaped carbide composite finishing bur is used to smooth and contour the flowable composite applied to the surface of the fiber. It will be further polished using rubber composite polishing abrasives.
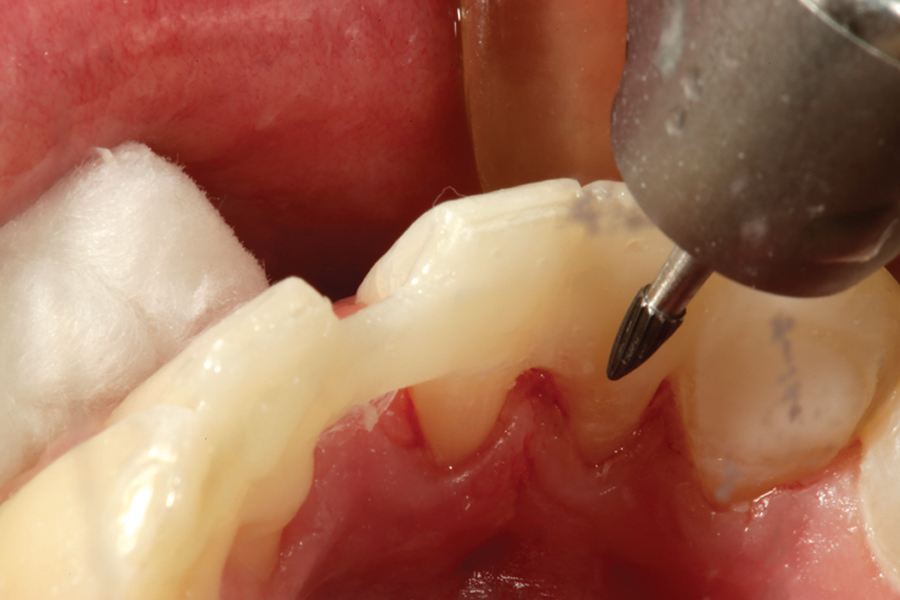
FIGURE 9. A facial view after placement of “heavy bodied” flowable resin on the surface of the bonded fiber.
Creation Of The Pontic With Direct Composite Resin
A “pontic” of composite is formed on the fiber material on both the labial and palatal aspects of the fiber using an opaque or body shade of composite. A thin strip of Teflon tape may be used to cover the edentulous ridge prior placement of the composite, however with careful placement, this is not always necessary. The palatal increment is placed first, sculpted, and trimmed with a fine pointed carbide composite finishing bur, making sure that floss threaders can pass easily into the interproximal embrasures and also that the floss will pass easily under the pontic. The procedure is then completed on the facial surface in the same fashion, leaving about 1 mm of space facial to the increment for the final enamel layer of composite material. When the “dentin” portion of the pontic is complete, the fiber will be completely surrounded on all sides with composite material (Fig. 10). If any fiber is exposed when finishing on the palatal surface of the completed bridge, because of the PMMA/Bis-GMA matrix, it will polish and be completely smooth, unlike “hairy” fiberglass reinforcements that will not.
FIGURE 10. A facial view of the “pontics” in the tooth 12 and 22 positions formed on both the labial and palatal aspects of the fiber using an opaque shade of composite.

Placement Of The Facial (Enamel) Increment
For the direct composite bridge technique described in this article, a plastic template will be used to create a beautifully aesthetic labial surface for the pontic. (Note: artistic operators who choose to do so can also place this final enamel increment “free-hand”). The size of the anterior labial templates are made to match ideal 80 percent width-to-length ratios and to correspond to smile design proportion (“golden proportion”) mesio-distal widths of 1.6 mm central incisor to 1.0mm lateral incisor to .6 mm canine. Also, because of precise anatomic “facial tooth contour” of the templates, the final result will yield different thicknesses of composite (greater in the middle of the facial surface and less toward the incisal third and gingival areas). The result of this varied thickness of material is different effects and values to mimic the “polychomacity” of natural teeth. Therefore, in many cases, only one shade of composite is required to get a natural gradient effect, rather than needing to use different shades with a layering technique. For this direct composite bridge case, the pontic is formed using a shade which will most closely match the opacity and chroma of the dentin of the natural teeth. Keep in mind; it is advisable to use a dentin shade that is slightly brighter in value if there is any doubt as to the final shade. It is always easier to darken a brighter dentin shade with the outer enamel composite layer than to try to brighten a darker dentin shade with a brighter enamel layer. With the nuances of facial proximal line angles, proper heights of contour and facial outline form in the template, a anatomically beautiful final “enamel” surface will be achieved in a fraction of the time, when compared to freehand layering techniques.
To complete the final enamel layer, a small amount of flowable composite is painted onto the inner surface of the lateral incisor template. Application of a flowable composite resin will leave a beautiful luster, which will need little or no finishing due to lack of an oxygen inhibition layer. Next, an increment of the selected shade of “enamel” composite is placed into the template, which is then placed onto the surface of the pontic composite with light pressure, in the correct axial alignment and positioned to “fit” in space with the adjacent natural teeth (Fig. 11). Next, the enamel increment is light cured and the template is removed leaving an anatomically correct and polished labial surface affixed to the pontic (Fig. 12).
FIGURE 11. Using a preformed labial template, the facial enamel portion of the pontics are placed and lite cured. The template allows the dentist to accurately form an anatomically correct facial surface without depending on rotary instrumentation and artistic ability to determine the final restorative outcome.
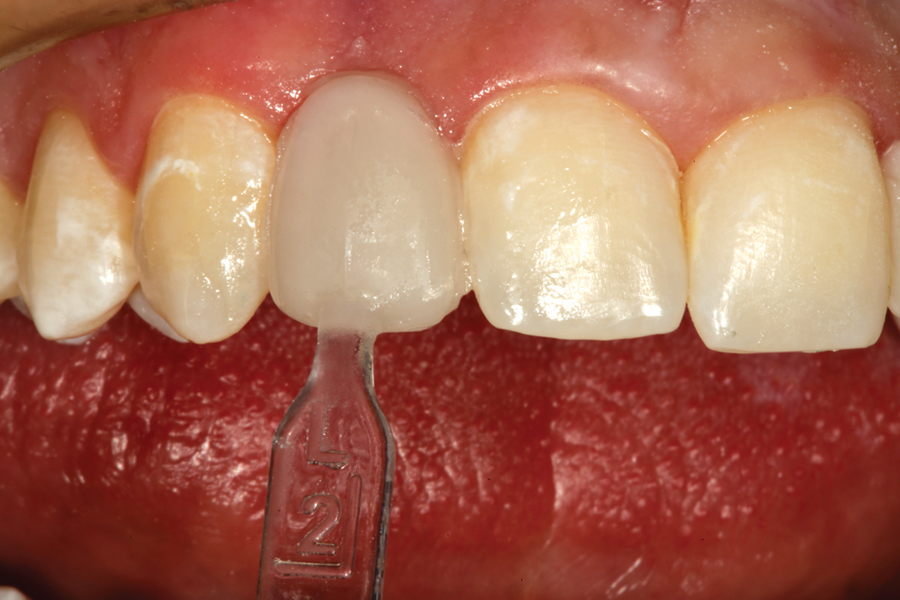
FIGURE 12. Once the facial enamel layer is cured through the autoclavable template, it is removed. Because of the lack of an oxygen inhibited layer, the surface is shiny and smooth leaving only minor finishing and polishing to be done around the periphery of the material.

Finishing The Direct Composite Bridge
Final finishing and polishing of the direct composite bridge is accomplished using a carbide composite finishing bur to remove and blend any areas where there is a small amount of excess from the placement of the enamel layer with the plastic template. These areas are then polished with rubber composite polishing abrasives to achieve a final luster (Figs. 13 & 14). Figures 15 and 16 show a facial and full-face views of the completed direct composite maxillary lateral incisor bridges. Figure 17 is an incisal view that shows the polished palatal surface of the composite and the fiber reinforcement. Note again, there are not “hairy fibers” extending from the adjustment and polished material. The palatal surfaces of the restoration are nicely contoured and smooth to the tongue.
FIGURE 13.Polishing the facial surface with a composite polishing point.

FIGURE 14. Polishing proximal and cervical contours with a rubber composite polisher.

FIGURE 15. A finished full smile view of the completed direct composite bridges.
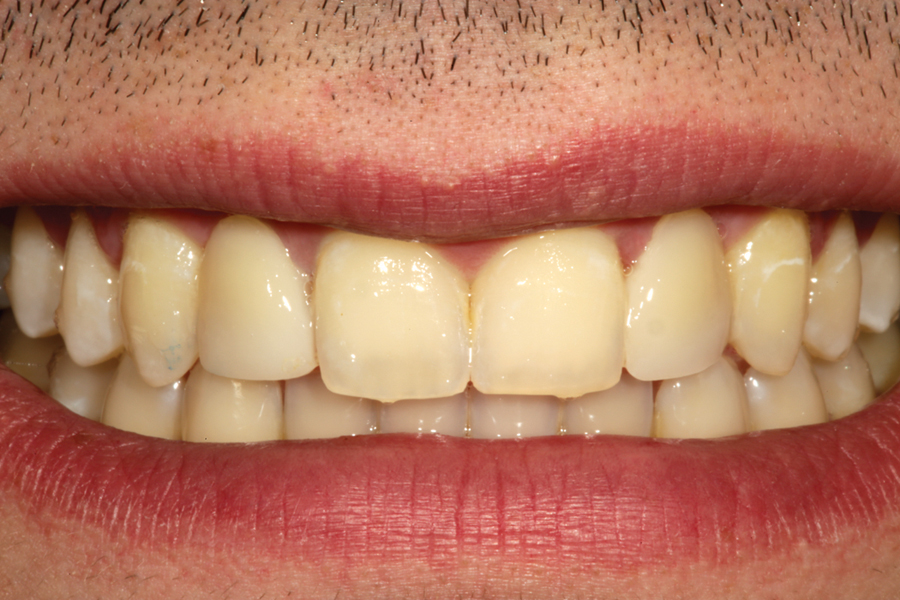
FIGURE 16. A view of the palatal aspects of the completed direct composite bridges is shown. The fiber reinforcement is embedded in and surrounded by “heavy bodied” flowable composite resin, which is finished with composite finishing burs then polished to a high luster.

For many orthodontic cases, the fiber reinforcement can be extended to the canines to double as orthodontic retention. If for any reason there is a failure of the bond of the fiber to the tooth, or a fracture of the composite, this bridge is extremely repairable unlike its ceramic counterparts. Should the patient elect for implants in the future, the pontic(s) can be cut out and the fiber in the interproximal areas polished prior to implant placement. The direct composite bridge with fiber reinforcement is an excellent way to conservatively restore these types of cases where long term stabilization and aesthetics is required for the patient. Figures 18 to 21 show before and after views of a mandibular incisor replacement with a direct composite fiber reinforced bridge. Facial, three quarter, and full smile views of this restoration show how beautifully aesthetic these composite tooth replacements can be! OH
FIGURE 18. A retracted preoperative facial view of a patient with a missing mandibular right central incisor.
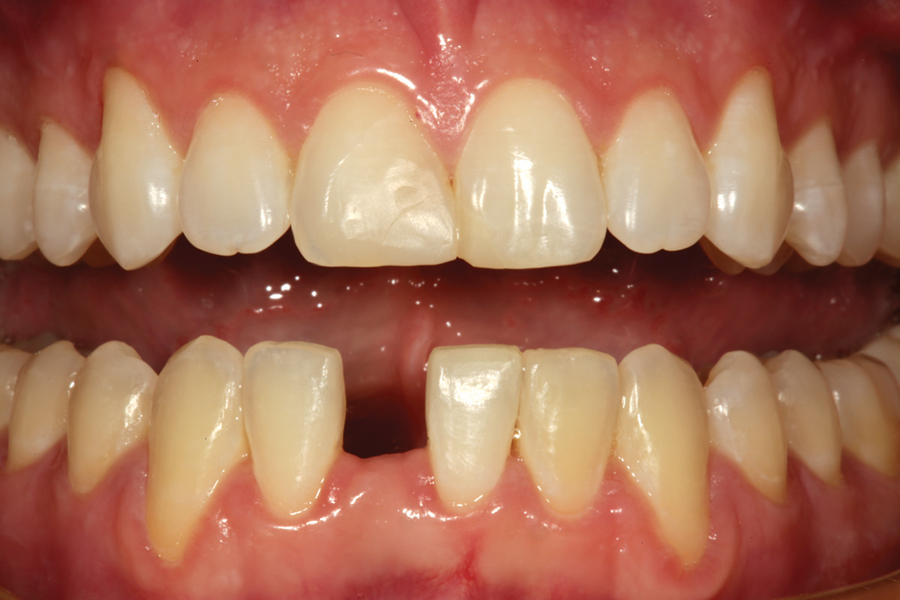
FIGURE 19. The completed direct composite fiber reinforced bridge for the missing mandibular right central incisor is shown from the facial aspect.

FIGURE 20. This oblique view of the completed restoration clearly shows the reflective line angles and labial anatomic form and how well it matches the natural adjacent central incisor.

FIGURE 21.This post operative full smile photograph shows how beautifully aesthetic the direct composite fiber reinforced bridge can be as well as being a expedient, one visit restoration for the patient.
Product Listing:
1) Fiber Reinforcement Used In Clinical Cases – everStick Crown and Bridge: GC America
Other Similar Products:
GrandTec: VOCO
2) Prefabricated Anterior Matrix Used In Clinical Cases – Uveneer: Ultradent, Clinical Research Dental
Other Similar Products:
Bioclear Matrix: Bioclear Matrix Systems
Edelweiss Prefabricated Composite Veneers: Ultradent
Componeer: Coltene Whaledent
3) Composite polishers used in clinical cases – Jazz Polishers – S.S. White, A.S.A. P. Polishers – Clinical Research Dental
Other Similar Products:
Jiffy Polishers – Ultradent, Dimanto Polishers – VOCO
Dr. Robert A. Lowe maintains a private practice in Charlotte, North Carolina. He can be reached at 704-450-3321 or boblowedds@aol.com.
Oral Health welcomes this original article.


