
I'll come clean right off the bat here and say that I stumbled across this little super easy lighting technique more by luck than skill. I'm pretty sure I can't be the only one who has taken a portrait whilst using a single key light and reflector, and fought with the reflector in one hand, and the camera in the other. You know the scene.
Super quick and clean "clamshell" lighting, with the key just above the models eyeline, and the reflector just below the chin bouncing some well needed light back up to fill in the shadows. You're micromanaging the reflector with one hand, trying to bounce just the right amount of light back into the shot. You're scooping, flapping, bouncing, and bending the damn thing around the key-light stand with one hand desperately trying to look professional. The result? Well the result for me is that when I load the images up on the laptop for review, I find that half the shots have the actual reflector sneaking into the bottom of the frame! Not good.
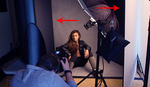
A while back I was experimenting with the reflector by bouncing back light into the shot from two hair lights behind the model pointed towards the camera. I had the reflector on a stand and I was literally holding the camera up in front of it so that the viewfinder was pressed against the reflector and taking pictures using the blessings of autofocus alone because I couldn't look through the lens.
It then dawned on me, "To hell with this," and I cut a very rudimentary hole in the middle of my reflector so I could see what was actually going on. From there I ended up changing the lights around by putting a big softbox behind the model and letting my reflector simultaneously be the key-light and the fill-light. In actuality this super simple setup produces such a flattering light that its got to be one of the cheapest ringflash looking lighting you'll ever find.
Step One
Pick yourself up a super-cheap reflector of a decent size. The one that I used here was a 32inch/80cm diameter one. I wouldn't go much smaller than that as you want to bounce back as much light as possible. I was fortunate enough to get a reflector that had both silver on one side and white on the other. That means that I can use the silver side to get more of a contrasting look but I can also flip it over to get a far softer look too. Definitely avoid the gold ones though, you don't want to bounce back that much color.

Step Two
Time to get crafty. Grab yourself some real simple hobby tools like a craft knife, a thick pen, something circular to draw around, and something like a cutting mat or cardboard so that you don't also slice a digestive biscuit sized hole in your lino!

Step Three
Hopefully you've found something of a decent size to draw a circle around in the middle of your reflector. This should obviously be larger than the diameter of your largest lens. I used a roll of gaffer tape as that seemed large enough but a small bowl would be fine too. In actuality, I might go back and find something larger and cut a larger hole so I can stand back a little with a longer lens and still shoot through the hole without getting the reflector in shot.


Cut the hole ensuring you've got your cutting mat beneath to protect the floor.
Step Four
It's worth mentioning that I just plonked the hole roughly in the middle of my reflector and drew around it. I did think about placing the hole off center so that when I shot through the reflector I could rotate it to adjust the amount of light I had coming from the top or bottom. It's probably worth an experiment at some point, but for these shots I just had it in the center. Place the cutting mat or cardboard underneath, and simply cut the hole tracing the line you drew previously.


Step Five
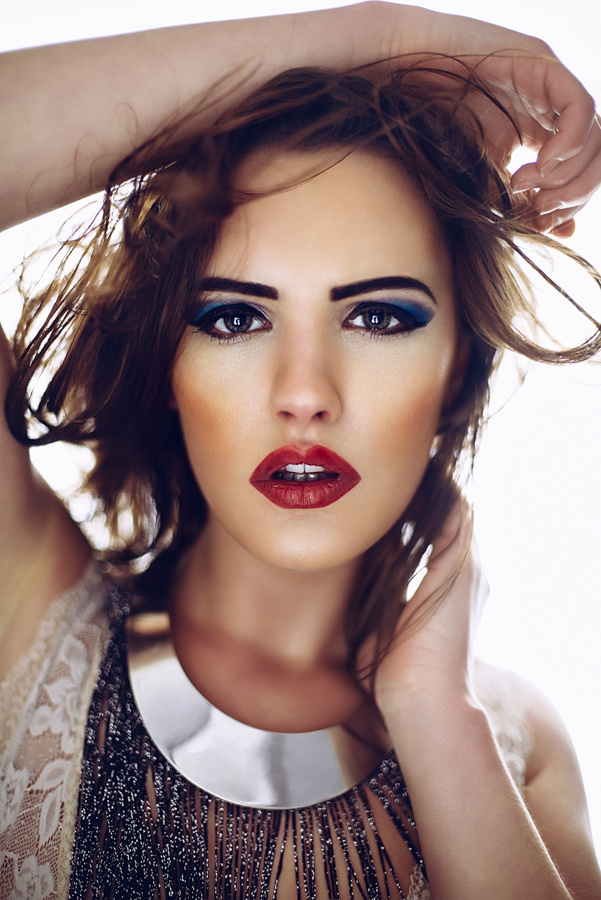
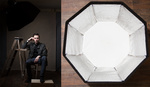
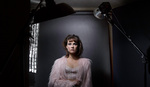
That's it, you're pretty much done! All that's left to do is to set up your one light. I had a big softbox placed behind the model, and then hung the reflector on a light-stand in front of her. You don't even need to hang the reflector though really and it's pretty easy to just hold it in your other hand. Also your lens is poking through the hole so the reflector is never getting in the shot anyway so it makes it really easy to control. Check out some of the shots I got in literally a few minutes. I was genuinely shocked as to how stunning the lighting looked on the back of the camera straight away. The reason for this is simply just how flattering the lighting is and how that single light wraps around the model and bounces back into the shot giving the impression of the light coming from everywhere. The softbox light bleeds around the model and cuts into her which has a visually slimming effect (especially noticeable with a shallow depth of field) and then bounces light back into the face from a source that is relatively large to her. This reflected light is coming from everywhere equally so it gives the appearance of very soft, flattering light, just like that of a ring flash.

 \
\

Key Points to Remember
1. Use a silver or white reflector of a decent enough size to cover a half body shot. A 80cm/32in size is a good place to start.
2. Cut a hole in the center of your reflector large enough to take the diameter of your largest lens.
3. Don't cut a hole in your carpet.
4. The bounced light of your reflector is your key light. To adjust the exposure of this light you will have to move the reflector closer and further away until you're happy.
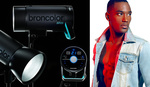
5. Use an Neutral Density filter on your lens to reduce any unwanted power from your strobe and shoot as wide open as your lens will allow.


You may have noticed from these shots here that they are all shot with a very shallow depth of field which works particularly well with this type of lighting. I was able to shoot at low apertures with my 500w strobes because I also had a LEE Filters ND filter on my lens. A lot of studio strobes are so powerful, it's sometimes difficult to shoot wide open when using them, but by using neutral density filters you're able to reduce the amount of light entering the lens and shoot at f1.8, f2 etc to get some beautiful looking shots. This one was a ND 0.6 which stopped 2 whole stops of light from entering the shot. If you're a studio strobe user and want to start using faster lenses to get these effects, then an ND filter is smart accessory to get.
Instead of a Neutral Density filter for your lens you can also purchase ND filter gels for your strobes too. This gives you greater flexibility with individual lights rather than reducing all light entering the lens. If you're interested in getting some Neutral Density gels then they are included in my 'Utility' Gels pack.
If you're interested in learning more, check out Jake's Workshops on different lighting tips and techniques, view more of Jake's work or follow him on Facebook.


Very cool...this definitely falls under the less is more way of thinking and the results show!
Will it work with HSS speedlites? Bought one and HSS triggers, on location they work amazingly, bit weak on the light, when you go over 1/1000 but not that bad. Still, if i can get my octabox on the back of the model, the ringflash on the lens (i have one and i don't know if poking a hole in the reflector is any good..) i could achieve the same or at least similar results...
Heya Paulo, yeah in theory it should be the same principle. My only concern is obviously the power drop off through a large softbox and the bounce back required from the reflector in front. Also its been my experience that speedlite softboxes tend to have a hot spot without excessive diffusion and that diffusion will reduce power even further. Maybe try it with a couple of speedlites in there. Good luck and I'd be interested in seeing your results :)
Yeah, they ain't easy to difuse...
I've done similar with using a round piece of cardboard and tin foil to achieve similar results, plus it works out cheaper.
awesome! Totally going to try this!
i love the images. just wish you posted SOOC images as well :)
Fair comment Jonas and perhaps one thing that is also worth mentioning is that this model shoot had a professional makeup artist too. I say this because although the SOOC don't look to different to the final shots here beyond a little blemish removal, the makeup adds a lot of great contouring and structure to the effect that isn't added in post-pro.
Totally agree. I've said this before here on FS: Any article on lighting technique should be accompanied by at least one SOOC shot. We all know how different a shot can look after even a little bit of post production.
Total nonsense. Jake is just showing you a lighting technique. Offcourse there is much more involved in a photo. Like Jake mentioned himself: the make-up also makes a big impression. So does he need to let you know how the make-up is applyed? What brand of make-up was used? His lens-choice? Where the jewlery and clothing came from? How the models feets en hips where placed? Etc etc. It would be nice, but No! Get creative!
its quite far from "total nonsense". im assuming there's some frequency separation done to these images. the whole point of frequency separation is to alter tones(light/darkness/color tones) without altering the skin texture. so to me it doesnt make any sense to post images where the light has been smoothed out in a lighting "tutorial". this is like trying to show me the iso performance of a camera and posting images with noise reduction applied in post.
You're assuming! But if true, it makes a HUGE of a difference indeed *cynical mode turned on*
Joey, no... I don't need any of the things you mentioned. What does the makeup brand or where the jewelry comes from have to do with a lighting tutorial?? All I want is to see at least one SOOC image for lighting tutorials.
Be creative Jonas ;-)
read the article next time, Joey :)
What makes you assume (you seem to assume a lot by the way) that i did'nt?
6. Have a beautiful model to shoot.
I've been doing the same lighting setup for a long time. Though instead of a circular reflector, I use a huge white foam board.
This lighting setup is good as you can use fast apertures.
Very creative idea and beautiful pics. I don't have a soft box as I have limited budget. I've sprayed paint a rain umbrella to use as a soft box, and bought a large piece of white foam at art supplies to use as a reflector.
Some company has an accessory that is somewhat like this but yeah...it's simple and genius.
Love it!!!
Comment I added when I forwarded the link to some friends.
"And you can also use two sidelights firing into the reflector to get a different look. If you back away from the reflector the reflector will act as a lens hood.
Might be fun to try this, when I catchup editing and start shooting again in March, after my Serval shoot."
"Maximize your chromatic aberration with this one easy trick!"
Why are the catch lights not matching the modifier in front of her? The catch lights are rectangular with a stand in front as opposed to circular with a hole.
I was also puzzled why the catch lights were not round as I expected?
Good catch. Now I'm curious about that too.
This is a pretty cool idea. You can do something pretty similar with a 60" umbrella placed right behind you and the camera. It gives a similar effect. Obviously the photographers reflection will be in the eyes, but it has a similar look to a ring flash
Looks a lot like the most recent cover of Elle. Not the *exact* same technique I'm sure, but just shows you can do a lot (or get far) on not a lot :)
I don't even shoot portraits but I love this!!
Hey man that is genius thanxxxxx :)
Cool!
I used similar technique but I put dark foam board between model and the light just for background. Light was reflected from floor and wall of a small room...
https://c2.staticflickr.com/8/7548/16063947718_f425f6e87d_o.jpg
You didn't happen to get "inspired" by the Omega reflector, did you? :)
http://www.fjwestcott.com/omega-reflector-kit
I was just about to post the link to that :)
I thought the same but I couldn't remember what it was called.
This is like the glory hole of lighting setups. Just a faceless lens protruding from a silver/white wall. I would feel really disconnected from my subject shooting this way. An interesting idea but I feel it solves one problem only to replace it with another.
You'll just have to work harder on maintaining your connection with the model. Especially do that on pre-hand.
That's my point. This solution replaces one problem with another. I would also say that if I had to choose between the perfect light and the perfect pose, I would take the pose. This thing just gets in the way of everything.
I bet you could get similar results using this technique with available light as well. I'll have to give it a try soon; thank you for writing this article!
Wow, such a cool project! I guess I'm off to the camera store =)
Jake is the boss! Been following his work and tutorials since he was featured on here a few months ago. Definitely speaks to me regarding the kind of work and do and want to further. I picked up one of the cheap reflectors so I can try this out.
Nice article and great results Jake, Layla Leigh Browne will be pleased with those shots no doubt ! Lets not forget the model also plays an important role in the image. I can't see any credit for her contribution to her in the article - Don't forget to credit people folks !
No need to bother with making your own through-the-reflector reflector- Amazon carries them already made for a big fat total of $6.99 - silver on one side, gold on another. (They're 12", so smaller than the 32" shown in this article, but you *can* mount it on your camera lens without the need of any stand, so it's quite portable and useful for close up work)
Search Amazon for "Neewer 12"/30CM 2-in-1 Gold & Silver Portable Circular Collapsible Lens-Mount Light Reflector".
Ive always loved that look, didnt know where to begin! Thanks! Looks like itd make a great photo booth set up
Yes, very clever! Just prefer a little bit of facial shadowing, such as around the nose. Don't really like seeing the nostrils so fully lit. But it's fine with such a beautiful model.
Tried this setup as described, but the results are very different from the examples shown here - there's a lot of light spill as the lens is pointing directly into the light, the faces look extremely flat (typical backlight situation). What am I doing wrong? Which focal length has been used for these examples? Help ;-)
Thanks for the tip. Promptly ordered some gear and got this look today with my daughter. I think I need more makeup and post production :-) (only contrast and saturation work on this photo). Love the technique though, thanks, will definitely be trying it out again with a few changes.
Thanks for the tip. Promptly ordered some gear and got this look today with my daughter. I think I need more makeup and post production :-) (only contrast and saturation work on this photo). Love the technique though, thanks, will definitely be trying it out again with a few changes.
Seems this is just a DYI version of:
https://www.youtube.com/watch?v=M4dbAhfvVfg
What kind of soft box is that?
You can also do this without the need of a reflector stand, ND filter or softbox. I use a speedlite, bounced into a wall behind the model and hold the reflector with one hand. https://www.instagram.com/p/BBIsedsCV0F/?taken-by=nickfancher
David Hobby did something similar three years ago, using the sun as the rim/background instead of a strobe: http://strobist.blogspot.com/2013/10/on-assignment-margo-seibert.html