Featured
Posted in Message

Happening in April

Host Code for April: GAF9ZEYZ

April promotions:

(last updated 4/16/24)
Posted in Project, Technique

Hey Chuck Has a Beach Day

Ever since I made my first cards with the Beach Day stamp set, I was looking for other images that I could add to my beach scenes. The particular chicken that I used for today’s card stood out to me. He’s wearing what can pass for board shorts. I thought it was a totally appropriate place for him to be (at the beach), since the stamp set includes a skateboard for him.

Stamp: Hey Chuck (retiring-sold out), Beach Day

Ink: Memento Tuxedo Black, Azure Afternoon, Basic Beige (sneak peek!)

Blends: Copper Clay, Crumb Cake, Pebbled Path, Daffodil Delight, Lemon Lolly, Azure Afternoon, Sweet Sorbet (retiring)

Paper: Basic White thick and regular, Coastal Cabana, Pool Party, Crumb Cake, Basic Beige (sneak peek!), Very Vanilla, Bright & Beautiful DSP

Accessories: Beach Day dies, Hey Chuck dies (retiring)

Instead of a skateboard, the chicken now has a surf board!

I created the beach scene from a TON of layers. The sky is created from Bright & Beautiful DSP (Azure Afternoon wash). The bottom layers from horizon (top) to the beach (bottom):

  • Coastal Cabana (not shown)
  • Pool Party, die cut with surf die
  • Pool Party, die cut with surf die (leftover)
  • Basic White, die cut with surf die
  • Crumb Cake, die cut with surf die (leftover)
  • Basic Beige, die cut with sand die
  • Very Vanilla, die cut with suft die (leftover)

For the first Pool Party set of waves, and the Basic White waves, I used the “surf” die as-is, to create the breaking waves.

The other layers that used the surf die, I used the leftover of using the surf die. Since I created a portrait die, I made sure to shift the die from side-to-side to make sure I got a curve that complemented the other layers.

The Basic Beige layer used the other die in the Beach Day set. It can be used to create a curved ground layer. I again used the waste side of using the die, since the straight edge of the die can create an impression on the cardstock. (And, apparently, so does the tape I used, haha.)

The Coastal Cabana layer is 4″ x 3″, and I layered all pieces to fit within those dimensions.

The card base is scored as an easel card, and the Coastal Cabana cardstock (+ layers) is adhered to the bottom section that folds down.

You may be asking why all of the layers don’t extend to the bottom of the Coastal Cabana layer. That’s to reduce bulk.

On the inside, I stamped a greeting on a 5/8″ wide strip of Very Vanilla that is mounted to a 3/4″ wide strip of Basic Beige.

This creates the stop for the easel, to allow it to remain open for display.

Anyone else ready for a day at the beach? 🙂

Posted in Project

More 3D Projects Using Memories & More Card Bases

After making the boxes I showed on Wednesday, I thought I would try making a box that opened differently. Once I made that, I realized that a variation on that box is a treat bag. And a few more ideas kept flowing…

Box 3:

This time, I wanted to have a box that opened like a deck of cards. The final dimensions are 3″ x 3-3/4″ x 1″. I added pieces cut off from a base of the other color, attempting to match the patterns.

This time, I cut 1/4″ from the original card base. Along the long side, I scored at 1″, 5″, 8″. On the short side, I scored at 1″ from one side, and at 1/2″, 1-1/2″ from the other side. Note that I trimmed the card base from the opposite side as compared to the previous projects.

From the bottom, cut up the score lines (straight) to the first score line.

From the top, cut up the score lines (straight) to the second score line. Note that some areas will be left attached (the lid), some areas will be cut off at the first score line (the inner flaps), and some areas would be cut off completely (front edge and construction tab). Note that the other large rectangle on the bottom has adhesive on the opposite side.

Large Bag:

After putting the box together, I realized that if I left off some of the additional score lines on the short side of the card base, I can create a large bag. The final dimensions are 3″ x 5″ x 1″.

I scored in almost the same way, also removing 1/4″ but from the original side of the card base again. Along the long dimension, I scored at 1/4″, 1-1/4″, 5-1/4″. The partial scores are at 3/4″ and 4-3/4″.

Along the bottom, cut up the score lines straight, just to the score line. On the opposite edge, I die cut with the zig-zag Basic Borders die.

I have to note that I used a 1/4″ tab to hold the bag closed. Tear and Tape is just a bit wider, so I fold it back onto itself so it doesn’t stick where I don’t want it to stick.

Small bag:

Walking you through some of my thought processes… at this point, I realized, hey, I can cut the large bag in half to create a smaller bag… I didn’t get a good picture of it, though. Just imagine it’s smaller than the bigger bag without the zig-zap top edge. I cut and scored the same as for the large bag, but also cut at 3-1/8″ along the shorter dimension, and added the same 1″ score along the short side for the second piece.

Cutting the tabs is just the same. Cut up from the bottom to the score line.

To finish this bag off a little bit differently, I decided to take the extra bits of one of the envelopes and create a sleeve. (This is similar to Pootles’ tent boxes.)

I cut the front flap of the envelope to 3″ high. The 3″ high section is scored in approximately in the middle, and then 2-7/16″ away from the score line.

To make this work without too much bulk, I had to peel back the side pieces of the envelope. I had just enough space. I cut off the side completely from one end and tore off the extra layer on the other.

The I cut another 3″ wide piece from the leftover from the front of the envelope.

I attached this smaller piece to the bigger one, since I needed an extension to hold the wrapper closed.

I stamped a sentiment on another scrap that is lighter on the opposite side (for addressing the envelope). Makes a nice finishing touch.

Phew! I also made the lip balm holder because I was pondering how to create something out of half of the card base cut along the score line.

Thank you for stopping by to check out some of my ideas to use the Memories & More Cards and Envelope for other than cards.

Posted in Project

Gift Boxes out of Memories & More Card Bases

I have made cards out of card bases from a Paper Pumpkin kit in the past, but haven’t done anything like that recently. There is a sample on page 44 of the Spring (January-April) mini catalog that looks like it was a card base-turned-into-a-box, which was the inspiration for the boxes I’m showing today.

I actually made two versions, because I didn’t know which depth I would like better. Because the card bases constrain me to a specific starting cardstock size, changing the depth changes the size of the box slightly.

Box 1:

I wanted a box whose lid flips up and also includes a flap that tucks into the box to hold it closed.

Here’s the assembled box first. The dimensions are 2-3/4″ x 4-1/4″ x 1″. I decorated with the discarded piece from the second box I made, as well as a heart from the Adoring Hearts hybrid embossing folder. Note that I tried to line up the contrast trim with the pattern on the lid.

The way I chose to construct the box meant that I had to remove part of the original card base (the width of which is the same as the width of the flap that tucks into the box as a closure), and the remaining width of the card base is divided into the depth of the box and the height. I am using the existing score line as one of the score lines of the final project. Along the long dimension, I scored at: 1/2″, 3-1/4″, 7″. On the short side, I scored at 1″ from each side.

I cut up on all of the score lines along the long direction, making angled cuts on the edges of the 1″ x 1″ sections. The 1/2″ x 1″ pieces are discarded. I also show where I put adhesive and a thumb notch to help opening the lid of the box when assembled.

Box 2:

For the second box, I decided to make it deeper (taller). The final dimensions are 2-1/2″ x 3-3/4″ x 1″. I decorated in a similar fashion with the off-cut from the first box and a heart from Adoring Hearts hybrid embossing folder.

Again, I removed 1/2″ from the original card base before scoring. Along the long dimension, I scored at: 1/2″, 3″, 6-3/4″. On the short side, I scored at 1-1/4″ from each side.

The box is cut apart in a similar fashion.

Here is a comparision of the two boxes. The sizes are not too different; choosing between the two would depend on what is being put inside.

Ever heard of “back of the envelope calculations”? I think it refers more to rough estimates to determine feasibility or appropriate scale. In my case, it’s how I developed how to score my boxes. 🙂

Come back on Friday, and I’ll show the other 3D items I created out of the Sweet Thoughts Memories & More Cards & Envelopes. (And, hint, I really did use parts of envelopes this time…) It’s when I was playing with all of these ideas that I came up with the lip balm holder that I showed in April’s Stay-at-home Saturday.

Posted in Message

Retirement Lists, Last Chance Sale, Price Increases

You may have heard by now, the Retirement Lists for the 2022-2023 Annual Catalog and the January-April 2024 Mini Catalog have already been published. I like to sort the Excel version of the lists into lists that make sense for me: by category, by discount, and bundle overview. The Annual Catalog lists always take much longer to sort because there are so many items on them. (I know, I’m so sad, too! There were a few items retiring that I am sad to see go, since I thought they were “essentials”…)

I have finally got the lists in order, and have posted the lists, by catalog, in the right sidebar. I also have a link to the original PDF and Excel file as published by Stampin’ Up!

Just a few notes about the retirement lists:

  • The lists sorted by category may have the non-English stamp sets removed. If the English version is retiring, so are the other stamp sets (French, Spanish).
  • Some retiring bundles may be cheaper separately, due to the individual items being discounted. Those items are noted with the individual items to order instead of the bundle item number.
  • Some retiring bundles will actually have one item carrying over. The retiring item is noted.

I sorted the lists just in time, too. Although the retiring items have been known for about 3 weeks now, the discounts (aka Last Chance Sale) starts tomorrow, April 9. Since everything is already being offered as “while supplies last,” if there are any items you can’t live without, I would recommend getting them as soon as possible. As of the time I’m writing this post (two evenings before), the following items are already sold out:

  • Item 161463, Carousel Horses photopolymer stamp set
  • Item 161340, Lazy Days photopolymer stamp set
  • Item 154994, Color & Contour photopolymer stamp set
  • Item 154999, Pansy Patch photopolymer stamp set
  • Item 159652, Cottage Wreaths photopolymer stamp set
  • Item 158810, Season of Chic photopolymer stamp set
  • Item 159722, Regal Reindeer cling stamp set
  • Item 160732, Taco Fiesta photopolymer stamp set
  • Item 161614, Just My Type photopolymer stamp set
  • Item 159209, Parakeet Party Classic Stampin’ ink refill
  • Item 159213, Starry Sky Classic Stampin’ ink refill
  • Item 159215, Orchid Oasis Classic Stampin’ ink refill
  • Item 161702, 2023 New Core Colors 8-1/2×11 cardstock
  • Item 161711, 2023 New Core Colors 12×12 cardstock
  • Item 101856, Vellum cardstock
  • Item 102210 6″ x 8″ cellophane bags
  • Item 144237, Very Vanilla 8-1/2×11 thick cardstock
  • Item 159233, Basic White 3×3 envelopes
  • Item 155554, Basics embossing powders
  • Item 161621, 2022-2024 In Color Pearls
  • Item 118491, Clear Block bundle
  • Item 118487, Clear Block A
  • Item 157980, Stripes & Splatters 3D embossing folders
  • Item 162785, Easter Lilies dies
  • Item 162821 Thoughtful Expressions dies

I hope you can find some deals on retiring items. I know I have my eye on a few…

One last discussion on cost: the cost of select items will be going up in the new catalog going live on May 1. If you need to restock, now is the time.

Here are a few highlights:

  • Single color cardstock: $10.00 -> $11.50
  • Ink refills: $5.00 -> 5.50
  • Blends: $10.00 -> $11.00
  • Very Vanilla, Basic White 40 sheets: $10.50 -> 13.00
  • Very Vanilla, Basic White 12×12: $8.50 -> $9.50
  • Cardstock assortments 8-1/2×11: $10.00 -> $11.50
  • Cardstock assortments 12×12: $13.50 -> $15.00
  • Punches: $22.00 -> $24.00
  • Glue dots: $5.75 -> $7.25
  • Paper Pumpkin Prepaid, 1-month: $23.50 -> $24.00
  • Paper Pumpkin Prepaid, 3-month: $69.50 -> $71.00
  • Paper Pumpkin Prepaid, 6-month: $127.00 -> $130.50
  • Paper Pumpkin Prepaid, 12-month: $234.00 -> $252.00

Happy shopping! 🙂

Posted in Project, Technique

Stay-at-Home Saturday

Welcome back, friends! It really feels like April came upon us quickly! Maybe it was because I was out of town for several days, then recovering. And, before that, I was furiously assembling all of my swaps!

This month, we have a couple of projects that have no relation to each other. 🙂 But, I still hope you find them fun.

Card:

This is a modified napkin-fold card. We made a small version in a previous Stay-at-Home Saturday. It’s the element that I called the “starburst” at the time. At the time, I didn’t realize that there is a tutorial on Splitcoaststampers for it. You’ll see that this project only does half of the more complicated folds.

  • Flowering Zinnias DSP (pattern 1): 5-1/2″ x 4-1/8″
  • Granny Apple Green cardstock: 2-7/8″ x 2-7/8″
  • Basic White cardstock: 2-1/2″ x 2-1/2″
  • Flowering Zinnias DSP (pattern 2): cut with 2-3/8″ circle punch
  • Flowering Zinnias DSP (pattern 3): 2-1/2″ x 1/2″
  • Dimensionals
  • Mini envelope (for 3″ x 3″ cards)

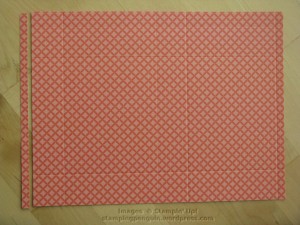
The main part of the project is the 5-1/2″ x 4-1/8″ piece of patterned paper. The leaf pattern is the outside pattern.

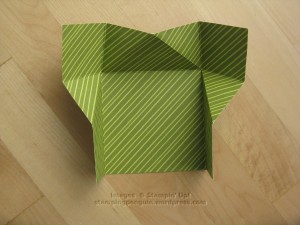
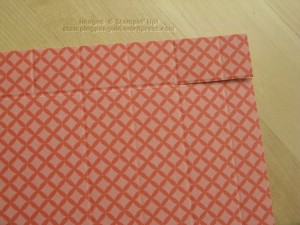
It’s a little hard to see, but here is how the paper is scored (rather than marking and folding as in the tutorial).

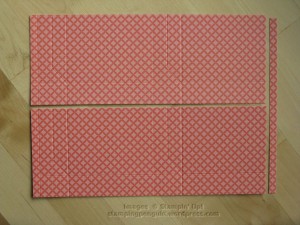
Turning the paper over so that the leaf pattern is facing down, fold in on the side score lines, burnishing well.

Make sure the two sides meet in the middle, and the sides are kept straight with the rest of the paper.

Open up the folds and fold the top down on the score line parallel to the long side.

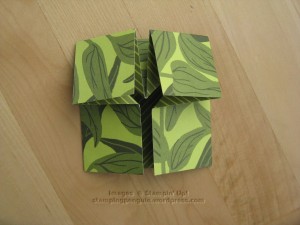
Open again, and flip so that the leaf pattern is facing you again. Fold the two top corners into the center, making sure that they line up with each other. (If I scored properly, this should happen without too much work.)

Open up the patterned paper and flip the leaf pattern facing down.

If you pull the sides to the middle, the paper should fold up more-or-less easily into the modified napkin fold shape.

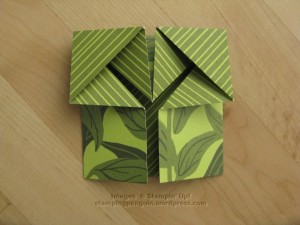
If desired, you can leave the project like this before going onto decorations. However, I thought it was more interesting to fold back the corners of the two top squares. Gently pull the corner back…

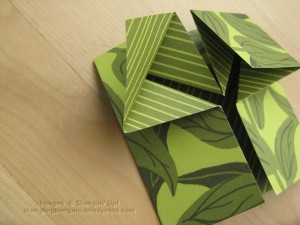
… and match it up with the outer corner.

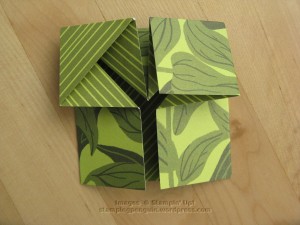
Repeat on the other side.

To create a space for a note inside, adhere the small 2-1/2″ x 1/2″ strip of tiny flowers to the Basic White 2-1/2″ x 2-1/2″ square.

Open up the napkin fold again, and adhere the square to the largest square section in the middle.

Now for the outer decorations… with the project closed again, place two dimensionals near the center fold, below the top left square.

Remove the liners on the dimensionals

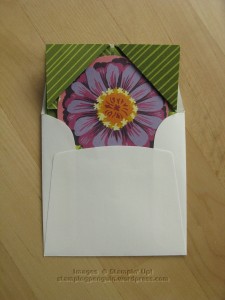
Carefully tuck the zinnia circle into the top two corners. Higher is better, but I centered mine on the project.

Press the zinnia circle down onto the dimensionals to adhere to the project. In this way, we insure that the zinnia is attached only in that one spot (rather than putting the dimensionals on the back of the zinnia).

Attach the napkin fold on the 2-3/4″ x 2-3/4″ square of Granny Apple Green cardstock.

The card fits into the 3″ x 3″ envelope (or could be attached to a larger project, like we did before).

To open the card, carefully slip the zinnia circle out of the two top corners first.

Slowly unfold the top sections.

Now the card can be opened completely.

Lip balm holder:

This project came about when I was experimenting with ways to create 3D objects using the Sweet Thoughts Memories & More Cards and Envelopes. A couple of months ago, I used the bases + the pre-printed decorative cards as a sample card. This time, I wanted to show other uses for the bases.

  • Sweet Thoughts Memories & More Card base: half (scant 4-1/4″ x 6-1/4″)
  • Sweet Thoughts Memories & More 3″ x 4″ card
  • Sweet Thoughts Memories & More Envelope: cut to 2-1/2″ x 2-1/8″
  • Basic White cardstock: 2-1/2″ x 1-3/4″
  • Sweet Thoughts Memories & More Envelope: cut with Best Label punch

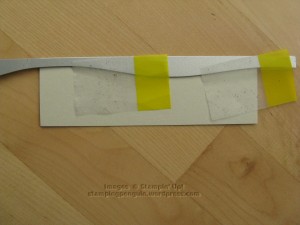
The base for our project starts as one-half of a Sweet Thought Memories & More card base, at a scant 4-1/4″ x 6-1/4″.

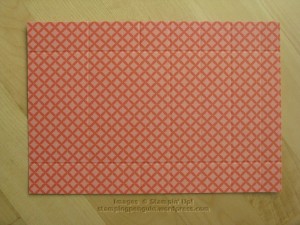
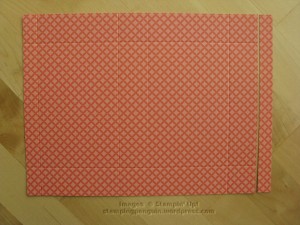
For reference, here is how the base was scored:

  • Along the shorter side, 3/4″ from each side.
  • Along the long side, at 1/2″, 1-1/4″, 2″, 2-3/4″, 4-3/4″; additionally, at 3-1/2″ but only to the score lines (not in the middle). This set of scoring starts on the right of the picture.

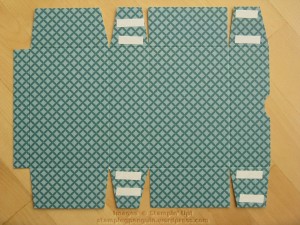
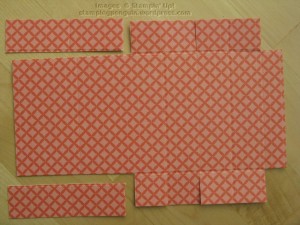
We need to do a little bit of trimming before we can assemble. From the 1/2″ section (right side of picture), cut along the two outer score lines up to the second score line.

Cut off the 1/2″ x 3/4″ pieces on the ends.

Next, still working within the 3/4″ score lines on the outer edges, cut from the outside to the score line, SKIPPING the first remaining score line, on the next three score lines.

From the last cut, cut along the 3/4″ score line to remove the last sections within the 3/4″ score line.

Burnish the outer 3/4″ score lines. This is a good time to also round the corners of the 1/2″ section (on the right).

Finish burnishing the rest of the score lines.

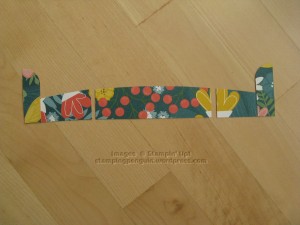
To decorate, we need to trim the piece of envelope I provided. The piece is wider left-right. Note the direction of the pattern, if any. Maintaining the 2-1/2″ width, cut off from the bottom, two 1/2″ strips (cut to 1-5/8″, then 1-1/8″).

Bend the Best Label at about 1/3 from one end, with the floral pattern on the outside.

(Do this next step if you want to decorate the box with the strips we cut.) Add glue to the bottom 1/3 of the folded label.

Attach BEHIND the first 1/2″ strip we cut. Make sure to center left-right.

With the rounded section of the base at the top, adhere the two 1/2″ strips to the next two sections in order. Adhere the larger piece to the section at the bottom. You will want to maintain the direction of the pattern.

(If you don’t use the smaller strips to decorate, you can adhere the folded Best Label to the box directly, but put the glue on the opposite side. Sorry, I didn’t take a picture of that option.)

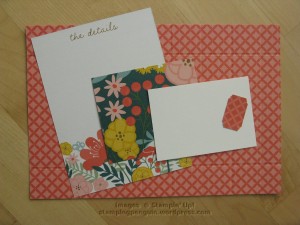
If you want to write a message to your recipient, you can decorate the remaining large section with the provided Basic White cardstock.

Alternatively, you can use the provided Memories & More card to add a decorated piece that still have room for a message. I only had enough of the card shown above for my recipients, so I used a different card. You will want to cut the piece to 2-1/2″ (wide) x 2-1/4″ (tall). Note that the direction you adhere this piece to the base is opposite of the other pieces.

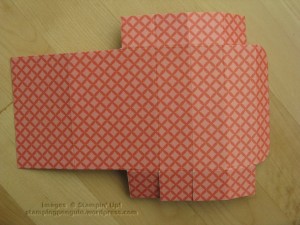
Ready to assemble? Flip base over. Add adhesive (glue or Tear n Tape) to the tabs as shown.

Rotate 180 degrees, because we’ll start with the tab on that side first.

Fold down the outer middle section and adhere in place.

Fold over the outer tabs, meeting the side of the next tab with the score line. The tab will be adhered to the outside.

Do the same with the other two tabs.

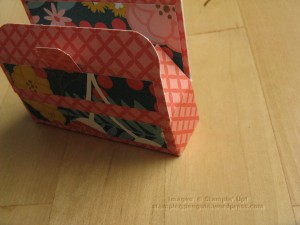
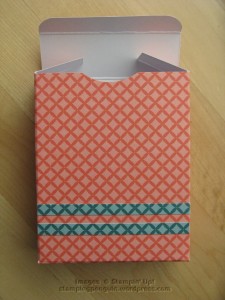
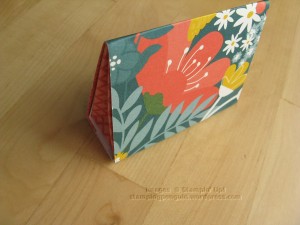
The box is ready for a lip balm.

To close, fold down the side tabs.

Now, close the remaining flap, checking the fit.

You may need to trim the edge of the side tabs closest to the back. Do start with the tiniest sliver, and keep adjusting until the top closes easily. If you trim too much, the top may not stay closed very well.

Our project is now complete!

Such a cool little box! It really makes me happy.

Hope you enjoyed this month’s projects. Next month’s Stay–at-Home Saturday lands on National Scrapbook Day, so don’t be surprised if you see a mini album.

See you next month! Plus, I plan to show other 3D items I made using the Sweet Thoughts Memories & More card bases as the starting point.