

Introduction: Getting Started! ESP8266 Basic Interpreter Http://esp8266basic.com


To get started you will need the following.
Parts
- ESP8266 Module
- 3.3v power supplie (Available on ebay for less than $3)
- Solid State relay. (I used a 40A)
- Wire nut
- DuPont wires
- 110v extension cable
Tools
- wire cutters
- arduino uno
Step 1: Download ESP8266Basic

Go to http://www.esp8266basic.com/download.html and get the latest version of ESP8266 Basic.
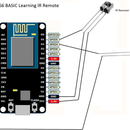
Step 2: Hook Up ESP in Flashing Configuration

Hook your ESP8266 module up in flashing configuration as shown.
Step 3: Run the Flasher Program

Click the "Firmware Flash" button.
Wait for the flash to finish with out errors.
IF there are any errors check your wiring.
Reset the ESP8266 module with out GPIO 0 grounded.
Step 4: Connect to the ESP8266 Over Wifi to Configure It

The module will attempt to connect to the last network it was connected to.
Because this module has never been connected before it will start its own access point.
Connect to the "ESP" access point
Step 5: Log in to Esp8266 Web Interface
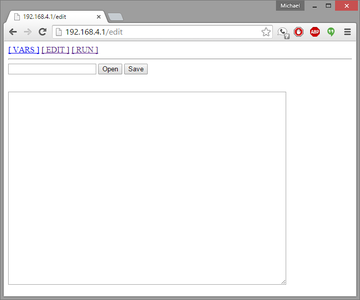
Goto http://192.168.4.1/edit in your browser.
You should see a screen that looks like this.
You can now use the edit area to type basic programs for the ESP8266.
Saving the program with no file name will make it the default program that is loaded upon restart of module likewise clicking the open button with out a program name specified will open the default program.
Step 6: Hook Up Relay, Esp and Power Supply to Extension Cord
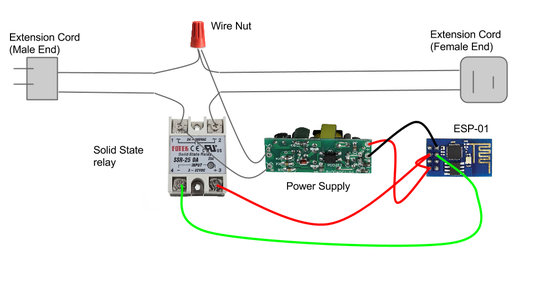
Use the picture to hook up all the wires to the esp
Step 7: Upload the Control Program
go to the edit page on the ESP and past in the following program.
cls
Print “ESP8266 WiFi Solid State Relay”
print
Button “On” [on]
button “Off” [off]
button “Exit” [exit]
wait


[on]
po 2 0
Wait


[off]
po 2 1
wait

[exit]
end
Step 8: And You Are Done.

Hit the run link in the browser and start toggling your relay to your hearts content.


