

Introduction: G-code


Objective: The g-code is the easiest and most accurate way to predict how your part will print. Learn how to make gcodes, inspect them, and make them be one of your best 3D Printing Friends.
To learn how to master 3D Printing see more posts at:
http://3dprintingninja.blogspot.com
Please leave your comments.
and as always thanks for visiting,
The 3D Printing Ninja
Step 1: Creating a G-code

There are many options for a software to slice your model to be printed, such as Slic3r, Cura, or as I am using in the pictures, Makerware. These programs are free to download and take your model and convert it into a file that can be printed. To create the gcode of your file, import your model and export it as a gcode.
Step 2: Inspecting the G-code (Uploading)

Next we take our gcode file that we just created and import it into a gcode viewer. There are multiple viewers, however I enjoy the free online viewer found at: gcode.ws
Drag and drop your newly created gcode file into the site. Loading bars should appear. This is what it looks like:
Step 3: Inspecting the G-code (Inspection)


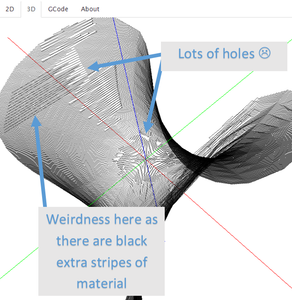

3D mode display a 3D model constructed of the paths of each layer. It looks a little odd at first, but you'll get used to it soon. The most important thing is to rotate and zoom to get every angle so that you can spot the errors. Below are examples of what you are trying to spot.
- Giant Holes / Missing Layers
This is the most common problem that you can see usually due to non-manifolds. Rotate your model until you see something as shown in the picture below. This means that nothing will be printing where the missing material is lacking. So don't print the file because it will look exactly like this.
- Random Extra Material
- Inner Material
Usually this is due to the software you used to make the gcode will want to add automatic supports inside the model.
- Odd object
Step 4: 2D Mode
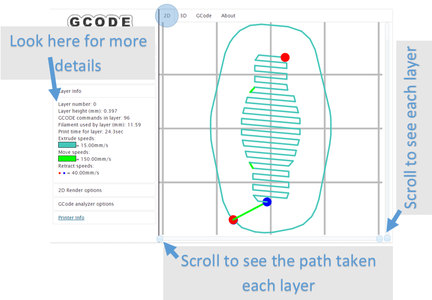
This mode lets you look at each individual layer and the path the printer will take. You can also check the speeds of each layer, and if need be change the speed in advanced settings when you print it.
Also you may find it useful to look into the "2D Render Options" on the right hand side to make the view more clear.
Step 5: 2D Mode (Inspection)


- Odd Layer
When a person mows a lawn they usually follow a pattern or some logic order. But imagine a person who decides to mow the lawn with a random pattern. This happens in 3D printing and to me it is hilarious and annoying. I just want to ask the software if they are drunk or on drugs because the path is so bad.
This happens most often at the first and last layers. In the picture shown below, you can see how the rough layer on the feet and between the legs of this cougar. It would look identical in the gcode 2D view.
Gcodes do take a little more time, but in my opinion are worth it so that you do waste time and material printing something that you could have know would have not printed out well.

Participated in the
3D Printing Contest


