

Introduction: Low Cost Foundry/forge


This is my design for a metal melting foundry that also works as a forge.
Materials needed:
1 old beat up standard propane tank
Portland cement
Silica sand
Wood ash
Perlite (not vermiculite)
Fireclay
External parts:
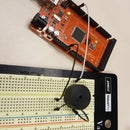
Forge burner
------ I used the burner from this instructable
https://www.instructables.com/id/how-to-build-a-gas-forge-burner/
High pressure gas regulator
Crucible (shown at end)
Tools needed:
Reciprocating saw (for cutting the propane tank)
3" hole saw drill attachment (optional)
1 3/8" hole saw
Chisel
Small drill bit
Hacksaw
Drill
Step 1: Prep the Tank


Completely empty the tank of all propane by fully opening the valve. Using your chisel or a hacksaw, slowly cut the brass valve off. Which should expose a roughly 3/8" hole. Fill the tank with water and let it sit for a few minutes then empty it out. Don't throw the valve away because it's solid brass, which you can melt down later!
Step 2: Cut the Propane Tank

First you'll have to cut the top off the tank. Do this first by drilling a small hole in the tank at the desired height, mine being right where it begins to taper in. Then take the chisel and use it to punch a hole big enough for the reciprocating saw blade to fit, and then use the saw for the rest of it.
Step 3: Drill the Large Exhaust Hole.

Using the 3 inch hole saw, cut out the hole right in the top of the tank. My hole saw ended up breaking since it was old and this was the second foundry I've made, so I finished it with the reciprocating saw.
Step 4: (optional But Recommended) Lid Structure Addition
I didn't get a picture of this but basically weld a bunch of random screws onto the inside of the lid to help support the refractory brick.
Step 5: Mix the Refractory and Cast

For the body of the foundry:
Mix 15.6 c Portland cement, 15.6 c perlite, 15.6 c sand, and 15.6 c wood ash. Thoroughly mix and add 33.5 c water. Then add 31.2 c Fireclay and mix until there are no dry pockets. It should be the consistency of very very very soft cookie dough. Pour it into the body of the tank and press a 6 inch diameter by 7 inch high cylinder (basically a large paint can) into the mix until it is right up to the top of the tank.
For the lid:
Mix .8 c Portland cement, .8 c perlite, .8 c sand, and .8 c wood ash. Add 1.25 c water and mix. Add 1.6 c Fireclay and mix. Before you pour the lid, find a 3 inch cylinder to put through the ventilation hole. I used a large spray paint can. Then pour the mix and pack it in, but be careful of the screws welded on!
If you have any leftover cement, make refractory bricks!
Step 6: Drill Gas Supply Hole

Around the center of the tank, drill a 1 3/8" hole through the metal and the concrete. This is to put the burner in.
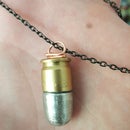
Step 7: Crucible


You can either buy a ceramic or graphite crucible, which I don't recommend as mine exploded after a while, or you can weld together a metal one which I have now. It's just a 3" ID schedule 40 steel pipe around 5 or 6 inches high. They're based off of the crucibles made on this site: http://backyardmetalcasting.com/crucibles.html
Step 8: Use It!


You can use it to melt anything from aluminum to copper and more as this reaches temperatures of up to 2400°F. You can use it to forge, cast jewelry or other metal parts, and you can melt glass too! Be safe!
PS: if you don't have access to propane as fuel, you can use charcoal with a hair dryer blowing into it instead. It isn't as hot but still works for aluminum and other low melting point metals up to around 1400°F.

Participated in the
Full Spectrum Laser Contest 2016


