

Introduction: Infinity Mirror Table - the Easy Version


I've been fascinated by infinity mirrors ever since I built my infinity mirror clock. But this time I wanted to make something simpler - so I decided to convert my center table into an infinity mirror table.
You can use this instructable to convert nearly any surface into an infinity mirror.
Step 1: The Electronics

This time I kept everything simple and "dumb". Bought the following:
- 12 V RGB LED Strip similar to http://www.ebay.in/itm/5M-SMD-RGB-Waterproof-300-L...
- 24 key IR Remote Controller similar to http://www.ebay.in/itm/24-Keys-IR-Remote-Control-C...
- Toshiba 12V 7Amp power supply
Please note - I did not buy any of these items online, I bought them from SP Road in Bangalore. The links are provided only for reference.
I had to extend the cable on the LED Strip as I was keeping the controller on the side of the wall. Simply used a 4-wire ribbon cable and soldered the ends.
Step 2: Modifying the Table


This required some preparation:
- Bought 4 wood strips - 1" x 1" x 30" (the size of my table is 30" x 30"); nailed them to the edges of the table, cutting as required so that they made a frame for the table
- Used some plaster of paris to smooth the edges (in hindsight should have used wood filler instead)
- The table I used had been damaged when we had moved from Gurgaon to Bangalore, and I had expected more damage in the next move. There were a lot of scratches on the veneer and corners were damaged a lot. To cover all this, we used a roll of vinyl film (similar to http://www.ebay.in/itm/Chrome-Brushed-PVC-Car-Viny...). I'm not sure how long this will last, however, it is meant to be put on cars, so should be long lasting.The effect is nice and it looks good as of now.
- Drilled a hole in the center of the table for the wires
If you plan to use the vinyl film, I would suggest you watch some videos showing how it is applied. It's pretty simple, but helps to see how it is done.
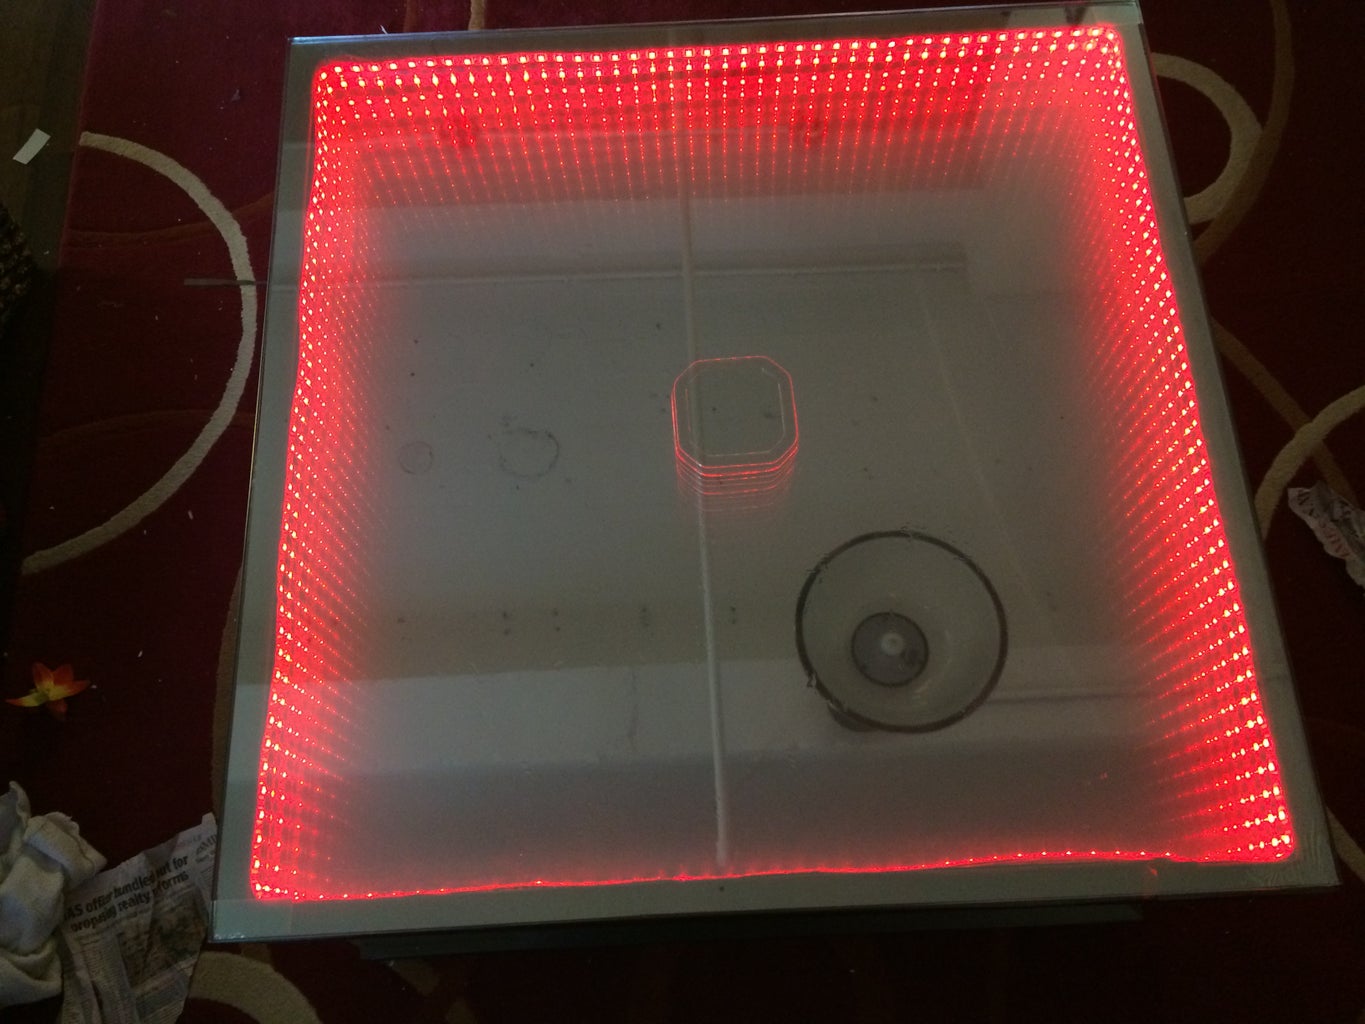
Step 3: Creating the Infinity Mirror


Bought the following:
- 6mm square mirror - 27 7/8" x 27 7/8" to fit in between the frame we created in the previous step
- 6mm square glass - 30" x 30" (the size of the table)
- One way mirror file similar to http://www.buydecorativefilm.com/one-way-mirror-si...
The installation steps were as follows:
- Thread the wire through the hole and keep it on a side
- Place the mirror in between the frame
- Stick the LED strip to the inside edge of the frame. I tried to stick it directly as the strip was adhesive backed, but it came off after some time. So had to use a strong adhesive (similar to gorilla glue or araldite)
- Place a small stainless steel lid in the center - this would create additional reflections in the center
- Stick the mirror film to the glass
- Place the glass on top and stick it with mirror mount tape
Sticking the mirror film on the glass is slightly tricky and to get best results you should spray the entire glass and the film with mild soap solution. This would help to get a smooth finish. Again - I would recommend you watch a few videos to see how it is done.
Step 4: Switching It ON


Connect the strip to the controller and the power supply.
Press the ON button on the IR Remote.
Voila...
Step 5: Problems Faced
Not too many, as this was a very simple project.
- The plaster of paris flakes off - would be better if you used wood filler
- The adhesive backing on the LED strips is not too strong. Best to use another adhesive to stick the strips.
- There are some bubbles in the mirror film - but these can be avoided using mildly soapy water (and a lot of it)
- The reflections off the stainless steel lid are not too good due to its vertical faces. I didn't want to use a circular plate as it would clash with the square shape of the table. Would probably add a pyramid in the center for better reflections.
Step 6: Future Plans
As I'd mentioned earlier, this one is pretty dumb, but I'm waiting for a few components to make this smart. These include:
- LED Amplifier - http://www.aliexpress.com/store/product/1pc-Lot-12... - to control the strips through the arduino; this seems like a simpler and more compact method than using MOSFETs.
- ESP8266 Wifi adapter - http://www.aliexpress.com/item/1Pcs-High-Quality-E... - to connect the arduino to wifi; these are the latest in cheap wifi connectivity modules. Should be fund to use.
- ATMEGA Pro Mini - http://www.aliexpress.com/item/Pro-Mini-Module-Atm... - I hate using expensive arduinos - hence the pro mini.
- Microphone Sensor - http://www.ebay.in/itm/251379509065?ssPageName=STR... - to listen to claps, music, etc.
The Plan is as follows:
- Single clap - pulls weather information from the web and changes the colour of the strip depending on the temperature - blue for cold, red for hot.
- Two claps - pulls information about our apartment shuttle and would blink fast if the shuttle is coming in to the complex and slow if it is far away.
- Three claps - create disco lights based on music being played. Probably have some beat detect algorithm.
Suggestions and comments welcome.

Participated in the
Wood Contest

Participated in the
Make it Glow!


