Solar Panel Keeps Cheap Digital Calipers Powered Up

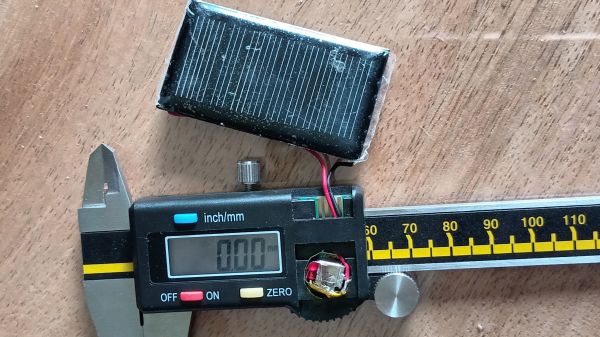
There’s no doubt that cheap digital calipers are useful, especially when designing 3D-printed parts. Unfortunately, cheap digital calipers are also cheap, and tend to burn through batteries quickly. Sure, you can remove the battery when you’re done using them, but that’s for suckers — winners turn to solar power to keep their calipers always at the ready.

[Johan]’s solar upgrade begins with, unsurprisingly, a solar cell, one that just fits on the back of his digital calipers. Like most of these cheap calipers, this one is powered by a single 1.5 V LR44 button cell, while the polycrystalline solar cell is rated for 5 V, so [Johan] used a red LED as a crude voltage regulator. He also added a stack of fourteen 100 μF SMD capacitors soldered together in parallel. The 1206 devices form a 1,400 μF block that’s smaller than the original button cell so that everything fits in the vacated battery compartment. It’s pretty slick.

Given their agreeable price point, digital calipers are a tempting target for hacking. We’ve seen a ton of them, from accessibility add-ons to WiFi connectivity and even repurposing them for use as DROs. Ever wonder how these things work? We’ve looked at that, too.

The ROM programmer on display, with an OLED screen attached

Relatively Universal ROM Programmer Makes Retro Tech Hacking Accessible

There’s treasures hidden in old technology, and you deserve to be able to revive it. Whether it’s old personal computer platforms, vending machines, robot arms, or educational kits based on retro platforms, you will need to work with parallel EEPROM chips at some point. [Anders Nielsen] was about to do just that, when he found out that a TL866, a commonly used programmer kit for such ROMs, would cost entire $70 – significantly raising the budget of any parallel ROM-involving hacking. After months of work, he is happy to bring us a project – the Relatively Universal ROM Programmer, an open-source parallel ROM programmer board that you can easily assemble or buy.

Designed in the Arduino shield format, there’s a lot of care and love put into making this board as universal as reasonably possible, so that it fits any of the old flash chips you might want to flash – whether it’s an old UV-erasable ROM that wants a voltage up to 30 V to be written, or the newer 5 V-friendly chips. You can use ICs with pin count from 24 to 32 pins, it’s straightforward to use a ZIF socket with this board, there’s LED indication and silkscreen markings so that you can see and tweak the programming process, and it’s masterfully optimized for automated assembly.

You can breadboard this programmer platform as we’ve previously covered, you can assemble our own boards using the open-source files, and if you don’t want to do either, you can buy the assembled boards from [Anders Nielsen] too! The software is currently work in progress, since that’s part of the secret sauce that makes the $70 programmers tick. You do need to adjust the programming voltage manually, but that can be later improved with a small hardware fix. In total, if you just want to program a few ROM chips, this board saves you a fair bit of money.

Continue reading “Relatively Universal ROM Programmer Makes Retro Tech Hacking Accessible”

Let The Solder Scroll Take Care Of Your Feed Needs

[Victor]’s nifty tool the Solder Scroll is a handheld device that lets one feed solder out simply by turning something a little like a scroll wheel. It looks like an intuitive and comfortable design that can adapt to a wide variety of solder thicknesses, and is entirely 3D printed.

One part we particularly like is the feed system. One rolls a wheel which feeds solder out using a mechanism a lot like extrusion gears in many 3D printer hot ends. Both wheels have ridged surfaces that grip and feed the solder; their gears mesh with one another so that moving one moves both in unison.

Solder feed tools like this have seen all kinds of interesting designs, because while the problem is the same for everyone, there are all kinds of different ways to go about addressing it. We love this one, and we have seen many other takes that range from a powered, glove-mounted unit to an extremely simple tool with no moving parts. We’ve even seen a method of hacking a mechanical pencil into a new role as a solder feeder.

Remove Wall Plugs Fast With A Custom Tool

The best thing about buying your own home is that you can hang things on the walls. It’s a human right all too often denied to renters the world over. Regardless, five years later, when you’re doing the mandatory minimalist remodel, you’ll be ruing the day you put in all those wall anchors. At that point, consider removing them with this nifty tool from [XDIY with Itzik].

The design aims to remove wall anchors as cleanly as possible. It’s easiest to watch the video to get the idea of how it works.

The tool features a block which holds a bearing. That bearing acts as a rotating stop for a wood screw. The idea is that you place the block against the wall, and use a power drill to drive a wood screw into the anchor at high speed. The screw can’t move forward, so the threads basically yank the plug out of the wall, and relatively neatly at that. Once removed, there’s a little push stopper you can use to hold the old plug in place as you remove the wood screw from the device, ready to go again.

[Itzik] demonstrates the device by removing ten wall plugs in just 40 seconds. If you’ve got a lot to do, or it’s a job you do regularly, you might like to have this tool in your kit.

Oftentimes, having the right tool can make a job ten times faster, and this seems like one of those cases. Video after the break.

Continue reading “Remove Wall Plugs Fast With A Custom Tool”

Hacked Oscilloscope Plays Breakout, Hints At More

You know things are getting real when the Dremel is one of the first tools you turn to after unboxing your new oscilloscope. But when your goal is to hack the scope to play Breakout, sometimes plastic needs to be sacrificed.

Granted, the scope in question, a Fnirsi DSO152, only cost [David Given] from Poking Technology a couple of bucks. And while the little instrument really isn’t that bad inside, it’s limited to a single channel and 200 kHz of bandwidth, so it’s not exactly lab quality. The big attractions for [David] were the CH32F103 microcontroller and the prominent debug port inside, not to mention the large color LCD panel.

[David]’s attack began with the debug port and case mods to allow access, but quickly ground to a halt when he accidentally erased the original firmware. But no matter — tracing out the pins is always an option. [David] made that easier by overlaying large photos of both sides of the board, which let him figure out which buttons went to which pins, and mapping for the display’s parallel interface. He didn’t mess with any of the analog stuff except to create a quick “Hello, oscilloscope!” program to output a square wave to the calibration pin. He did, however, create a display driver and port a game of breakout to the scope — video after the hop.

We’ve been seeing a lot of buzz around the CH32xx MCUs lately; seeing it start to show up in retail products is perhaps a leading indicator of where the cheap RISC chips are headed. We’ve seen a few interesting hacks with them, but we’ve also heard tell they can be hard to come by. Maybe getting one of these scopes to tear apart can fix that, though.

Continue reading “Hacked Oscilloscope Plays Breakout, Hints At More”

Fail Of The Week: Can An Ultrasonic Cleaner Remove Bubbles From Resin?

[Wendy] asked a very good question. Could putting liquid resin into an ultrasonic cleaner help degas it? Would it help remove bubbles, resulting in a cleaner pour and nicer end product? What we love is that she tried it out and shared her results. She purchased an ultrasonic cleaner and proceeded to mix two batches of clear resin, giving one an ultrasonic treatment and leaving the other untouched as a control.

Sadly, the test piece had considerably more surface bubbles than the untreated control, as well as a slight discoloration.

The results were interesting and unexpected. Initially, the resin in the ultrasonic bath showed visible bubbles rising to the surface which seemed promising. Unfortunately, this did not lead to fewer bubbles in the end product.

[Wendy]’s measurements suggest that the main result of putting resin in an ultrasonic bath was an increase in its temperature. Overheating the resin appears to have led to increased off-gassing and bubble formation prior to and during curing, which made for poor end results. The untreated resin by contrast cured with better color and much higher clarity. If you would like to skip directly to the results of the two batches, it’s right here at 9:15 in.

Does this mean it’s a total dead end? Maybe, but even if the initial results weren’t promising, it’s a pretty interesting experiment and we’re delighted to see [Wendy] walk through it. Do you think there’s any way to use the ultrasonic cleaner in a better or different way? If so, let us know in the comments.

This isn’t the first time people have tried to degas epoxy resin by thinking outside the box. We’ve covered a very cheap method that offered surprising results, as well as a way use a modified paint tank in lieu of purpose-made hardware.

Plasma Cutter On The Cheap Reviewed

If you have a well-equipped shop, it isn’t unusual to have a welder. Stick welders have become a commodity and even some that use shield gas are cheap if you don’t count buying the bottle of gas. But plasma cutters are still a bit pricey. Can you get one from China for under $300? Yes. Do you want one that cheap? [Metal Massacre Fab Shop] answers that question in the video below.

First impressions count, and having plasma misspelled on the unit (plasme) isn’t promising. The instructions were unclear, and some of the fittings didn’t make him happy, so he replaced them with some he had on hand. He also added some pipe tape to stop any leaking.

The first test was a piece of quarter-inch steel at 35 amps. The machine itself is rated to 50 amps. Sparks ensued, and with a little boost in amperage, it made a fair-looking cut. At 50 amps, it was time to try a thicker workpiece. It made the cut, although it wasn’t beautiful. The leaking regulator and the fact that he can’t run the compressor simultaneously as the cutter didn’t help.

From the look of it, for light duty, this would be workable with a little practice and maybe some new fittings. Unsurprisingly, it probably isn’t as capable as a professional unit. Still could be very handy to have.

It is possible to convert a welder into a plasma cutter. A handheld unit like this probably won’t benefit from a Sharpie.

Continue reading “Plasma Cutter On The Cheap Reviewed”