
Great retouching is all about small details. They often make the difference between a well-retouched image and a world-class retouched image. However, seeing some of the details can be tricky. Especially when you are on the go and retouching on a laptop screen that doesn't offer the precision of a well-calibrated screen with a large color gamut. A couple of months ago I showed you a trick to see more details than what your eyes might see on an image by using a solar curve. In today's article, I am going to show you another technique that I often use to clean up small details. It is so easy you might end up wondering why you did not think of it before.
Each and every one of us sees things differently. For example, some people will be able to differentiate more colors than others. When teaching retouching, I see that some problems seem to be recurrent though. For example, when doing negative (or local) dodging and burning, people have a tendency to use more of the dodging layer to clean than the burning one. That was my case too a couple of months ago until I started using the technique I am about to show. On the opposite side, if you tend to correct more of the lighter things by burning them down, do not worry. This technique will work for you too and will help you in using both layers more, rather than just one of them.
Using dodging and burning in an equal way will help you achieve better results. Your work will be more consistent, and you are more likely to avoid changing areas that might not have needed any work in the first place.
Negative for Positive Results
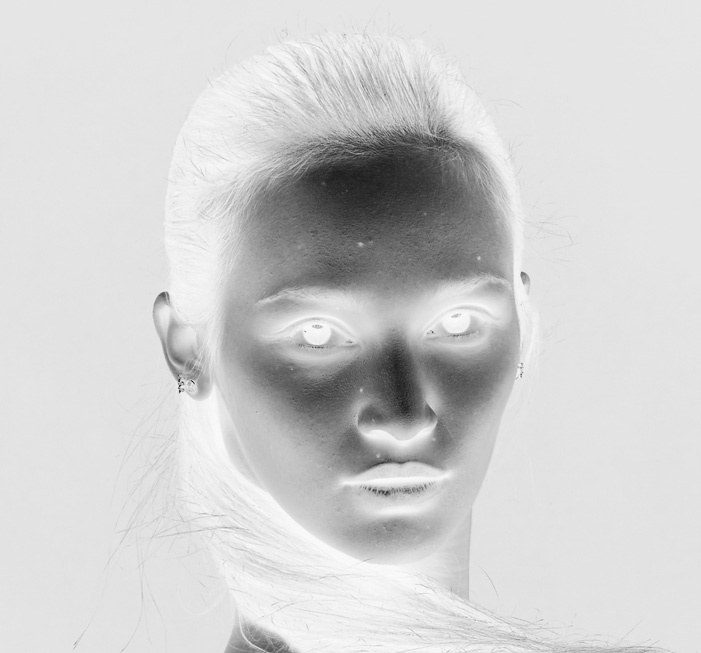
So let's get into the technique by explaining the logic behind it. If you tend to correct darker zones by dodging them ,but not using the burning tool, what you could do to inverse that? To see darker zones lighter and lighter zones darker, a very simple negative of your image will help you get that. By creating a negative of your image, the darker zones will appear as lighter zones. So then to lighten things on a negative, you have to use the burning tool and darken them with the dodging tool. That is actually how photographers/printers use to do it in the darkroom, hence the name of the techniques. They burnt (over-exposed) the negative to make it lighter and dodged part of the negative to make it appear lighter.
Multiple techniques exist to create a negative in Photoshop in a non-destructive way. The two I use the most are either a simple Invert adjustment layer or a curve adjustment layer with the curve inverted. Both work great and show a similar result. This goes without saying, you should follow Julia Kuzmenko McKim's advice regarding local dodge and burn and working with the image in black and white for an easier editing process.


And the same image zoomed in slightly more:
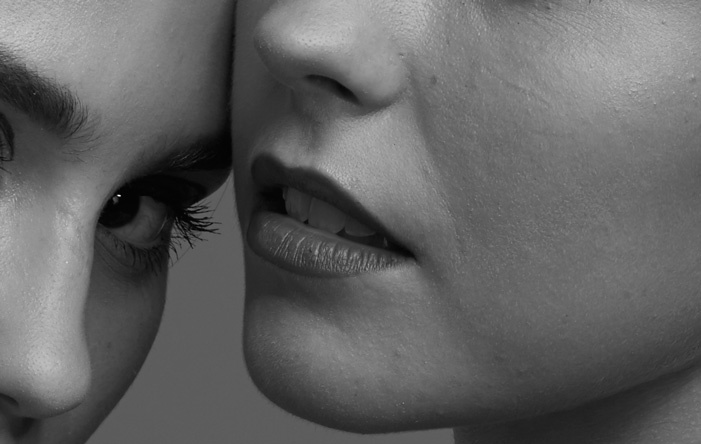

Note that both are unedited files with black and white visual help layers so that you can see the work that should be done using local dodge and burn, like I would when retouching.
Using both an adjustment layer that displays your image in black and white as well as one that shows its negative is a good way to obtain awesome results faster and more easily. Regarding the negative, be careful not leaving it active for the whole dodging and burning process. Otherwise you will just inverse your problem. The goal of the negative visual help layer is to help you see things you might have troubles seeing otherwise. By leaving it active, it will not help you. So enable and disable it every so often during your local dodge and burn process and you should see an evolution.
Not Limited to Dodging and Burning
The negative visual help layer is a very powerful tool for local dodge and burn, however it does not stop there. I use it when cleaning up an image with the healing brush tool and clone stamp tool in certain areas. For example, small backlit hair can be a pain to see clearly and clean up. Using a negative layer with added contrast can make a difference and ease that process for you. Another example is cleaning stray hair strands. I find it easier to do it using a negative layer, sometimes with added contrast using another curve on top of it.

Working with an inverted visual help layer on top of your other layers can take a little bit of time to get used to. Especially for the dodging and burning part, as you might be tempted to lighten things using the dodging layer. However, burning will make things look lighter when the negative is active. Also, do not forget to keep your visual help layers on top of all the others and delete them once your retouching is done, otherwise you might end up with some weird inconsistencies.


As always, great article!
Great article! I find that these kinds of checks are essential to actually being able to see what it is you're trying to fix.
awesome!
Now my secret is out. A secret I learned on youtube.
Great!
Having taught this method for over a decade I feel the need to warn that its extremely easy to go over board with retouching when using it. Its best used when irregularities are difficult to see when in Positive(normal) view.
Nice article though.