


Making modifications to your car or truck in Photoshop can be a lot of fun. In this tutorial we will demonstrate how to create a pimped out truck modification using photos taken with a simple point and shoot camera, with no advanced lighting setup. Let's get started!
Tutorial Assets
The following assets were used during the production of this tutorial.
Step 1
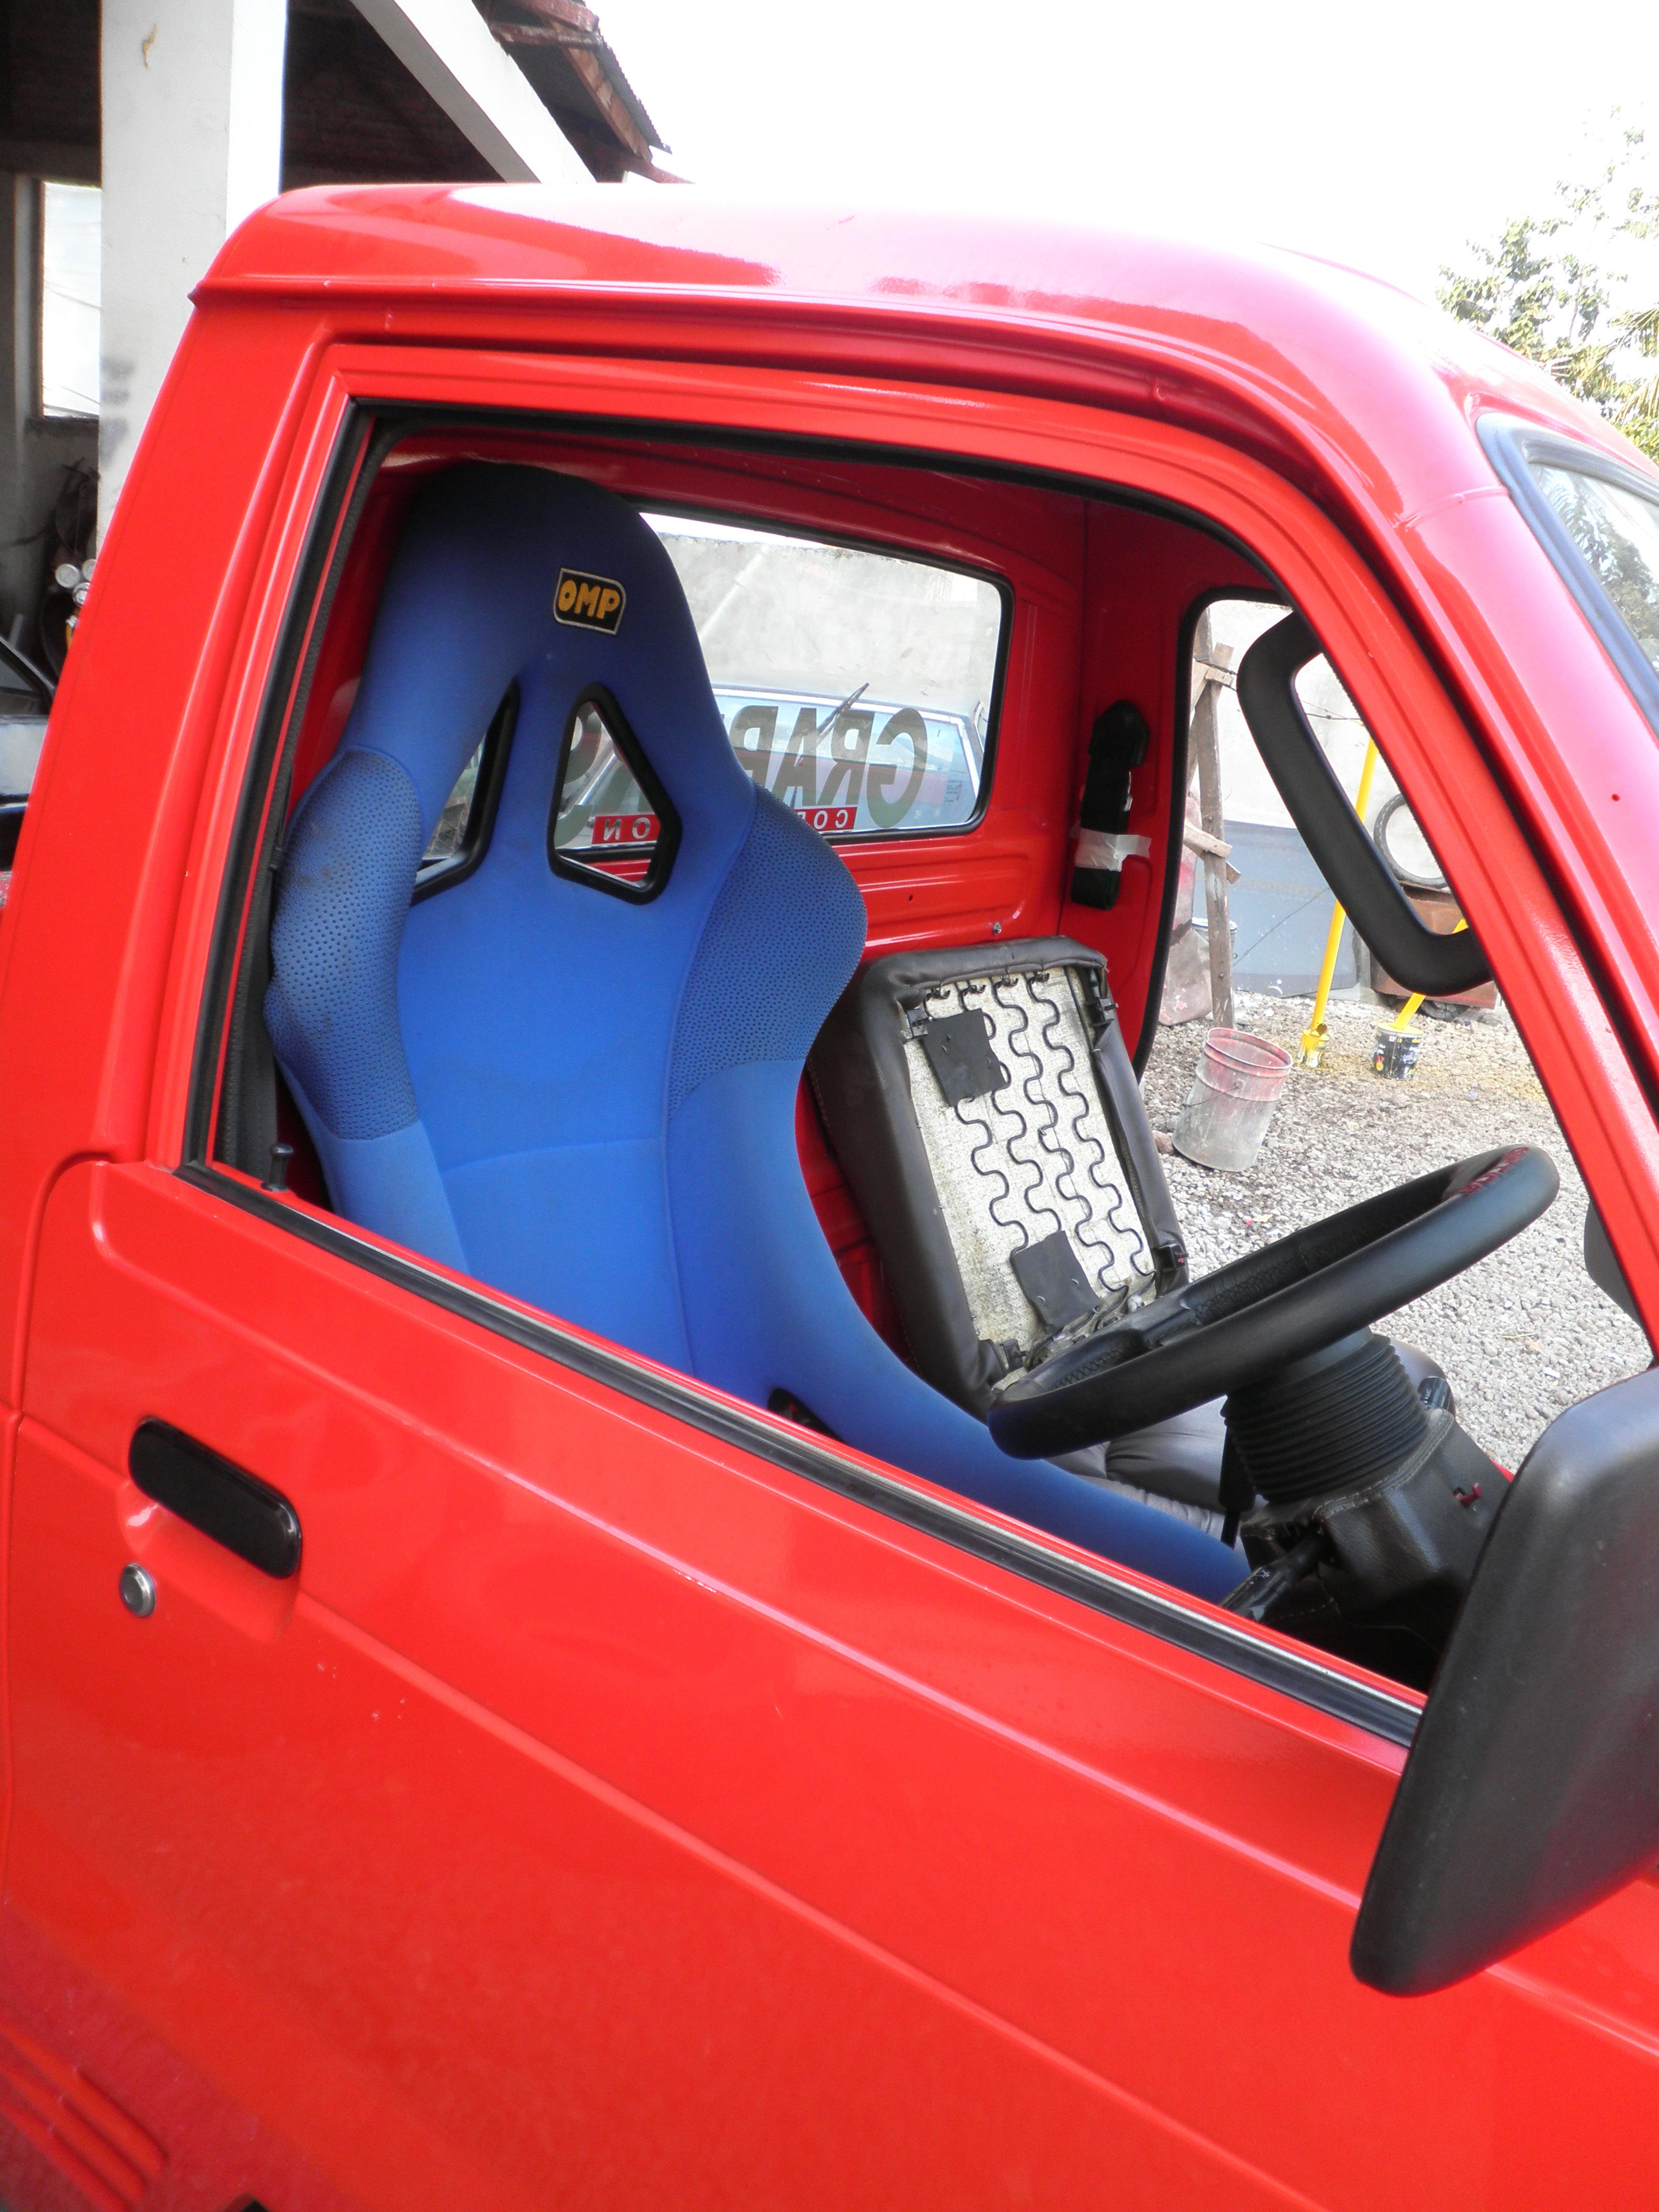
Start by opening the Truck in Photoshop. This photo is taken outside using ordinary pocket camera. No fancy lighting or set used in the process. So, it's obvious that you can do it yourself.


Step 2: Drawing Perspective Lines
Activate Paths panels and click Create new path icon to make new path. Use Line tool to draw perspective line by following the cars shape. In the end, you will end up with a two-point perspective. Psdtuts+ has already published a very complete tutorial on drawing perspective. I found out that the best tutorial is How to Draw with Perspective from Gavin L. The technique used here is similar to Step 39-44 in the tutorial.


Below you can see the detail. You can see that we can just simply following some straight lines on the truck.


Step 3
We are going to render the perspective path into a line. First, we need to set the Brush property. Activate Brush tool (B), right click and set its brush size to 5 px with 0% Hardness.


Step 4
Make new layer. Activate Path Selection tool, right click on the canvas and select Stroke Path. In the next dialog box, select Brush.


Step 5
Below is the perspective I used in this project.


Step 6: Background
Before moving on, let's work on its background. Make new layer and draw a radial gradient from white to gray.


Step 7
Duplicate background by pressing Ctrl/Cmd + J. Perform transformation (Ctrl/Cmd + T). Pull transformation handle down until we have a nice floor.


Step 8
Activate Eraser tool. Select big brush size and set its hardness to 0%. Erase top part of the floor.


Step 9
Add Adjustment Layer Hue/Saturation with following settings. This Adjustment Layer will add a nice green color onto the background.


Step 10: Cutting The Truck
Select truck head using pen tool.


Step 11
Convert path into selection by pressing Ctrl/Cmd + Enter. Hit Ctrl/Cmd + J to put selection into new layer.


Step 12: Bumper
Let's start drawing its bumper. First, we need the perspective line to guide our drawing. Place the line on top of the canvas. Following this guide, draw bumper basic shape. No need to worry about shading or highlight. The first important thing is to match its perspective.
After complete working on the perspective, then start painting its highlight. Add new layer. Activate Brush tool with low Opacity setting. Paint white for its highlight and black for its shadow.


Step 13
Let's hide the new bumper for now by clicking on its eye icon in Layers panel. Select original bumper and then hit Ctrl/Cmd + J to duplicate it to a new layer.


Step 14
Bring the new bumper back by clicking its eye icon again. Place the duplicated bumper on top of the new bumper. You may need to erase its edge until it blends with the new bumper using a soft Eraser tool.


Step 15
Make new layer and place it on top of the bumper. Activate Clone Stamp tool. Set sample source to All Layers. Alt-click area similar to the new bumper as clone source and then click on the license plate to cover it. Do this carefully. You may need to use lots of clone source to avoid repeating pattern and get natural result.


Step 16
Activate brush tool and set its Opacity to 20-35%. Set foreground color to white and draw some highlights on lower part of the bumper.


Step 17: Intercooler
Let's draw a hole for intercooler inside the bumper. Make new path and then draw a rounded rectangle path on the bumper. Make sure to keep an eye on its perspective. Hit Ctrl + Enter to convert the path into a selection and then fill it with black. Using a soft brush with small Opacity, draw some soft and subtle shadows on left and lower sides of the intercooler. See picture below for reference.


Step 18: Side Body Kit
Draw more perspective line to help you draw its side body. I find it convenient to draw using pen tool. It helps to draw precisely. And, if you mess up all you need to do is modify each point using Direct Selection tool.


Step 19
Convert path into selection and then fill it with #8dab3c.


Step 20
Make new layer on top of the side body kit. Activate brush tool with low Opacity. Hit D to set foreground and background color to default, black and white. Hit X to exchange these two colors. Paint white to draw highlight on top of the side body kit and black to draw shadow on lower part of the side body kit.


Step 21
Extend the side body kit. Paint another highlight and shadow on top of it.


Step 22
Draw a small polygonal selection on fender and fill it with white.


Step 23: Tire and Rim
Draw an elliptical shape for its tire.


Step 24
Alt-drag the shape to duplicate it. Place the tire under rear fender.


Step 25
Use pen tool to simply draw a polygonal shape for tire sides.


Step 26
Draw a white elliptical shape. Add layer Style Gradient Overlay.


Step 27
Draw two overlapping ellipses with color #a19b94. Set path mode to Add and Subtract. Add Layer Style Gradient Overlay with following settings.


Step 28
Duplicate crescent shape we have just created and change its color to #353535. Move inner ellipse few pixels away to the left. Place the shape under the original shape. Add Layer Style Gradient Overlay.


Step 29
Repeat Step 28. This time change the color to #bfbaba.


Step 30
Repeat previous step. Move the inner ellipse further away. Change the color to #252423. Add Layer Style Gradient Overlay to add subtle reflection inside the metal rim.


Step 31
Now we're working on the spokes. Draw another shape behind the rim with color #191919. Make some holes inside the rim by adding elliptical shape with mode Subtract. Add Layer Style Gradient Overlay.


Step 32
Activate Brush tool with low Opacity and 0% Hardness. Make new layer and draw subtle reflection of the holes on the rim.


Step 33
Draw inner side of the hole with color #10100f. Make new layer and paint subtle highlight.


Step 34
Draw another shape behind the rim with color #232220.

Step 35
Draw black shape for tire background. Add Layer Style Gradient Overlay.


Step 36
In Layers panel, Ctrl-click layer shape made in Step 31. Make new layer above the rim. Click Edit > Stroke. Set color to white and Width: 2 px.


Step 37
Use soft Eraser tool to erase some of the stroke line. See picture below for reference.


Step 38
Draw an elliptical shape with color #323233. Add Layer Style Bevel and Emboss and Gradient Overlay with following settings.


Step 39
Draw following shape for center of the tire. Add Layer Style Inner Shadow and Gradient Overlay.


Step 40
Make a new layer. Draw thin black lines on center of the rim and then reduce its Opacity to 10%.


Step 41
Draw an elliptical shape. Set its Fill to 0% and then add Layer Style Bevel and Emboss.


Step 42
Let's draw the bolt. Draw a ring shape and rectangle on its center with color #666667. Draw a black circle and rectangle. Subtract it with circle from previous shape. Draw bigger circle behind the bolt for its shadow. Activate brush tool and paint subtle highlight on the bolt.


Step 43
Below is the finished, viewed in 100% magnification. Put all bolt layers inside a group layer by selecting them and then hit Ctrl + G.

Step 44
We have placed the bolt layers in a group layer which makes it easier to duplicate. Alt-drag the group to duplicate it. Make some bolts on tire center.


Step 45
Place bolt, rim, and spoke in a group layer. Duplicate them by Alt-dragging the group layer and place it on top of the other tire.


Step 46
Make sure to do some minor editing to match perspective on each tire. Below, you can see some subtle difference I made onto the tire. Compared to the right tire, we can see more holes on the left tire's spoke. I also add a subtle shadow on upper part of the left tire.


Step 47: Side Wing
Make new layer and place above all layers. Activate pen tool and draw side wing basic shape. Convert path into selection and then fill it with #98b338.

Step 48
Do not remove selection yet. Make new layer. Right click and select Stroke. In the dialog box, select white color with size 1 px. Make new layer and draw shadow on lower part of the wing.


Step 49
Draw a polygonal shape that attached wing onto the side body kit. Paint some highlight and shadow on it to give it realistic appearance.


Step 50
Make new layer under the wing. Paint soft shadows from polygonal shapes made earlier on the side body.


Step 51: GT Wing
Before drawing the GT Wing, we need to modify the perspective lines. Draw some vertical lines to help us match the perspective of the spoiler. Psdtuts+ has published another great tutorial on drawing with perspective, Perspective Basics: A Draw-Through Technique, With a Spaceship.


Step 52
Draw GT Wing basic shape. Make new layer and convert it to Clipping Mask by pressing Ctrl + Alt + G. This way, everything you paint will goes inside the GT Wing. Paint some white and black lines using soft Brush tool.


Step 53
Draw green shape as seen below. Paint white on top of the shape for highlight and black on its lower part for shadow.


Step 54
Alt-drag to duplicate the shape.


Step 55
Make new layer and paint GT Wing shadow on the shape.


Step 56: Carbon Fiber
Let's make a carbon fiber carbon texture. Click File > New to make new file. Set its size to 2.000 x 1.500 px.


Step 57
First we need fiber pattern. Make new file again, this time with size 80 x 30 px.


Step 58
Activate Gradient tool. On option bar, click the gradient preview box to open Gradient Editor dialog box. Set its gradient from #090909 to #595959.


Step 59
Select half of the canvas using Rectangular Marquee tool. Shift-drag to fill it with gradient from top to bottom.


Step 60
Select the other half. Fill it with same gradient but this time with opposite direction.


Step 61
Let's save it as a pattern. Click Edit > Define Pattern. In the next dialog box, name the pattern as fiber.


Step 62
Close the pattern file. You don't need to save the file because we have saved it as a pattern. Let's return to the bigger file (2.000 x 1.500 px). Click Edit > Fill. Set Use: Pattern and select fiber pattern we have just created. Click OK to fill the canvas with fiber pattern.


Step 63
Click Filter > Distort > Twirl.


Step 64
Copy carbon fiber texture we have just created by pressing Ctrl + A to select all then Ctrl + C to save it to clipboard. Ctrl-click GT Wing to make new selection based on its shape. Click Edit > Paste Special > Paste Into (Ctrl/Cmd + Shift + + Alt + V) to paste texture into selection


Step 65: GT Wing Base
Using Brush tool, draw GT Wing base. Add following Layer Styles to add glossy effect onto the shape.


Step 66
Ctrl-click GT Wing base. Make new layer and then paint shadows from the GT WIng. Below, you can see the difference before and after painting the shadow.


Step 67
Use Brush tool to draw a polygonal shape on tip of the spoiler base. Add some shadows and highlights onto the shape to give it realistic appearance.


Step 68
Draw white cable tip using Brush tool on indicated area below. Add following Layer Styles to turn it into a three dimensional shape.


Step 69
Use Brush tool to draw a simple line and circle for cable and screw.


Step 70
Repeat Step 67-69 to the other GT Wing base.


Step 71: Rear Bumper
Draw shape shown below for basic bumper. Make new layer on top of it. Ctrl-click the layer to make a selection based on its shape and paint subtle highlight using soft Brush tool.


Step 72
Change Brush to smaller size. Draw a small and subtle highlight on the bumper edge. Then, draw more highlights on other parts of the bumper to make sure the lighting is realistic.


Step 73
Draw a white elliptical shape on rear bumper. Add following Layer Styles to give it three-dimensional appearance.


Step 74
Draw a white rectangular shape as a cable tip. Add following Layer Styles.


Step 75
Draw a white thick line to be used as a cable. Add following Layer Styles.


Step 76
Use Brush tool to paint cable shadow on the rear bumper.


Step 77: Left Tire Fender
Draw left tire fender on area indicated below.


Step 78
Start by drawing fender basic shape. Then, paint its highlight and shadow on different layer.


Step 79
Remember that we have two wheels. So, let's duplicate the fender by Alt-dragging it.


Step 80: Seat
Open car seat photo in Photoshop. Trace the seat using pen tool and set its mode to Add to path area. Trace its inside and then set its mode to Subtract from path area.


Step 81
Hit Ctrl + Enter to convert path into a new selection.


Step 82
Drag selection into our truck image. Hit Ctrl + T and then right click the transformation area and select Flip Horizontal. Change its size until it is proportional inside the truck.


Step 83
Use Brush tool to draw seat belt strap. Paint shadow on top of it to give it a realistic lighting. Paint strap shadow on the seat. Finally, paint black behind the seat.


Step 84: Dashboard
Make new layer and place it behind the truck. Draw dashboard basic shape. Activate Brush tool and set its Opacity to 30% or lower. Paint white for its highlight and black for its shadow.


Step 85: Steering Wheel
Use pen tool to draw a steering wheel with color: #010101. Paint some highlights on its upper side. To make it realistic and not too flat, draw a curve on the steering wheel and paint subtle shadow on it.


Step 86: Gear Stick
Draw a white rectangle for the trucks gear stick. Add following Layer Styles to give it realistic lighting.


Step 87
On top of the gear stick, draw another shape for its knob. Add following Layer Styles.


Step 88
Draw a white shape connecting gear stick and its knob. Add following Layer Styles.


Step 89: Roll Bars
Draw two roll bars inside the truck. Add following Layer Styles.


Step 90
Draw a polygonal shape connecting the roll bar and truck. Draw some holes inside it. Paint some shadows to add realistic lighting..


Step 91
Draw highlight and shadow on the roll bar using Brush tool. See picture below to see the progress on drawing it.


Step 92
Draw highlight and shadow on the other roll bar using same technique.

Step 93
Draw a roll bar above the door. Add following Layer Styles to give it highlights and shadows.


Step 94: Side Window
Draw path for side window car glass. Convert it to selection by pressing Ctrl + Enter. Paint white and black using soft Brush with low Opacity. Make more layers and then paint subtle highlight and shadow on the glass.


Step 95
Repeat the same process to draw right side window.


Step 96
Duplicate seat and its strap by selecting them and then Alt-drag it. Merge the layer using shortcut Ctrl/Cmd + E. Place the duplicated seat and strap on side window near it. Delete unneeded areas outside the window. Set blend mode to Soft Light and reduce its Opacity to 70%.


Step 97
Duplicate driver seat and place it on the passenger position.


Step 98: Rear Part of The Cockpit
Make new layer and then draw rear part of the cockpit.


Step 99
Set foreground color to black and then draw layer shape for rear window hole.


Step 100
Paint shadow on rear part of the cockpit using Brush tool. Reduce Brush Opacity and then paint subtle shadow behind the seat and on the car glass.


Step 101
Activate Brush tool with low Opacity. Paint subtle white and black for highlights and shadows on the windshield. I also draw a red rectangle on top of the windshield.


Step 102: Door
Select upper part of the door. See picture below for reference. Click Image > Adjustments > Desaturate to remove all its color. Click Image > Adjustments > Brightness/Contrast. Reduce Brightness and increase Contrast until this part turns to black.


Step 103: Front Intercooler
Select front intercooler. Duplicate it to new layer by pressing Ctrl + J. Click Image > Adjustments > Brightness/Contrast. Decrease Brightness setting to make the intercooler darker.


Step 104: Luggage Compartment
Select luggage compartment using pen tool. Convert path to selection. Click Image > Adjustment > Brightness/Contrast and reduce the Brightness.


Step 105: Door
Do not remove the selection yet. Copy fiber texture we have created in Step 56-63. Paste it inside the selection (Ctrl + Shift + Alt + V). Set blend mode to Overlay with Opacity: 85%.


Step 106: Air Scoop
Draw a rectangle matches with the truck perspective. Make new layer and then paint its highlight and shadow using soft Brush with low Opacity. Draw more shapes inside it. See picture below for reference.


Step 107: Steps
Draw some steps right under the side intercooler. Paint its shadow on the truck. Still using soft Brush tool, paint highlight and shadow on the steps.


Step 108: Wind Deflector
Draw a simple wind deflector on truck rooftop with color #b0d156.


Step 109
Paint some shadows and highlights. See picture below for reference.


Step 110
Paint highlight on top of the wind deflector. Select half of the highlight and then erase it.


Step 111: Muffler
Draw a simple rounded rectangle for muffler. Make sure to match its shape with the truck perspective. Add simple Drop Shadow to lift it from the truck body.


Step 112
Make new layer and paint subtle gradient on top of the shape.


Step 113
Draw two intersecting black circles.

Step 114
Make a new layer. Paint subtle highlight and shadow to turn the shape into a three-dimensional tailpipe. See picture below for reference.


Step 115
Current pipe shape is not yet three-dimensional. It appears very flat. We need to emphasize its edge. Select the circles path and hit Ctrl + Enter to make new selection based on its shape. Make new layer. Click Edit > Stroke. Set Width to 1 px and white color.


Step 116
Erase some of the stroke line using soft Eraser tool. Repeat the stroke a few times until we get more definition on its edge. Finally, draw some bolts and its shadow.


Step 117: Cable
Draw cable behind the truck. Make new layer. Manually, use Brush tool to paint shadow and highlight. Once you're done, select cable and its highlight and shadow. Merge them into one layer by pressing Ctrl + E. Duplicate the cable, then resize and place it under the original cable. This will become cable reflection on the truck body. Erase cable outside the truck body. Erase upper part of the reflection and then reduce its Opacity.


Step 118: Highlight
Activate Brush tool. Set foreground color to white and then reduce tool Opacity to 10%. Paint some subtle highlight on wind deflector and its windscreen.


Step 119
Let's add more highlights. Draw a circular selection on top of front tire. Make new layer. Click Edit > Stroke. Set Width: 2 px with Color: White.


Step 120
Soften stroke line by adding Gaussian Blur. Click Filter > Blur > Gaussian Blur. Activate Eraser tool. Erase stroke line outside the truck.


Step 121: Edit Truck Color
Currently, the truck is still in its original color. Personally, I found it too bright and it looks like a plastic. So, let's reduce it. Select its green color.


Step 122
Hit Ctrl + Shift + C to copy all areas inside the selection. Without removing the selection, click Edit > Paste. Click Image > Adjustments > Hue/Saturation and edit the settings until we have darker color.


Step 123
Set blend mode to Hue and reduce its Opacity.


Step 124: Shadow
Make a new selection under the truck. Make new layer and then fill it with black.


Step 125
Remove selection by pressing Ctrl + D. Soften the shadow by adding Gaussian Blur. Click Filter > Blur > Gaussian Blur.


Step 126
Duplicate the shadow by pressing Ctrl + J. Soften this shadow again, this time use bigger radius size in Gaussian Blur.


Final Image
Below is our final result. I hope you enjoy it. Remember that we started this project using a very simple photo from a cheap pocket camera. So, I'm sure you can do this to your own truck. Well, if you have one.

