In this tutorial we'll use 3D-rendering, Blends, and an Art Brush for creating the final brick art. The skills you will learn here can easily be transferred to creating various brick letters. Enhance your vector skills as a digital brick artist in today's Illustrator tutorial. So let's get started!
Step 1
First of all create any letter using the Type Tool (T).


Go to Type > Create Outlines (Command + Shift + O).


Step 2
If your letter has holes in it, then go to Object > Compound Path > Release.


Then select the outer path and go to Effect > Stylize > Round Corners.


Go to Object > Expand Appearance. Select both paths, and go to Object > Compound Path > Make (Command + 8). Let's name this path "The Main Letter."


Step 3
Take the Rectangular Grid Tool, click in the workspace, and set the options as shown the diagram below. Pay attention that you need to set a big enough number of vertical dividers. Let's name the Height (pointed by an arrow in the diagram below) – "the first main result."


Go to the Pathfinder palette and click the Divide button.


Fill the grid with orange and set the Stroke to gray.


Step 4
Select only one rectangle and go to the Info palette in order to know the width of it (W-value). Divide this value by two and memorize the result. Let's name it "the second main result." I have received in this tutorial 12,951px.


Select the group of rectangles, copy it and paste in front (Command + C then Command + F). Then go to Object > Transform > Move, and type "the second main result" into the Horizontal position, and "the first main result" into the Vertical position. You need to achieve the following result.


Step 5
Select both groups of rectangles, copy them and paste in front (Command + C then Command + F). Now go to Object > Transform > Move, and type zero into the Horizontal position, and "the first main result" multiplied by two into the Vertical position.


Now click the Copy button.


Go to Object > Transform > Transform Again (Command + D).


Repeat this action as many times as you want.


Step 6
Place your letter over the brick wall.


Select both: the letter and the wall, then go to the Pathfinder palette in order to click the Crop-button there.


Step 7
Get rid of tiny bricks. For example see the diagram below.


The same pointed area is shown below in the scaled diagram.

Go to the Pathfinder palette and click the Unite button for these selected bricks.

Do the same with all the tiny bricks, then delete the inner path if you have one.

Step 8
Go to Effect > 3D > Extrude & Bevel, then set the values as shown. Pay attention to the Blend Steps value.

Step 9
Copy the letter and paste in front (Command + C then Command + F). Set the fill color to None and the Stroke color to gray.


Now go to Object > Expand Appearance. And go to Object > Ungroup three times. Select the first unnecessary path in the Layers palette, and go to Select > Same > Fill Color. Press the Delete button on your keyboard. Delete all the superfluous paths the same way. You need to achieve the following result.

Step 10
Select the inner parts of the bricks.

And go to Object > Compound Path > Make (Command + 8).


Step 11
Delete the boundary paths, which you are able to delete without deterioration of the picture.

Then select all the gray paths that represent layers of concrete between the bricks, and go to the Pathfinder palette and click Unite.

You will now have one Compound path in the Layers palette.

Step 12
Decrease the Opacity of this Compound path, and lock it in the Layers palette. Then take the Pen Tool (P). Change the Fill color in the Control Panel to None, and the Stroke color to None too, and create a path which will allow you to delete all the remaining gray boundary paths. See the images below for reference.


Step 13
Select all (Command + A), copy it and paste in front (Command + C then Command + F). Then move the copy gently in order to combine it with the first letter.

Step 14
Now delete or make invisible several bricks in the front letter.

Delete all parts of the concrete layers, which are located in the selected area shown below.

Do it by making Clipping Mask.

Step 15
Pay attention to the point shown with an arrow in the diagram above. The blowup image for this point is below.

We need to correct such problem areas. For this, select the front layer of bricks (without the concrete) and go to Object > Expand Appearance. Now go to Object > Ungroup three times. Do the same for the behind layer of bricks.

Now select the top facet of the brick and move it downward.

Repeat this action for the other problem facets.

Step 16
Decrease the Opacity of the front letter, and lock it in the Layers palette. Now select with the shown path a part of the concrete layer of the hind letter.

Select the concrete layer of the hind layer, copy it, and paste in front (Command + C then Command + F).

Now make the Clipping Mask (Command + 7) using the path, which has just been created.

Step 17
Select the top facet of the brick.

Convert it to the following form in order to cover chinks and to comply with a rules of geometry. Sometimes chinks may remain after the following steps, so it would be wonderful to get rid of them now.

Repeat these actions for all selected paths.

Step 18
Create the following path at the top of the letter.

Illustrate the analogous paths for other bricks.

Illustrate the next path.

Step 19
Illustrate the following path on the lateral side of the letter.

Do the same for all the lateral sides of the letter.

Step 20
In order to create shadows use Blends. Draw two triangular paths in the inner part of the letter, and go to Object > Blend > Make (Command + Alt + B). Change the Opacities of the triangular paths, and change the Opacity of the Blend itself as you like. See the diagram below for reference.

The shadow on the top part of the letter consists of two similar blends.

The Blend under the overhanging brick is shown in the diagram below, where the violet path shows the Clipping Mask of the Blend.

The Blend of the overhanging brick itself is shown below, where the violet path shows the Clipping Mask of the Blend too.

Step 21
Make a blend from two white elliptical paths.

Make an Art brush from this blend.

Take the Pen Tool (P), create the following paths and apply the Art brush to them.

You need to achieve the following result.

Step 22
Select "The Main Letter" path and lie it down by going to Effect > 3D > Rotate. Then create a blend from it.

Crop this blend with the Clipping path.

Copy the blend and paste it in back (Command + C then Command + B). Cut off the second part of the blend.

Change the blends in order to convert the shadow to a soft shade and to achieve the following result.

Place the shadow under the letter.

Step 23
Now select the front orange path of any brick.

Go to Select > Same > Fill Color.

And fill all the selected facets with the Linear gradient filling.

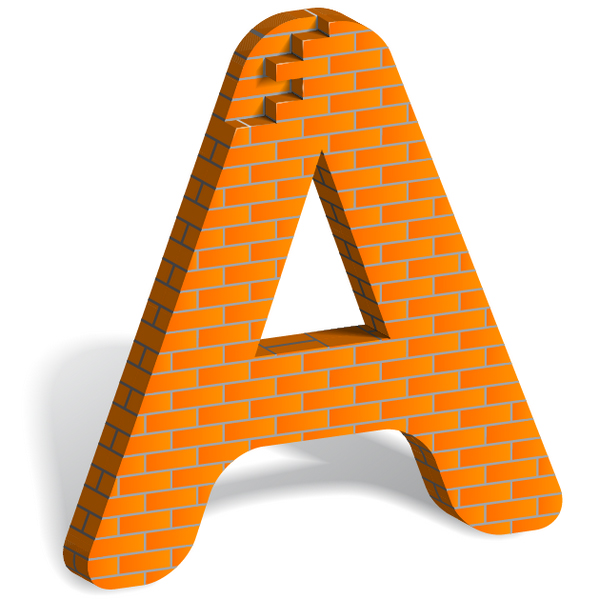
Conclusion
Using this technique you will be able to construct any letters or signs from bricks.